
Custom Translations & Language Settings on the Kaa IoT platform
Welcome to our tutorial on Custom Translations & Language Settings on the Kaa IoT platform! In today's globalized world, it is essential for any IoT application to cater to diverse linguistic needs. With Kaa's robust customization features, you can seamlessly integrate various languages, custom fonts, and text direction options into your IoT solutions, ensuring accessibility and usability for users worldwide.
In this tutorial, we will guide you through the process of configuring custom translations and language settings on the Kaa IoT platform. Whether you are targeting multilingual markets or simply aiming to enhance user experience, mastering these capabilities will unlock new possibilities for your IoT projects. So, let's delve in and explore how you can customize your applications to meet the language preferences of your users!
To continue with this guide we will need the following:
- Created solution and dashboard
- Prepared translation strings
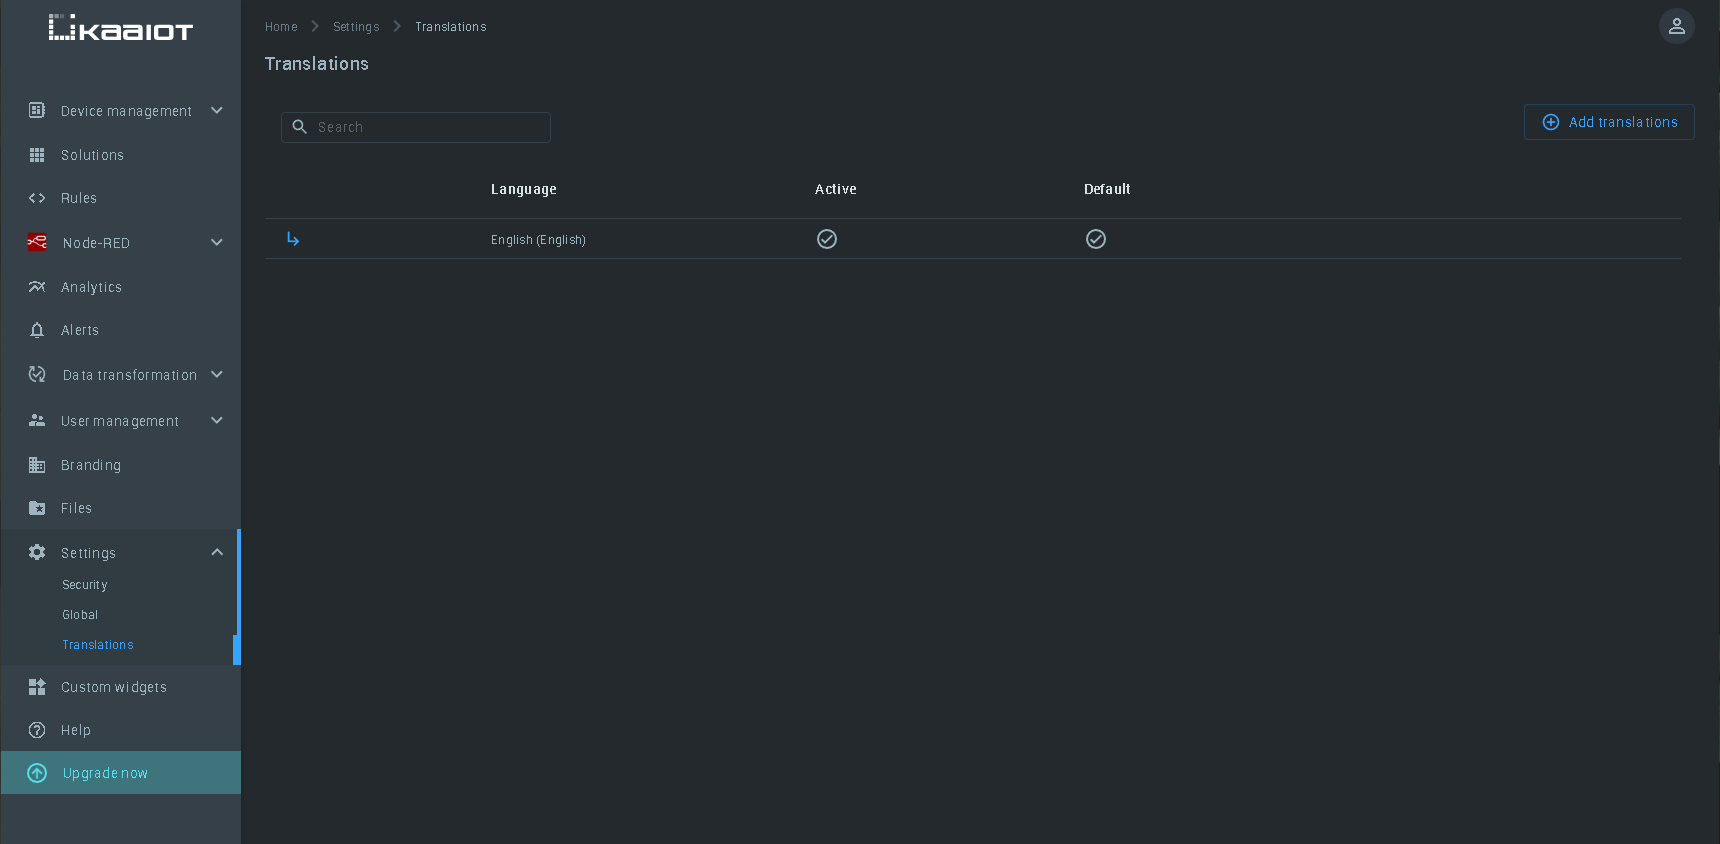
1. Setting and selecting the active language
To view the list of available languages for translation, change the current translation language, or add a new one, you need to:
- While on the Kaa IoT Cloud home page, go to the full list of the "Settings" tab
- Go to the "Translations" tab, where in the list that appears, you have the opportunity to select the translation language options
2. How to add a third-party language (Japanese as an example) and fonts
2.1 How to add a third-party translation
The first step is to add language translations. You can do this by going to the Settings -> Translation page, where you can see the list of available languages and manage them. If you have not added a new language option before, the list will contain only the standard language - "English". To add a new language, you need to:
- Go to the Settings -> Translation page
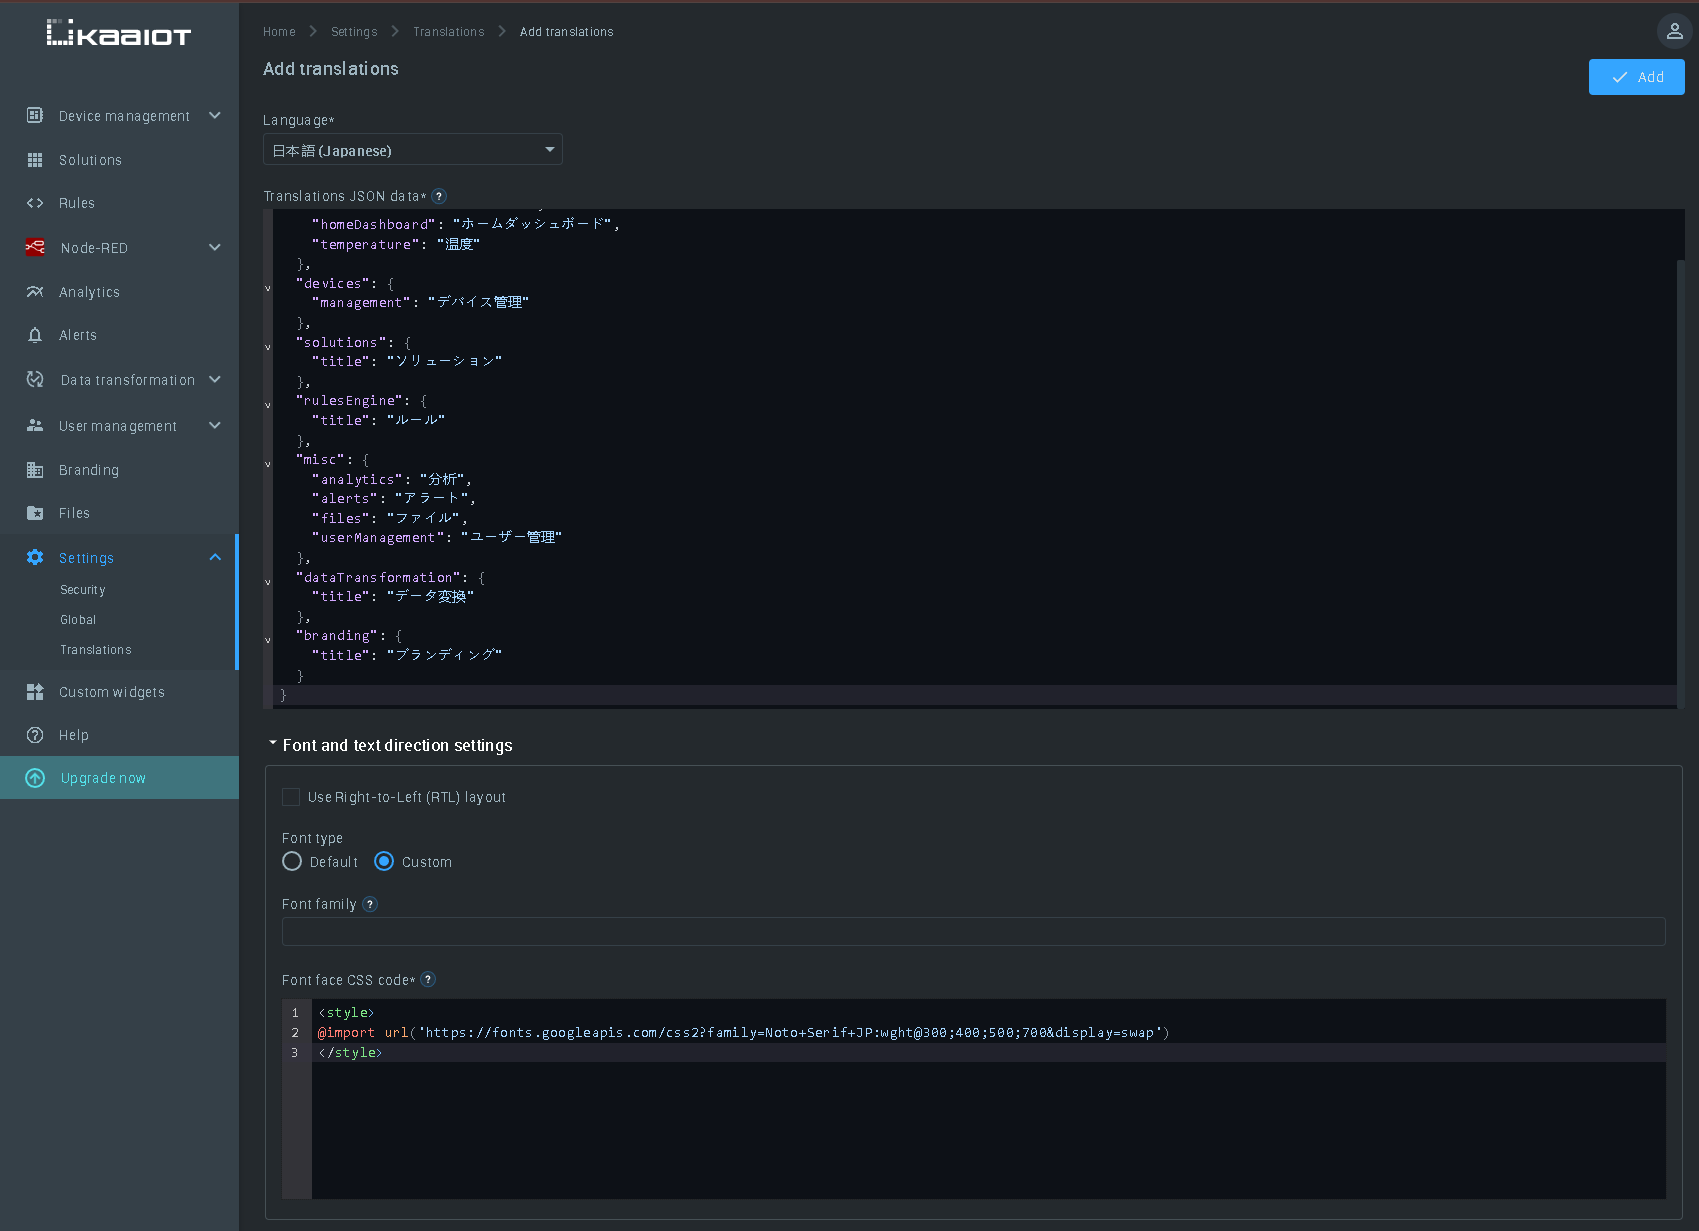
- Click on the “Add translations” button and select the language you want to add from the drop-down menu (the drop-down menu is labeled "Language*")
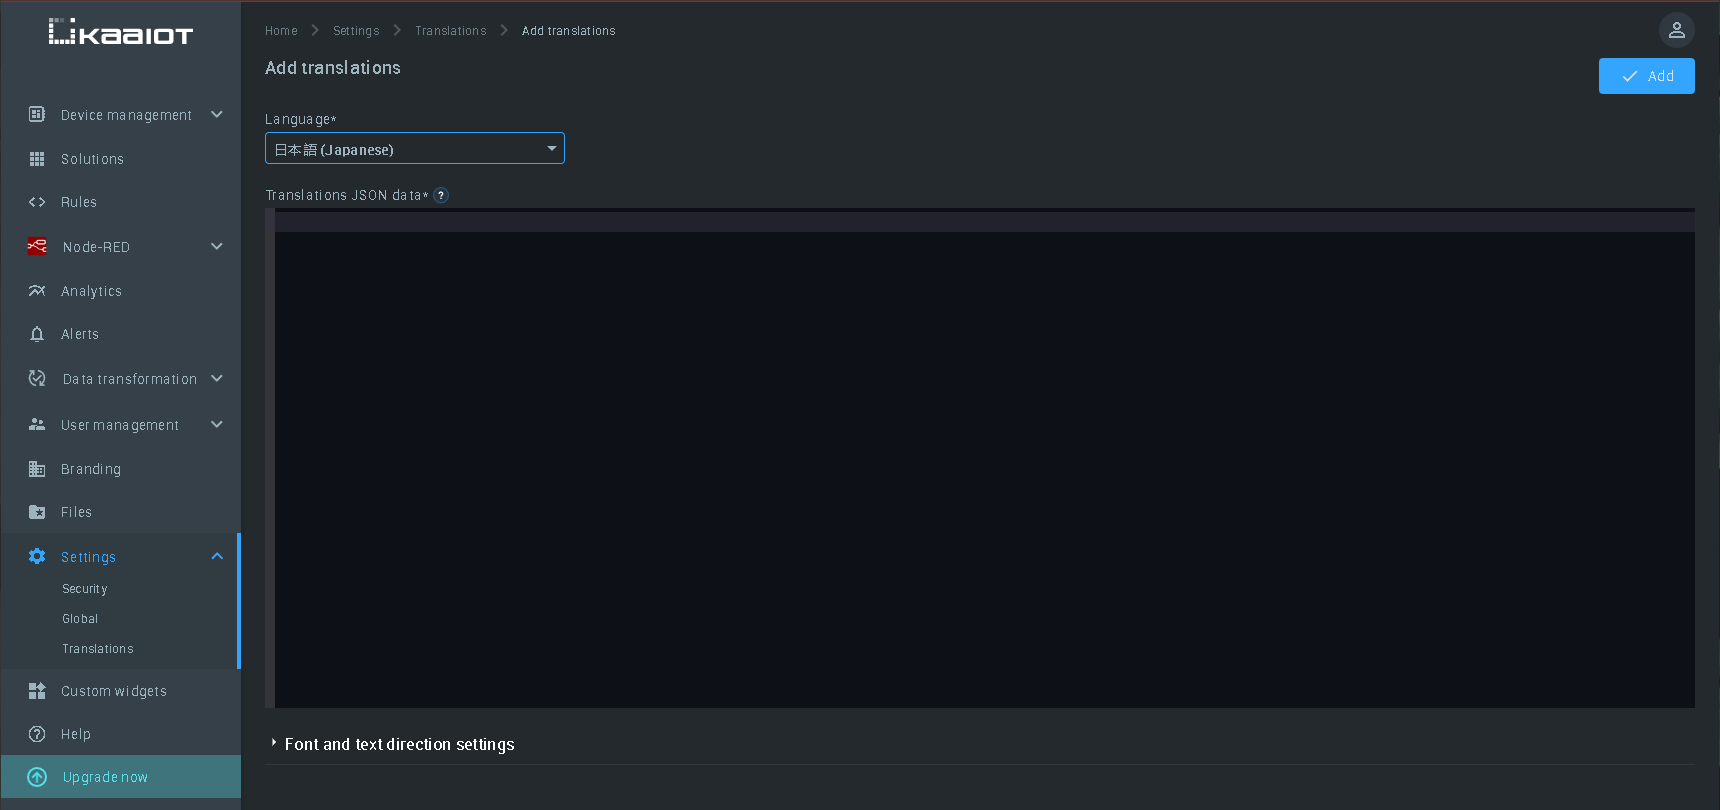
As an example, we'll start with the Japanese language. Japanese needs additional glyphs in the font because it has a large character set. To deal with this, we will use a custom font that we will add from Google Fonts. So, to add the Japanese language, we need to:
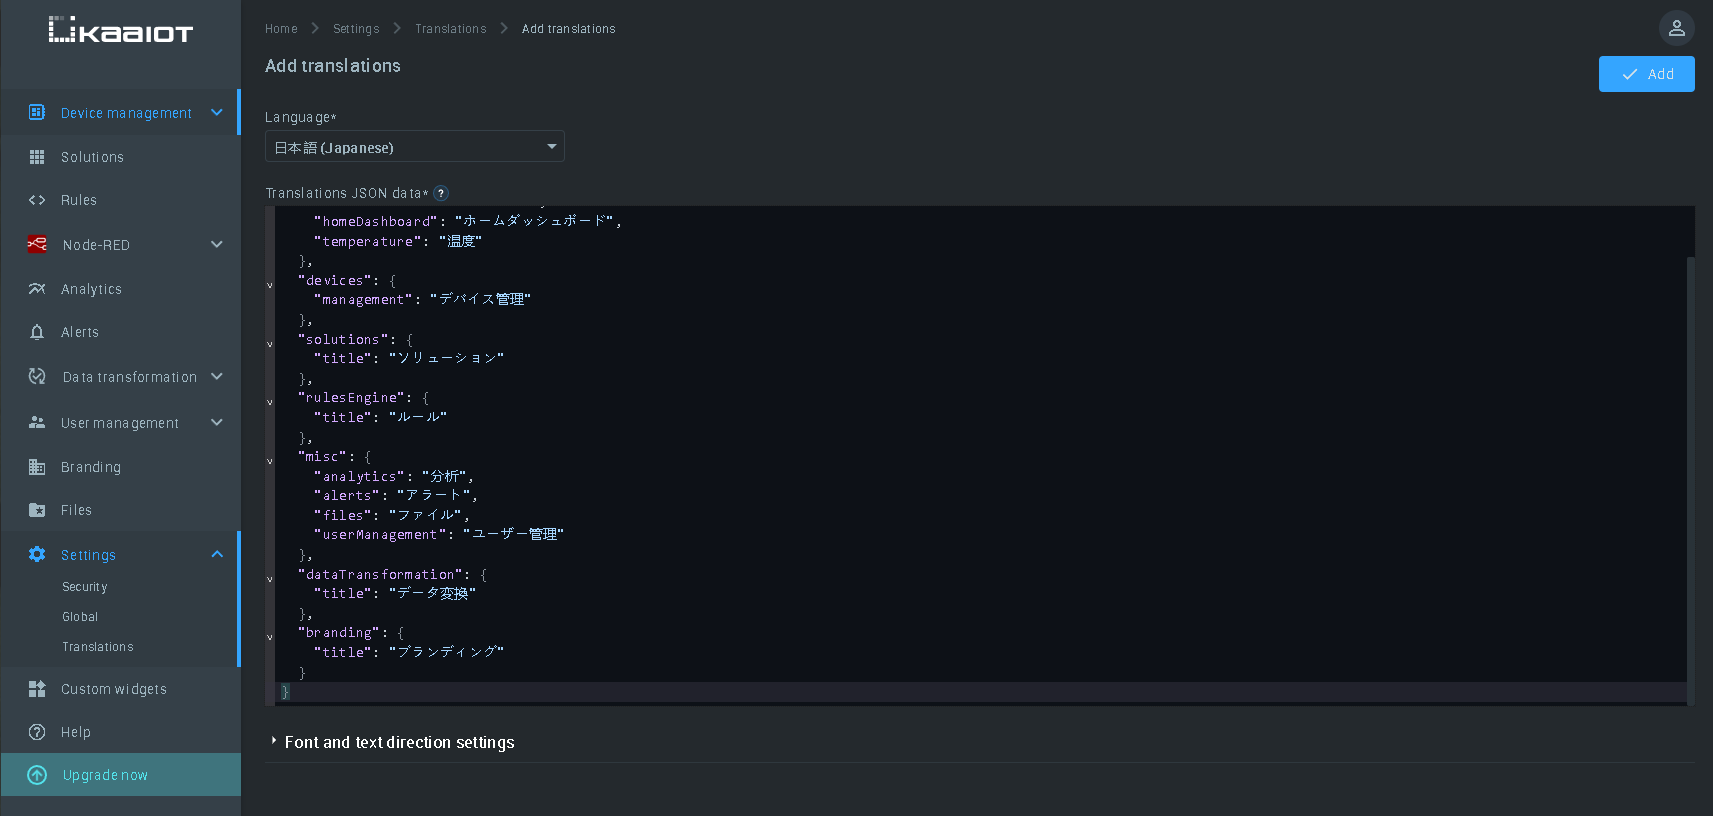
- Add a prepared Japanese translation (the translation in the example was prepared in advance). To create a translation, you can use any tool or service you prefer
- After you paste the translation text into the text field, make sure it is correct
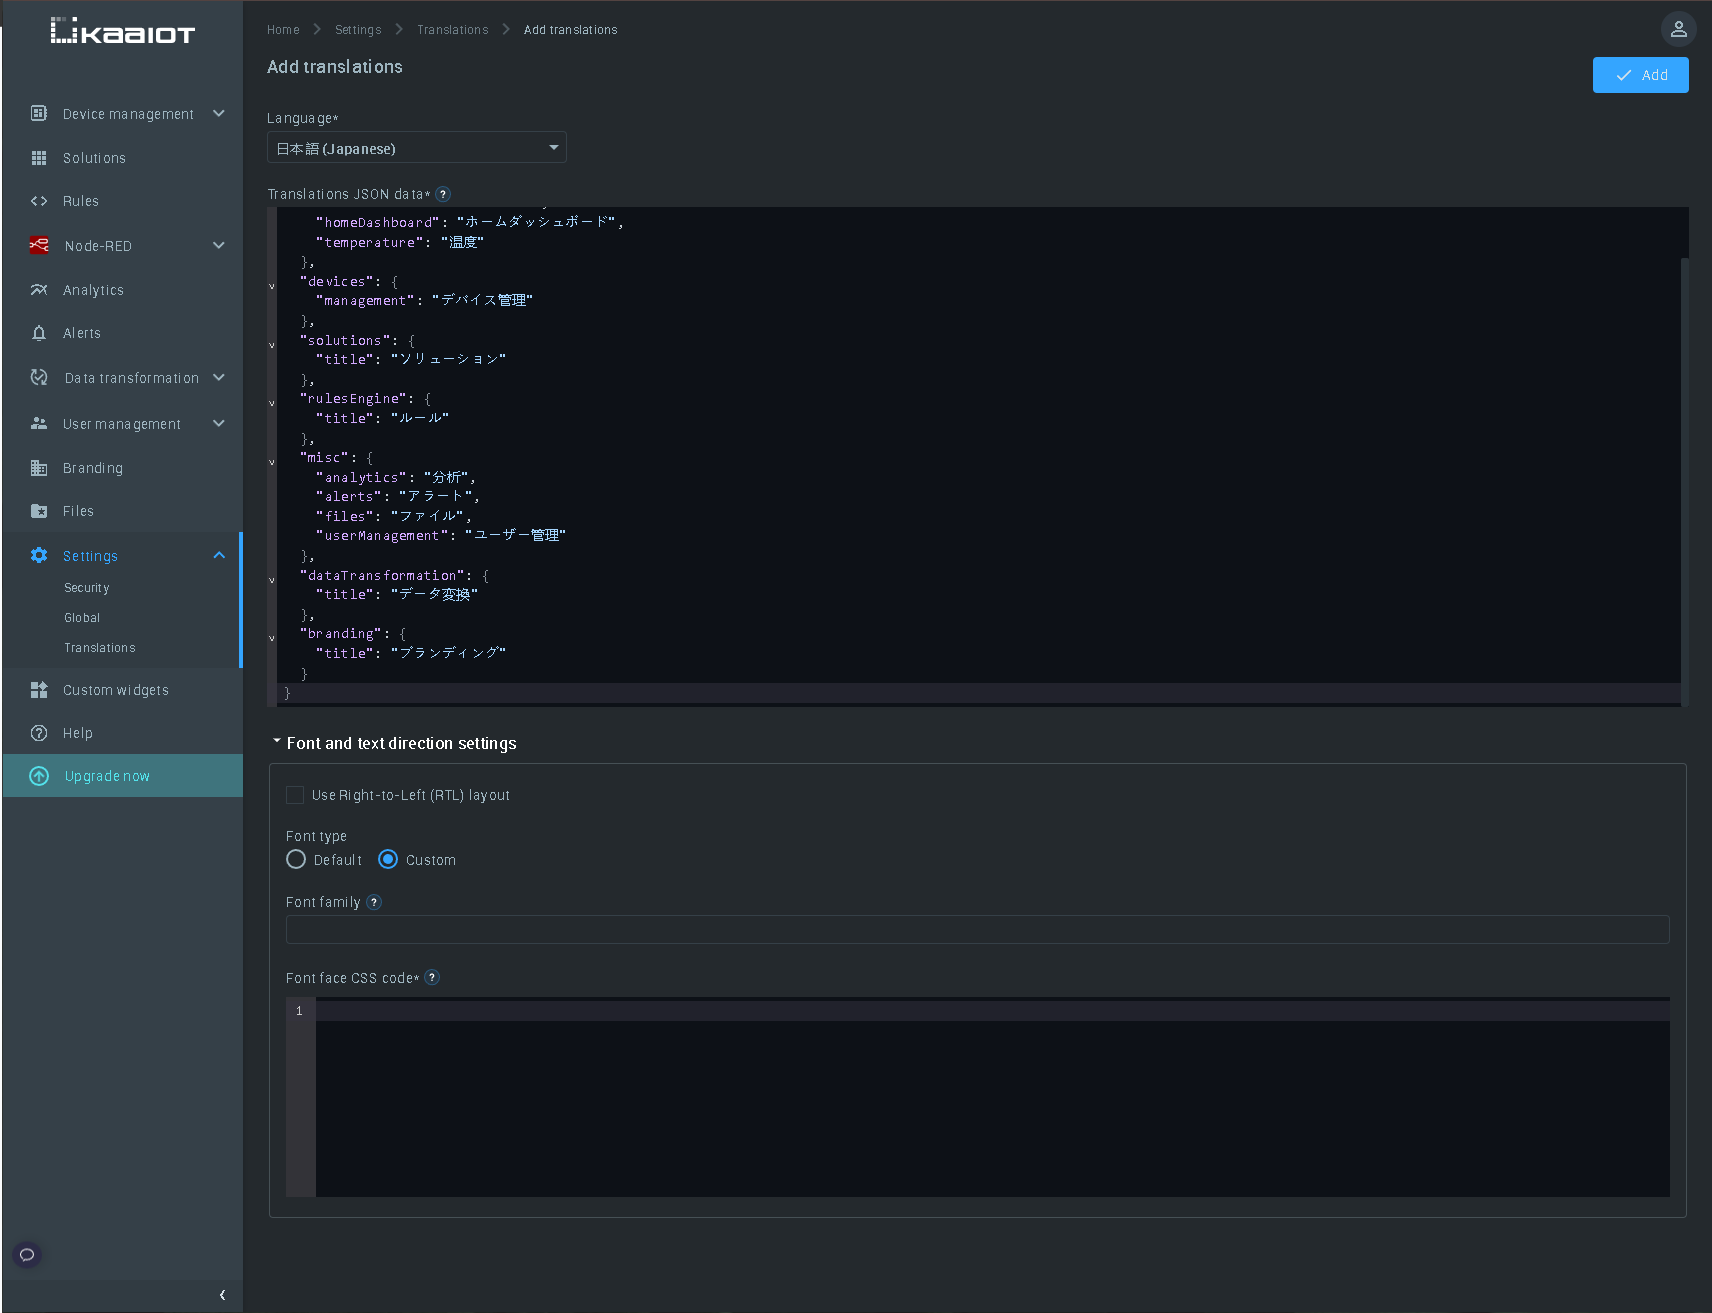
2.2 How to add a third-party font
Next, we need to add the custom font we want to use for the Japanese language. We will use Google Fonts to find and import the font we want. We need:
- Go to "Font and text direction settings"
- Of the two options offered, "Default" and "Custom", we choose the second one so that we can specify the CSS code that defines font files and other things
- Go to the Google Fonts page
- In the column "Filter" we need the option "Language"
- In the drop-down menu called "All language" we need to select the language for which we are looking for the font, currently, we need Japanese, let’s select it
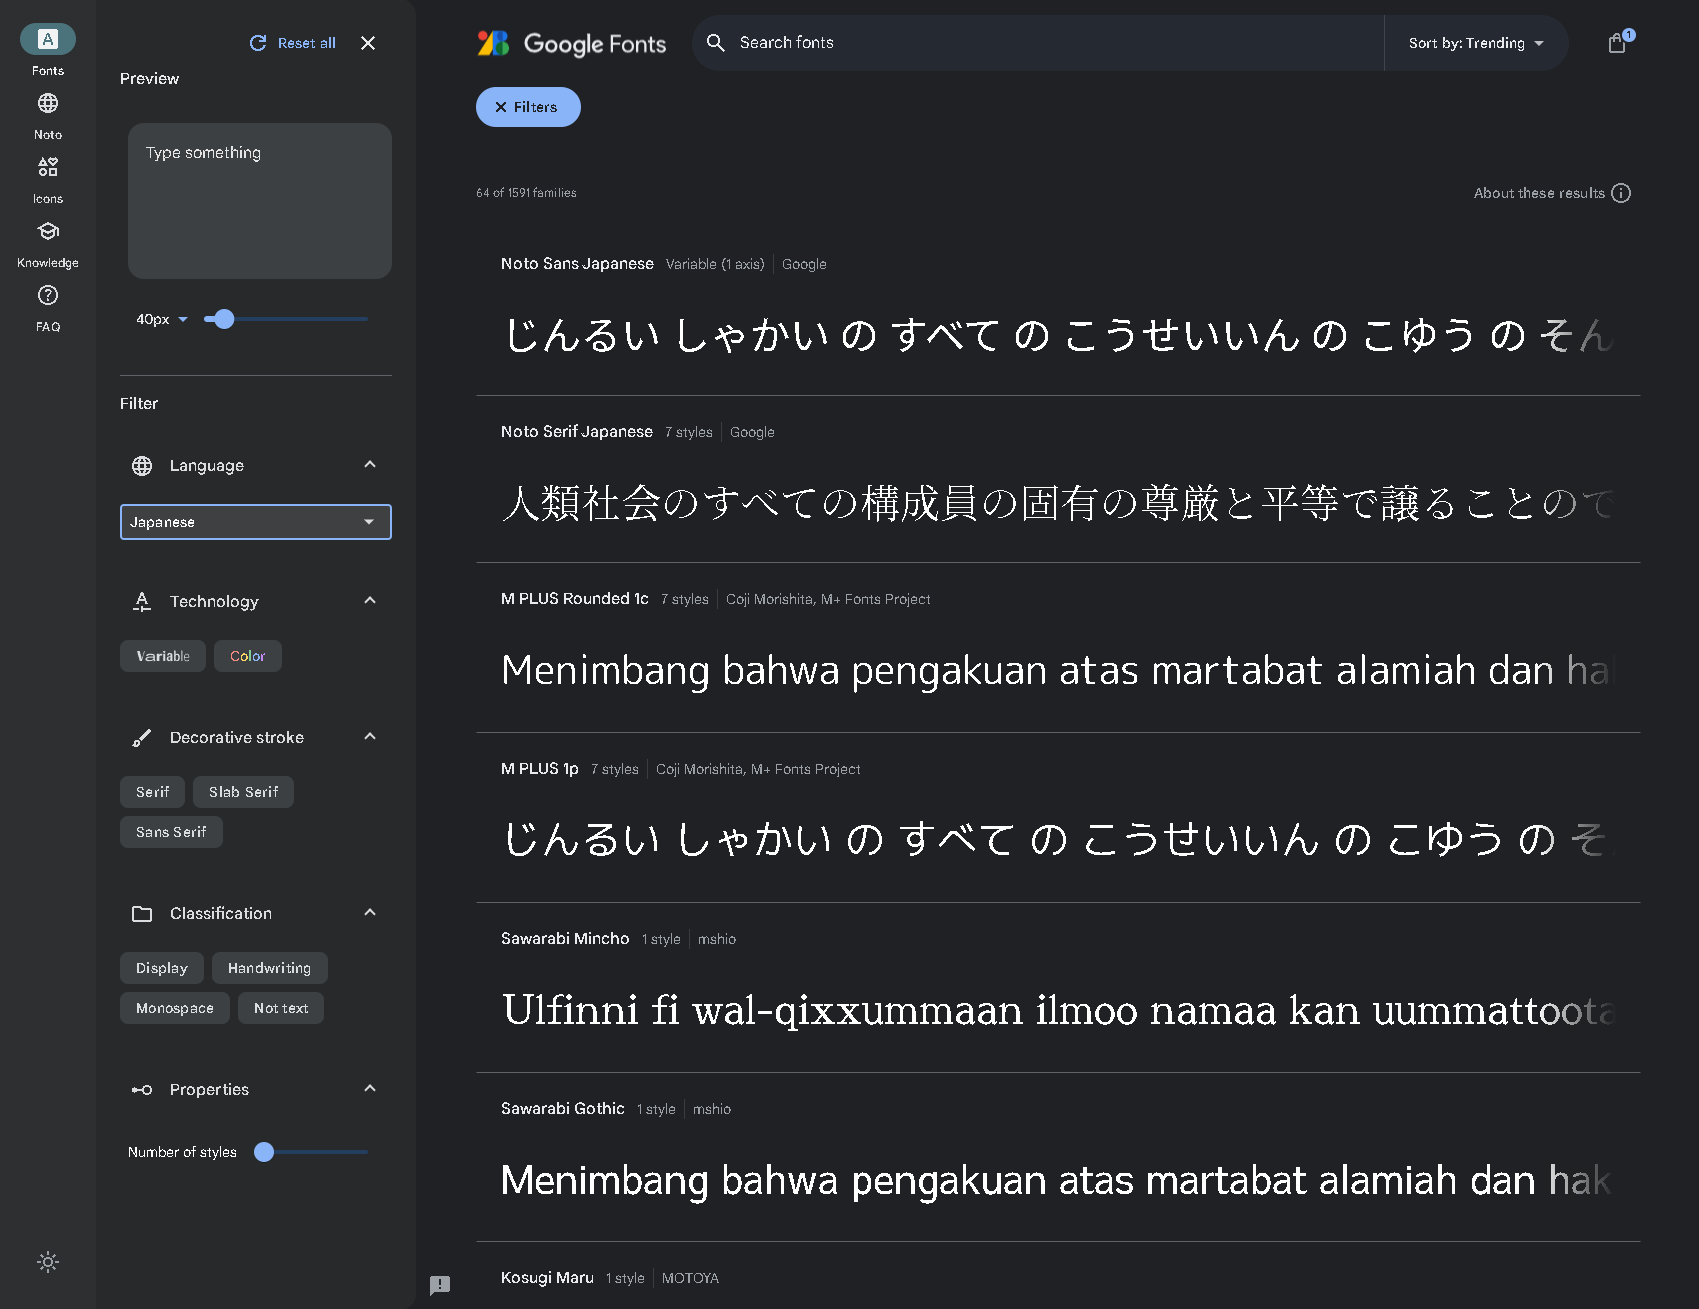
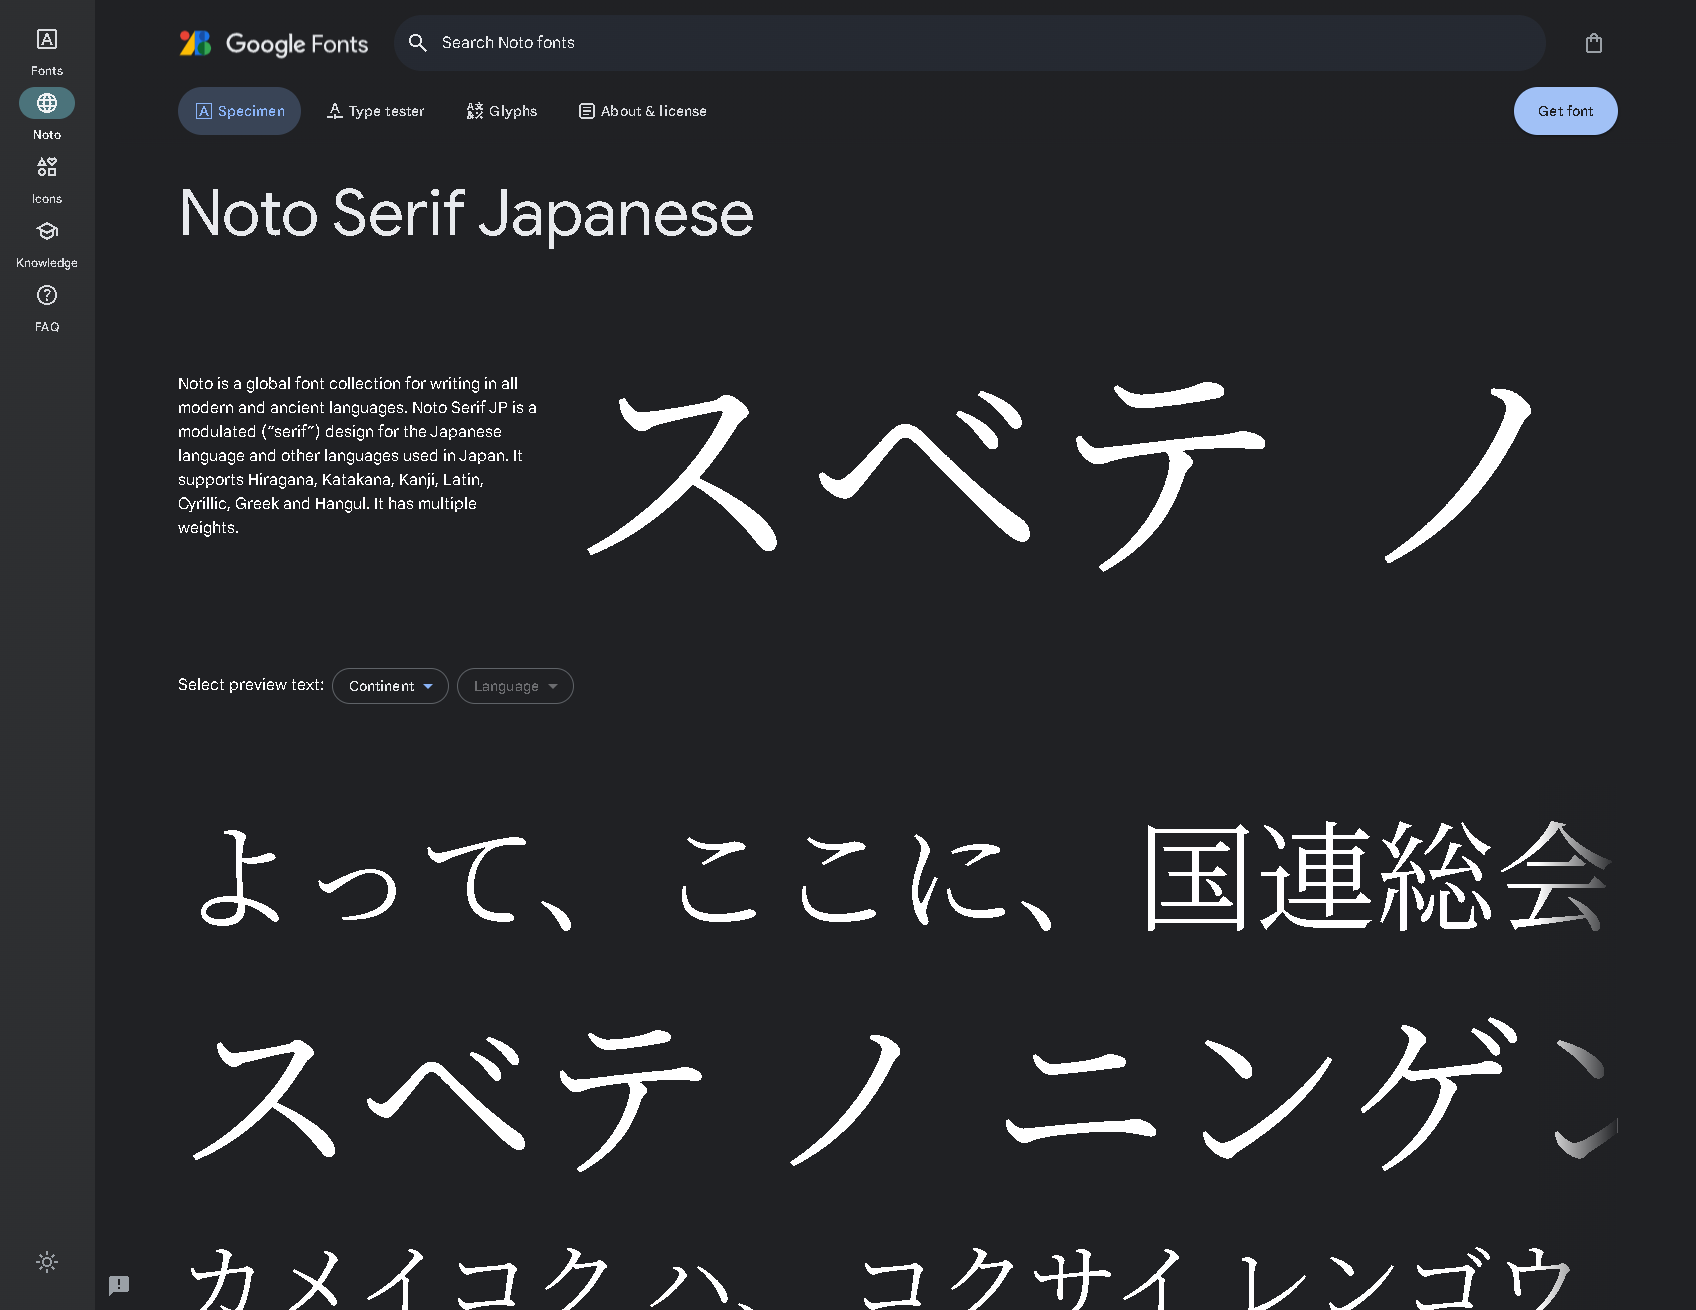
Here is a list of fonts for Japanese from Google. You need to choose the font you need or like. For this tutorial, we have chosen the Noto Serif Japanese font, but you can choose any other font that matches the Japanese language filter. We will add several font families (Light, Regular, Medium, and Bolt) for better clarity. Now that you have selected the font you need, you need to add it to the Kaa IoT platform:
- On the page of this font, click the "Get font" button
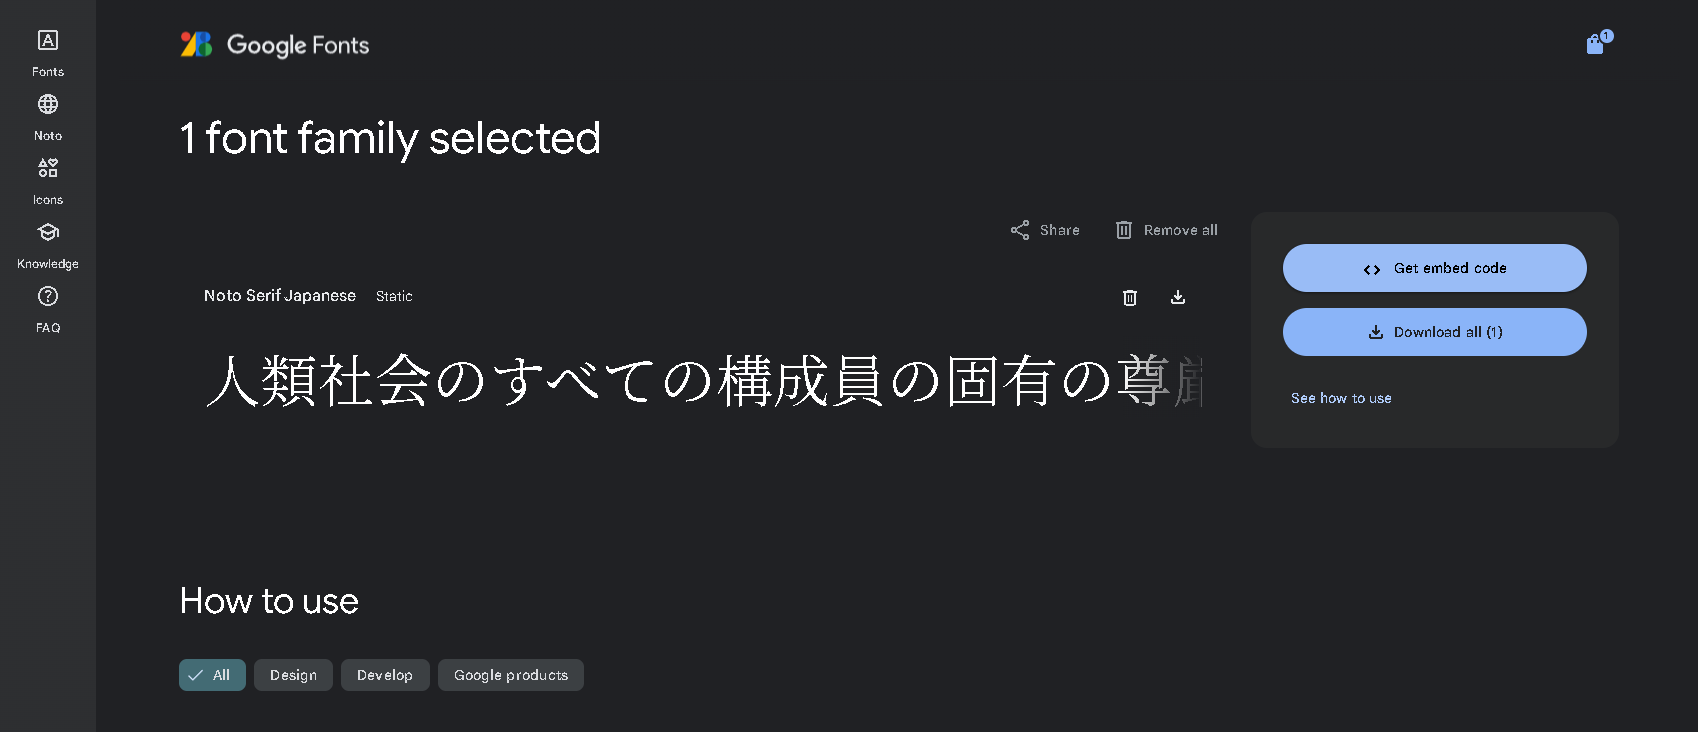
- After the inscription "1 font family selected" appears in the menu on the right, click on the "Get embed code" button
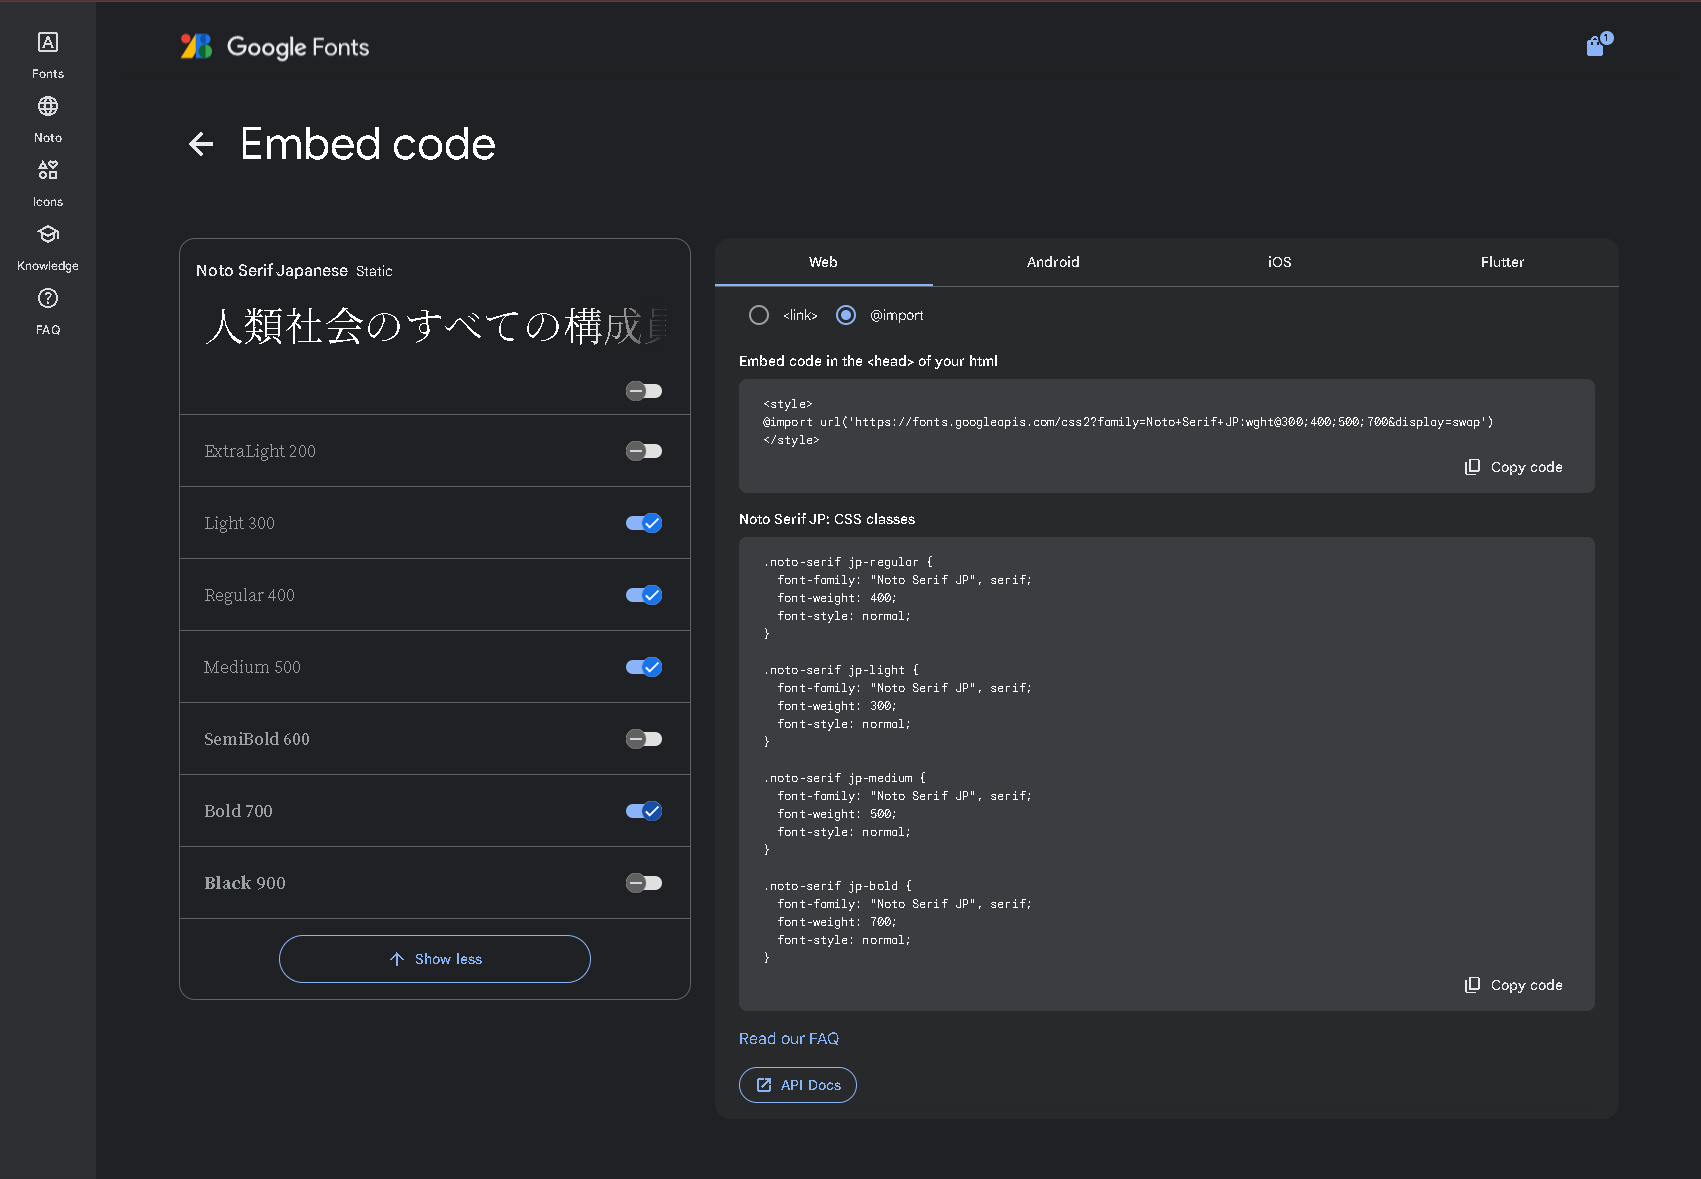
- In the "Embed code" tab, click on the "Change styles" button, and in the drop-down menu, use the switches to select the font families you need
- After you have selected the options you need, in the "Web" tab, among the "<link>" and "@import" radio buttons, select the second one
- Now you need to copy a part of the CSS code from the first line and paste it into the text field of the "Font face CSS code*" section on the Kaa IoT platform
- After that, we need to enter the name of the font family in the "Font family" line, you can copy it from the pasted CSS code, but you need to remove the pluses and put spaces
- Click the "Add" button
2.3 Activating and testing a custom language
Great, you've added a third-party translation language. Now all that's left to do is to activate it and check that it works correctly. To do this, you need to:
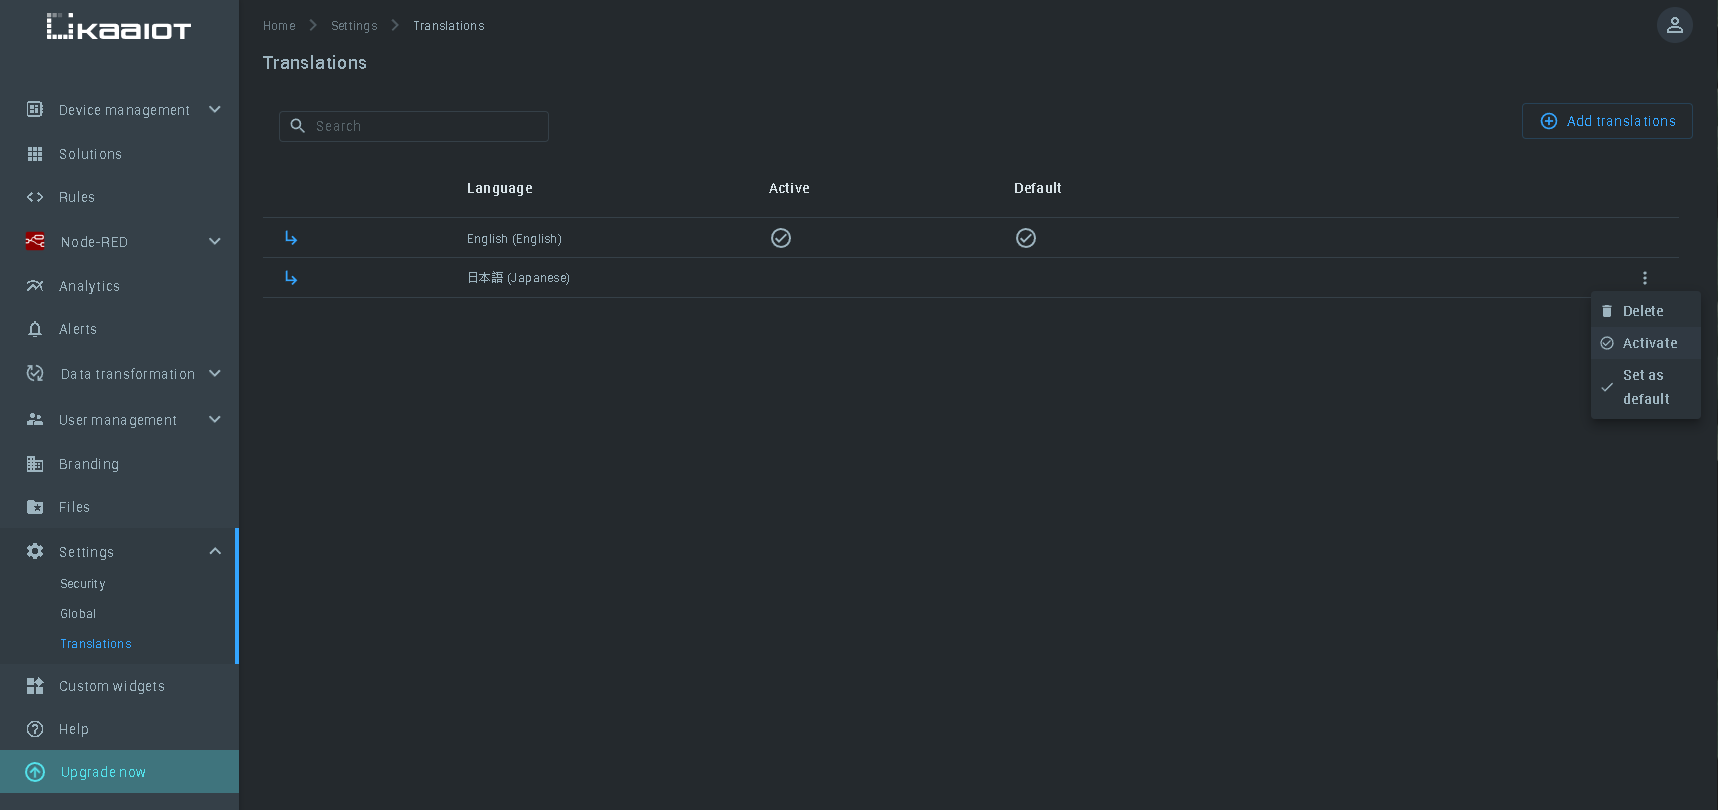
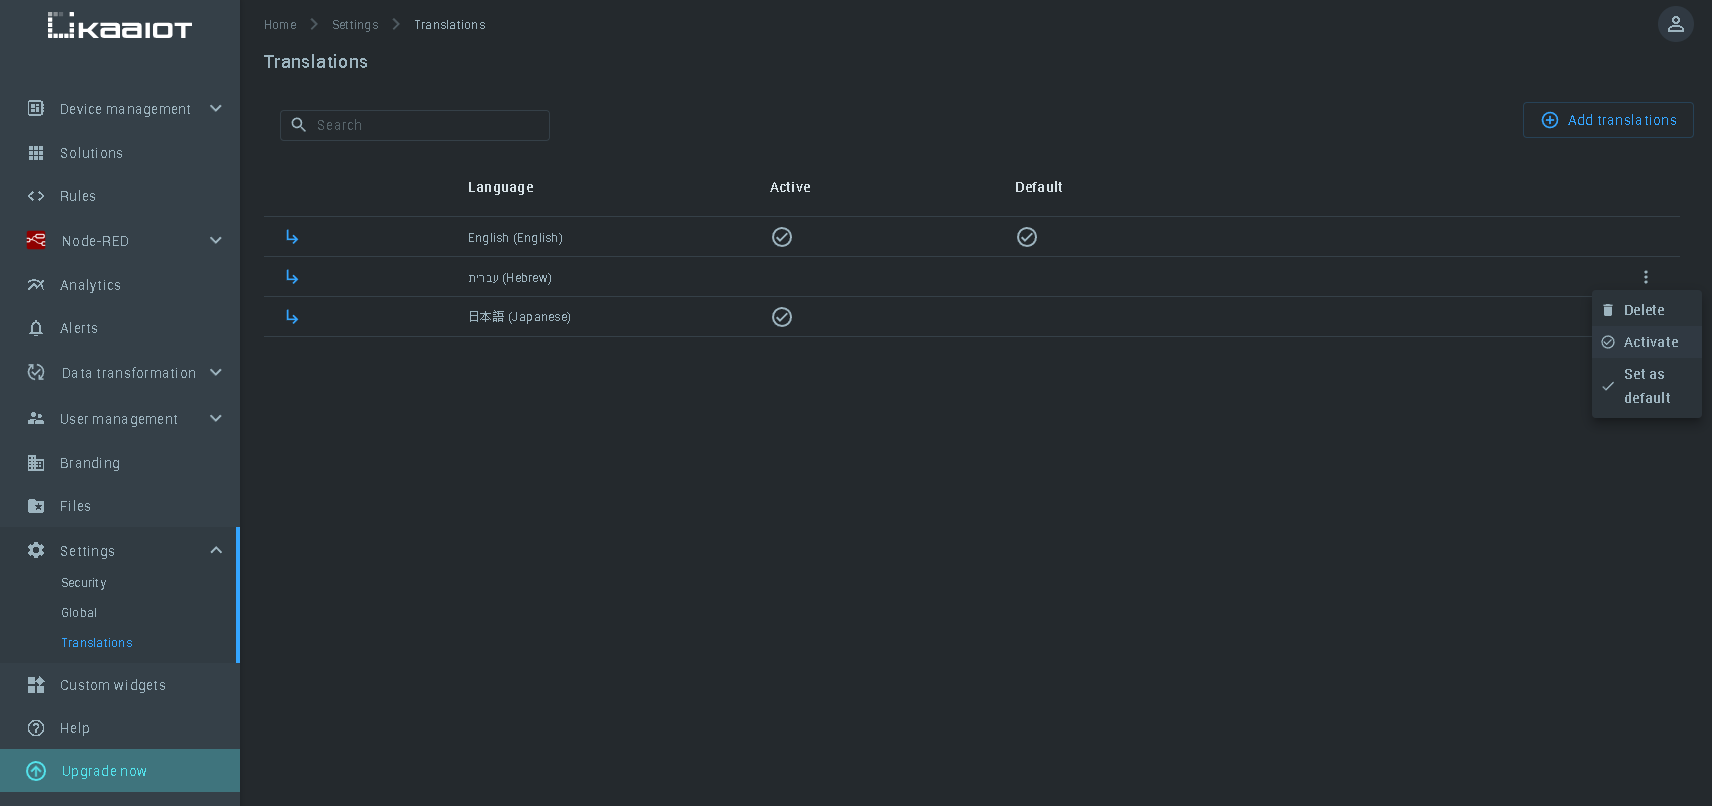
- On the Settings -> Translation page, in the line of the translation language you have added, click on the options menu icon (3 dots at the end of the line)
- Click on the "Activate" button
We have activated the third-party translation we added previously. Now we need to select it in the profile language settings and check that it works correctly. To do this, we need:
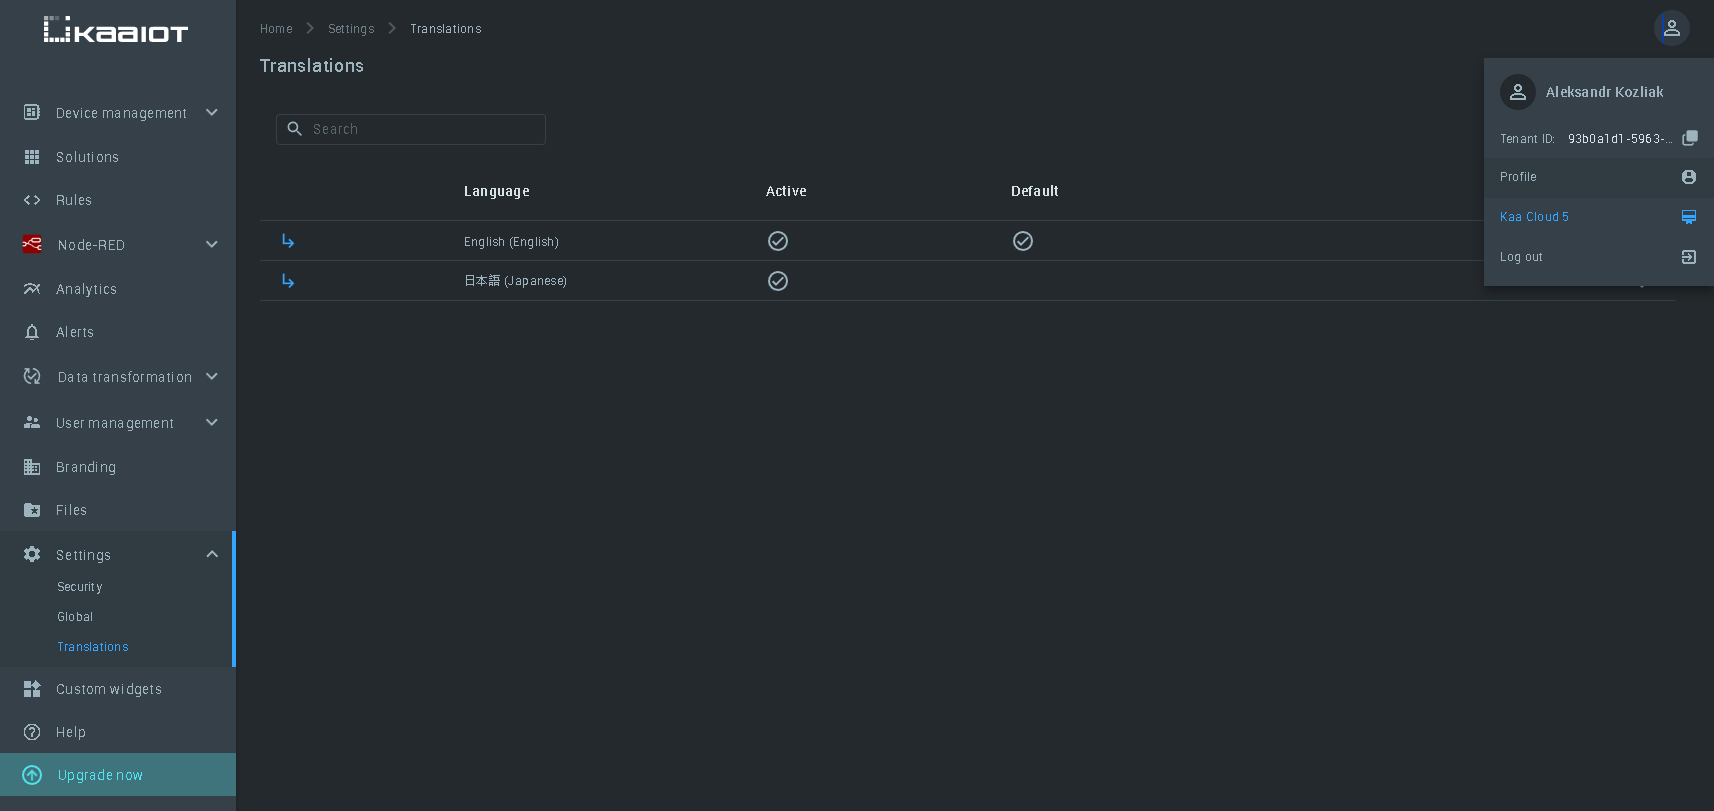
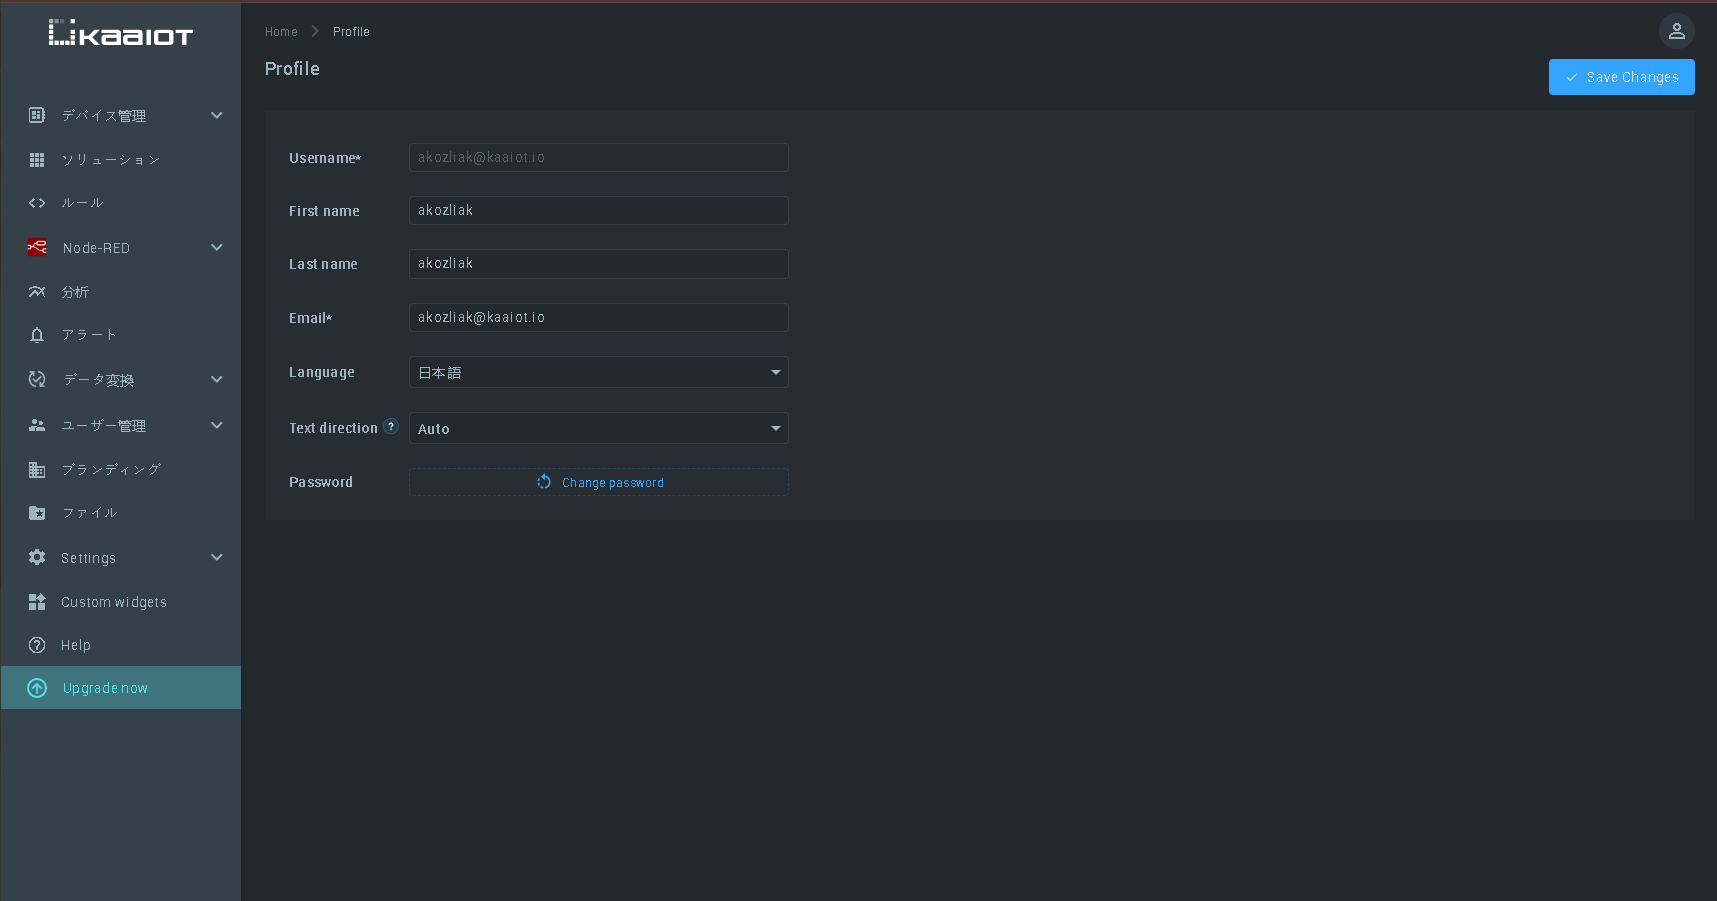
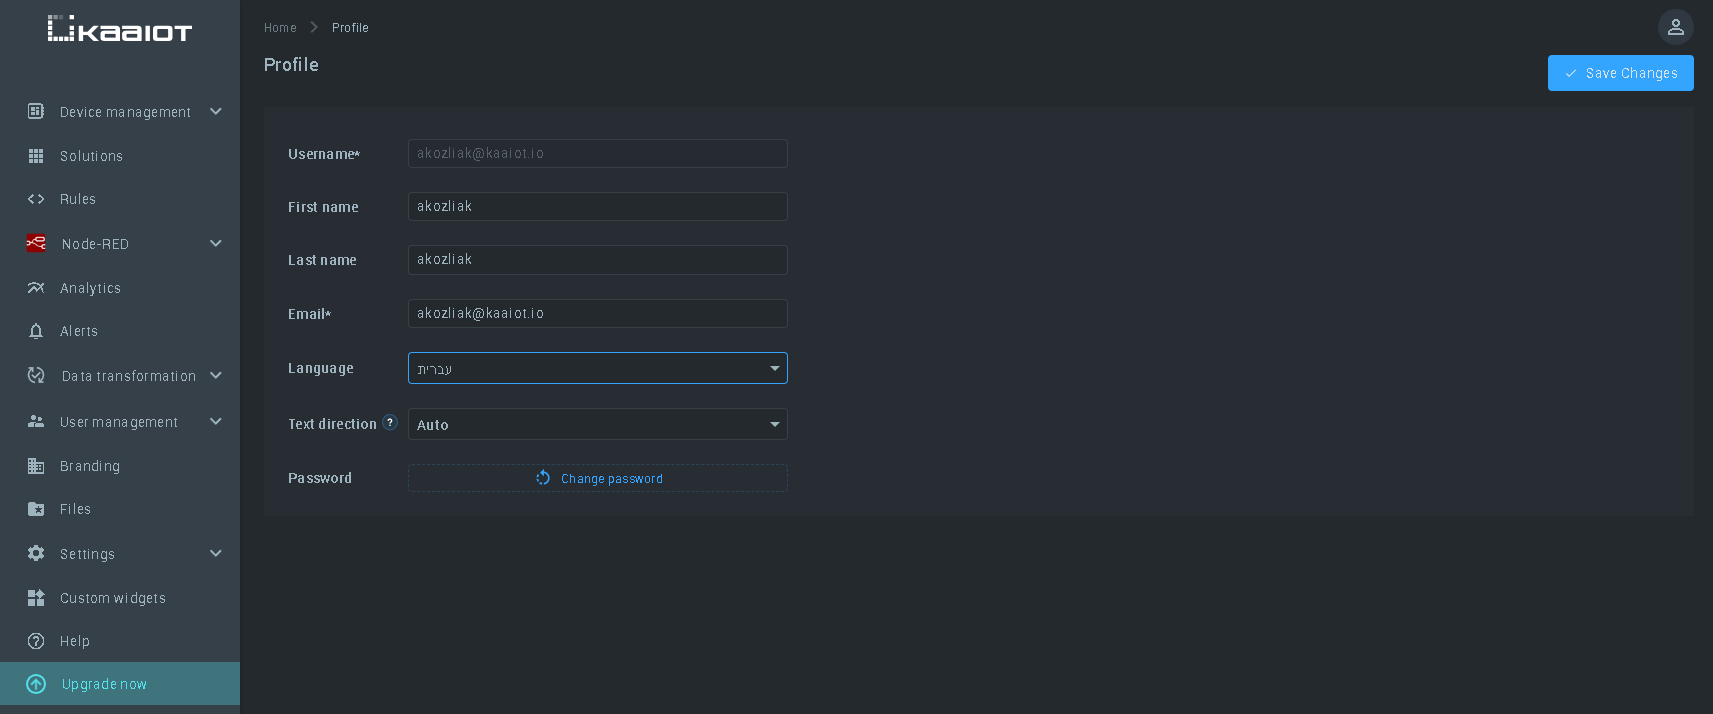
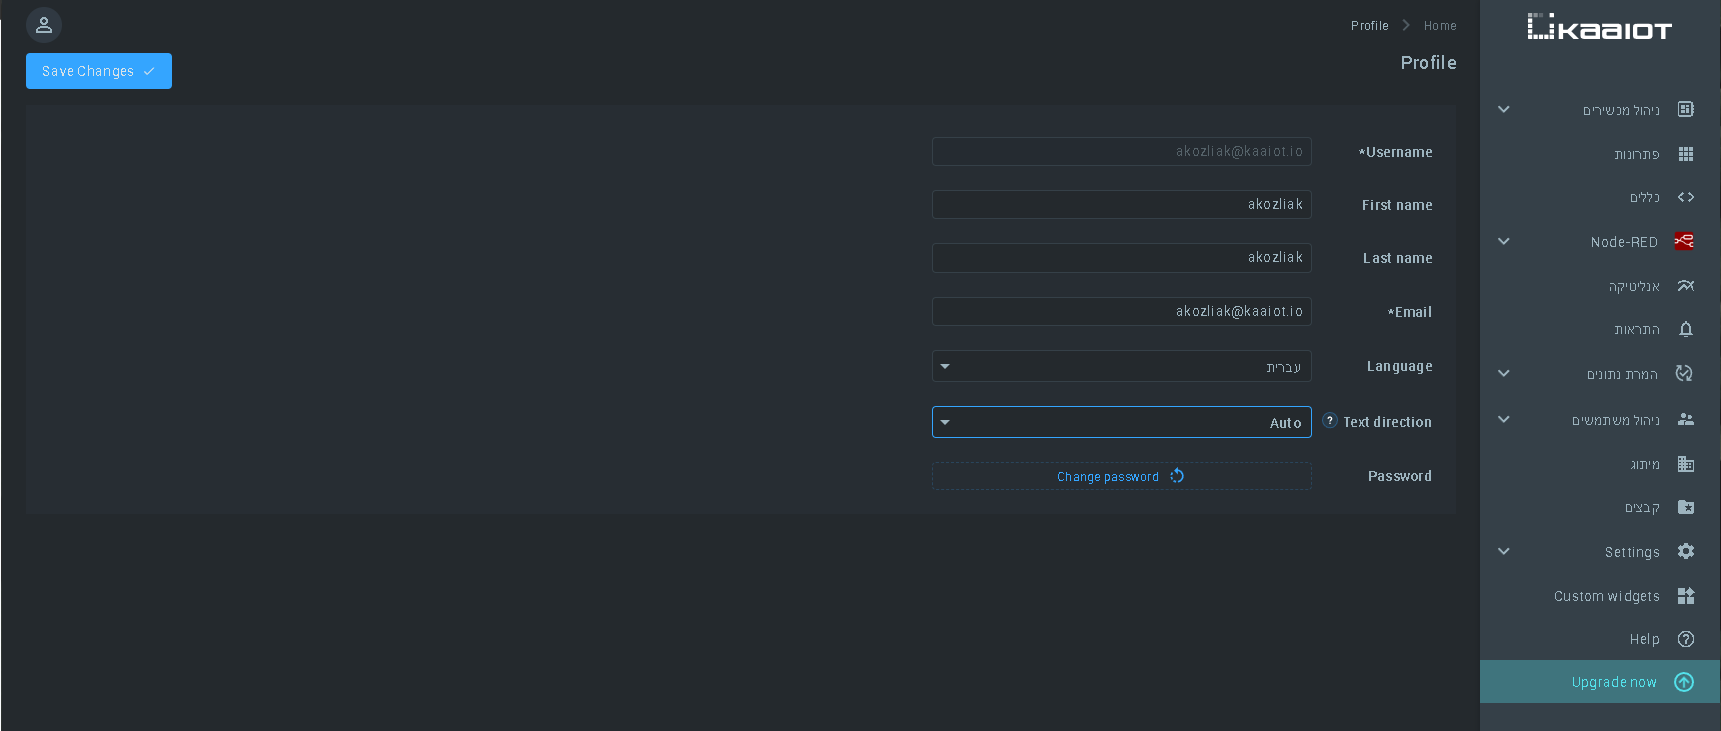
- Go to the "Profile" section (click on the round button with the avatar icon in the upper right corner)
- In the pop-up menu, select "Profile"
- You are now in your profile settings, in the line called "Language" select the language we have added
- Click on the "Save Changes" button in the upper right corner and reload the page
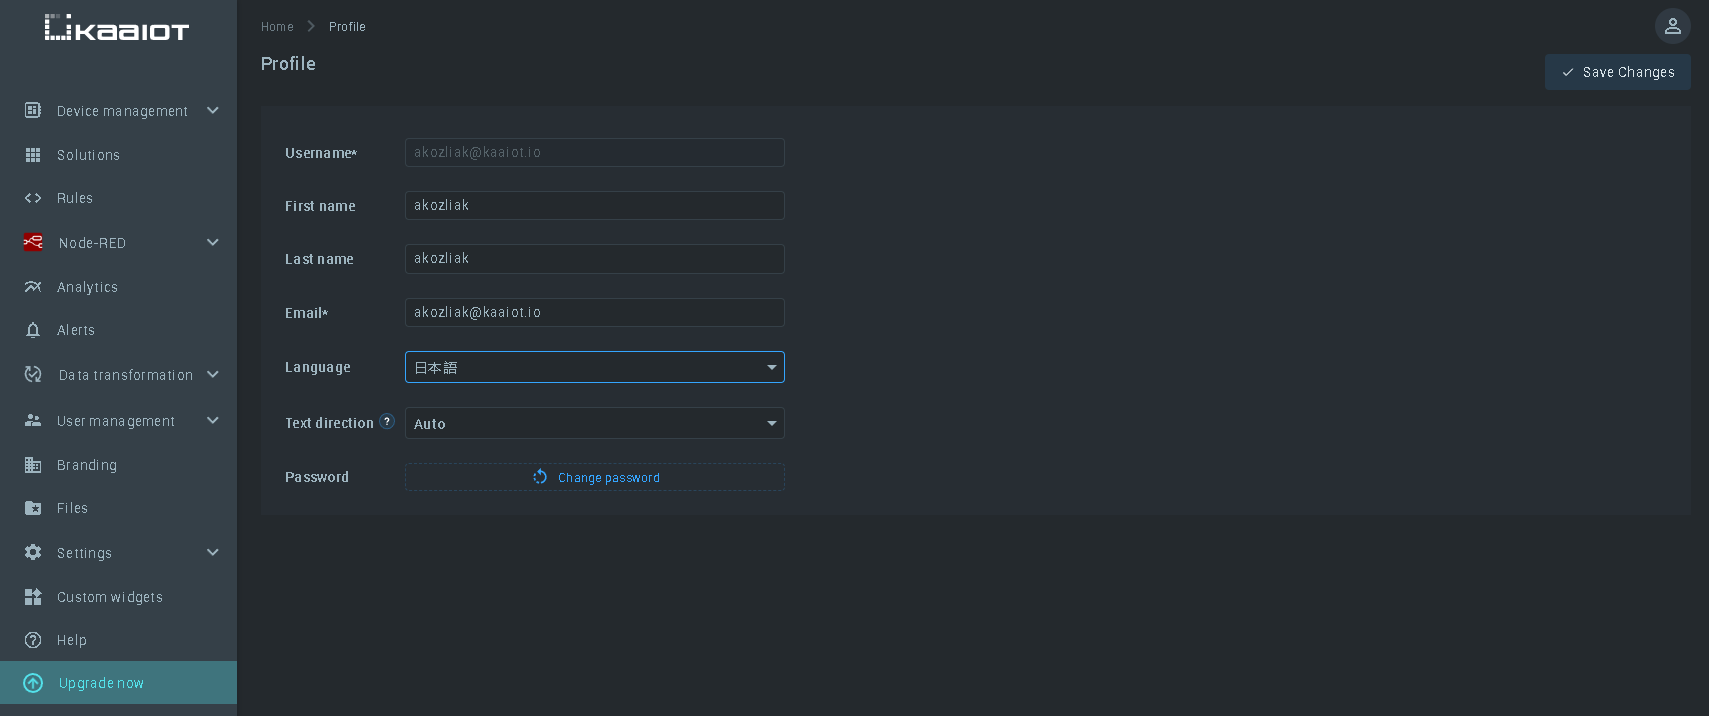
Your page language is now replaced with a third-party language. Make sure that the translation strings are applied correctly and that the font style is changed to match the font you have chosen.
3. How to add a language with a right-to-left layout (Hebrew as an example)
3.1 How to add a Hebrew translation
To add a Hebrew translation, we follow the same steps as for the Japanese translation. We will use a simple translation that we prepared in advance. To do this, we need:
- Go to the Settings -> Translation page
- Click on the "Add translations" button and select the language you want to add from the drop-down menu (the drop-down menu is labeled "Language*")
- Paste the JSON code with the prepared Hebrew translation into the text menu (you can use any tool or service you prefer to create the translation)
- After you paste the translation text into the text field, make sure it is correct
3.2 How to turn on right-to-left alignment
The usual way to write text in many languages is to print from left to right. This is the way that most languages are written, whether it's English, German, or another language of European origin. However, there is a group of languages that have a different printing method, namely, the order of writing from right to left. This affects the location and alignment of text and other elements on the page. To add a right-handed language, you need to do two things:
- On the "Add translations" page, when adding a new translation, open the settings item called "Font and text direction settings"
- The first setting from the list is called "Use Right-to-Left (RTL) layout", this is the setting we need to activate, just check the box next to it and click the "Add" button in the upper right corner

3.3 Activating and testing translation with the right-to-left alignment
Now that we've added a translation that uses the right-to-left layout, we need to apply it and check that it works correctly. To do this, we need to:
- On the Settings -> Translation page, in the line of the translation language you have added, click on the options menu icon (3 dots at the end of the line)
- Click on the "Activate" button
We have activated the third-party translation we added. Now we need to select it in the profile language settings and check that it works correctly. To do this, we need:
- Go to the "Profile" section (click on the round button with the avatar icon in the upper right corner)
- In the pop-up menu, select "Profile"
- You are now in your profile settings, in the line called "Language" select the language we have added
- Click on the "Save Changes" button in the upper right corner and refresh the page
You should see that the translation strings are applied correctly and the layout of the main interface has changed from left to right. Also, the user can choose which layout he wants to use, so he can specify the default auto, which means that it will be handled by the language settings, or the user can force the layout to be right-to-left or left-to-right. The "Text direction" parameter in the profile settings is responsible for this.
4. How to set translation for solutions and widgets
4.1 How to add the code responsible for displaying custom translation settings to the translation we need
Next, we'll look at how to add translations to widgets. We'll return to the standard language settings (English) to make this point of the tutorial more understandable. So, how to specify a translation for solutions and widgets?
To do this, we need to:
- Go to the Settings -> Translation page
- From the list, select the language to which you want to add custom translation settings (for example, we took English)
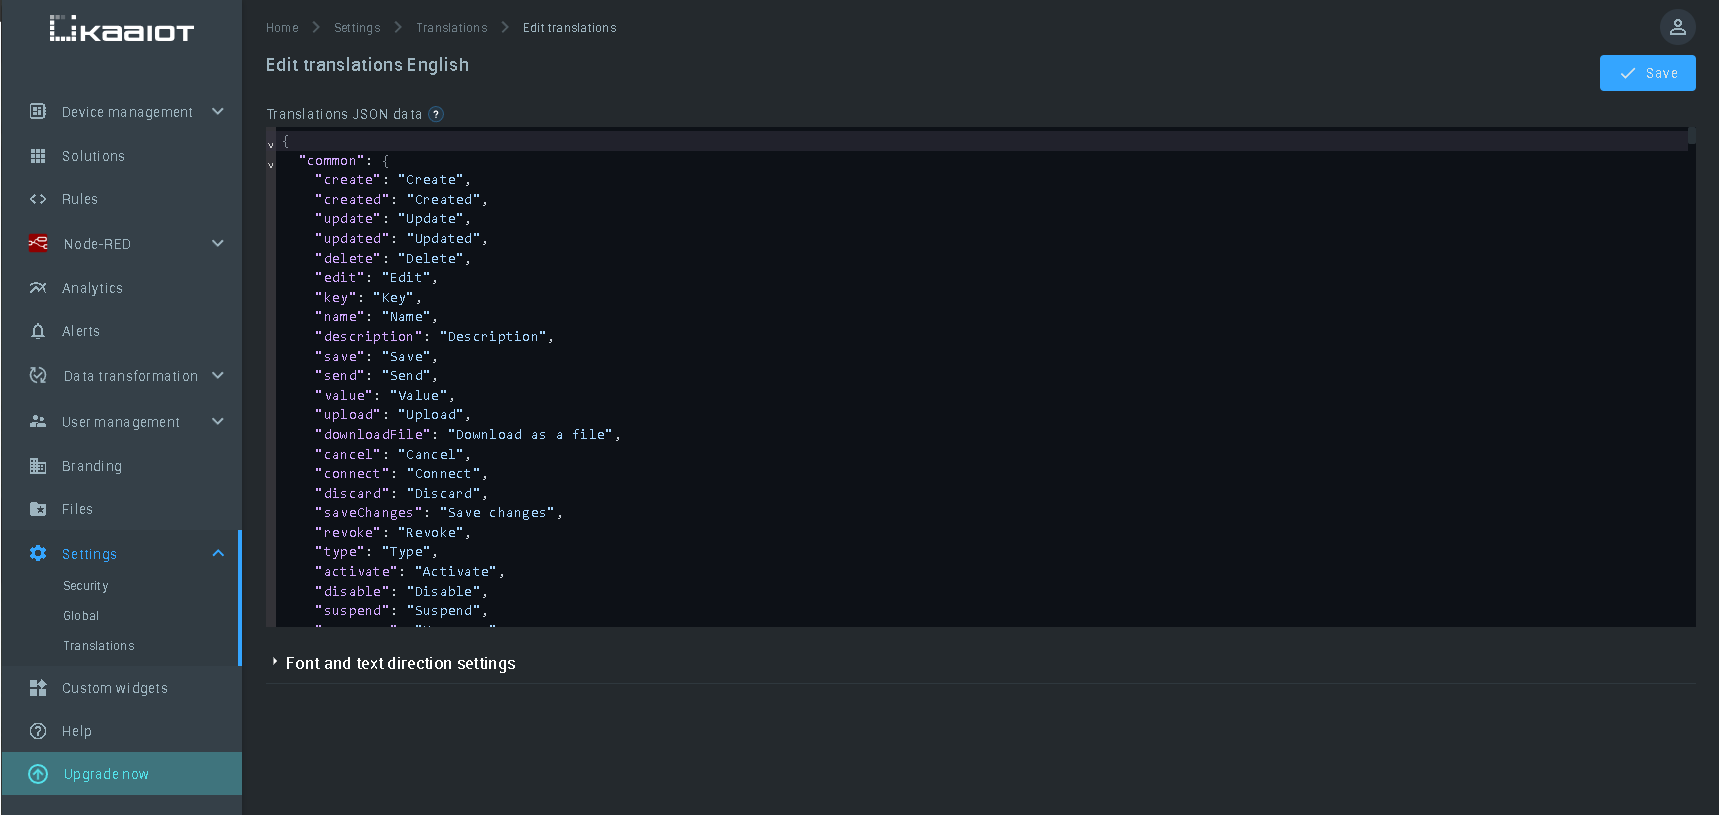
- Once you are on the translation settings page, click on the line called "English" to open the translation editing page, in our case, it is called "Edit translations English"
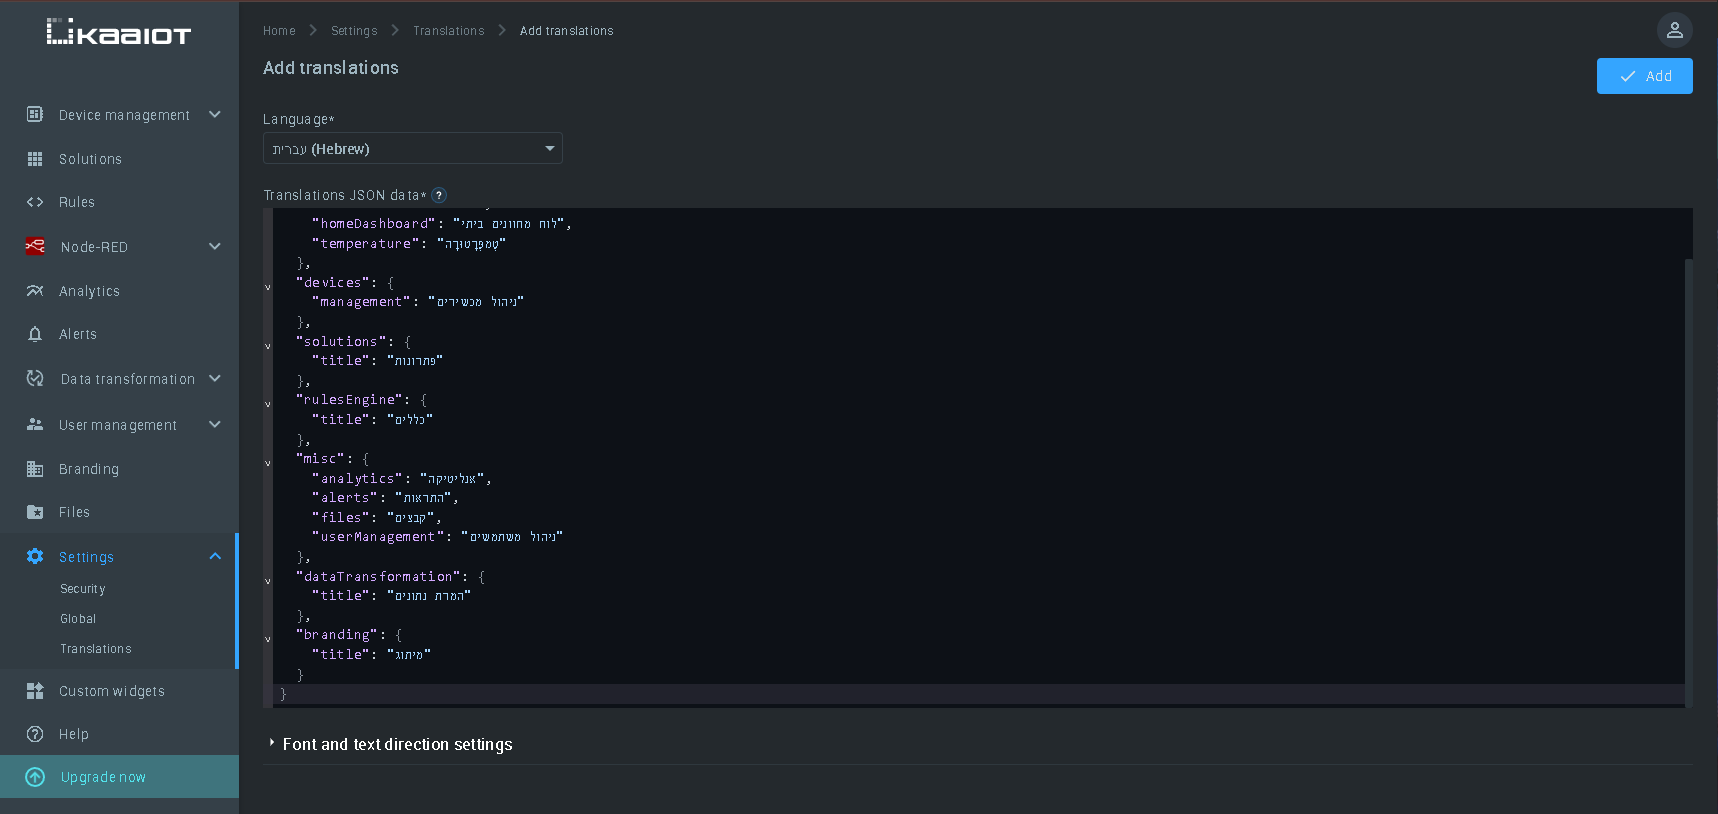
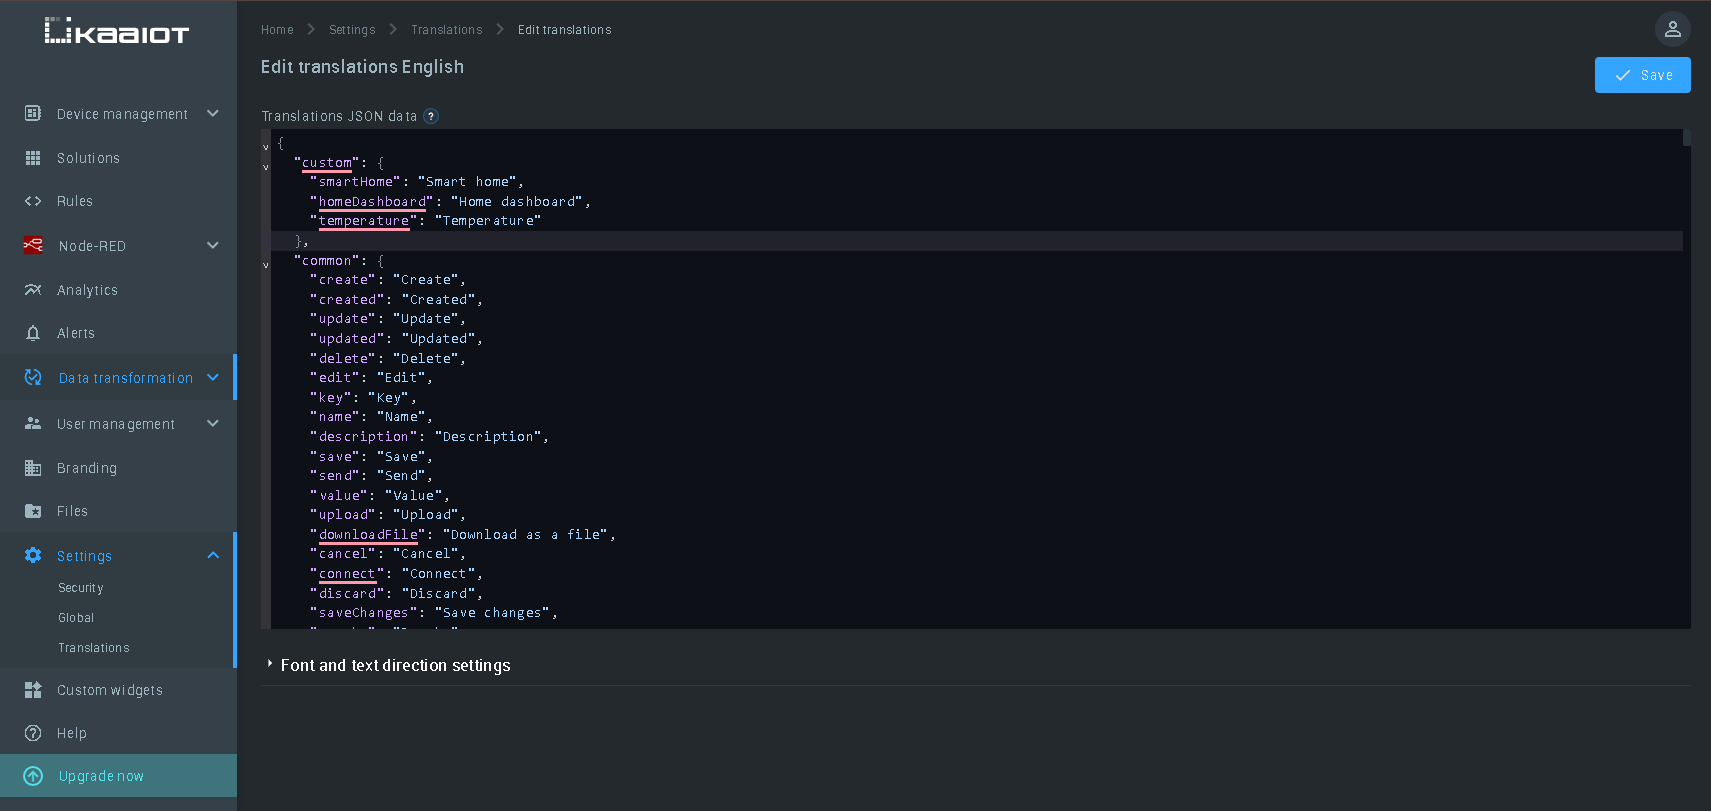
- In the text field called "Translations JSON data", there is already a JSON code responsible for the standard language of the page (English). At the beginning of this code, you need to add the lines responsible for the custom translation display parameters (as an example, we have added the code we prepared earlier, and you add the code you need)
- Click the "Save" button
If you do not have sufficient practical skills, we have described in detail the code responsible for displaying custom translations in Section 4.2. If you are not a beginner in programming and already know how to work with JSON, you can skip step 4.2 and go straight to step 4.3
4.2 Detailed overview of the code responsible for displaying custom translation settings
As an example, we used the custom JSON code strings prepared earlier. We took this code from the Hebrew translation and added it to the English translation code to quickly test it.
  "custom": {
    "smartHome": "בית חכם",
    "homeDashboard": "לוח מחוונים ביתי",
    "temperature": "טֶמפֶּרָטוּרָה"
  },
There are 3 translation values in our custom code:
- "smartHome"
- "homeDashboard"
- "temperature"
We have indicated the values for our translation opposite them, i.e. we have written the translation in the language we need for a particular widget value. Here's what we got:
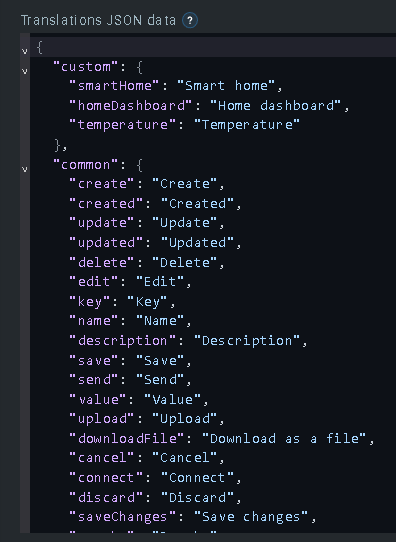
  "custom": {
    "smartHome": "Smart home",
    "homeDashboard": "Home dashboard",
    "temperature": "Temperature"
  },
4.3 Working with solutions and displaying their translation
We have added a part of the code to the translation code that is responsible for displaying custom translations. Now we need to apply this code to existing solutions. To do this, you need to:
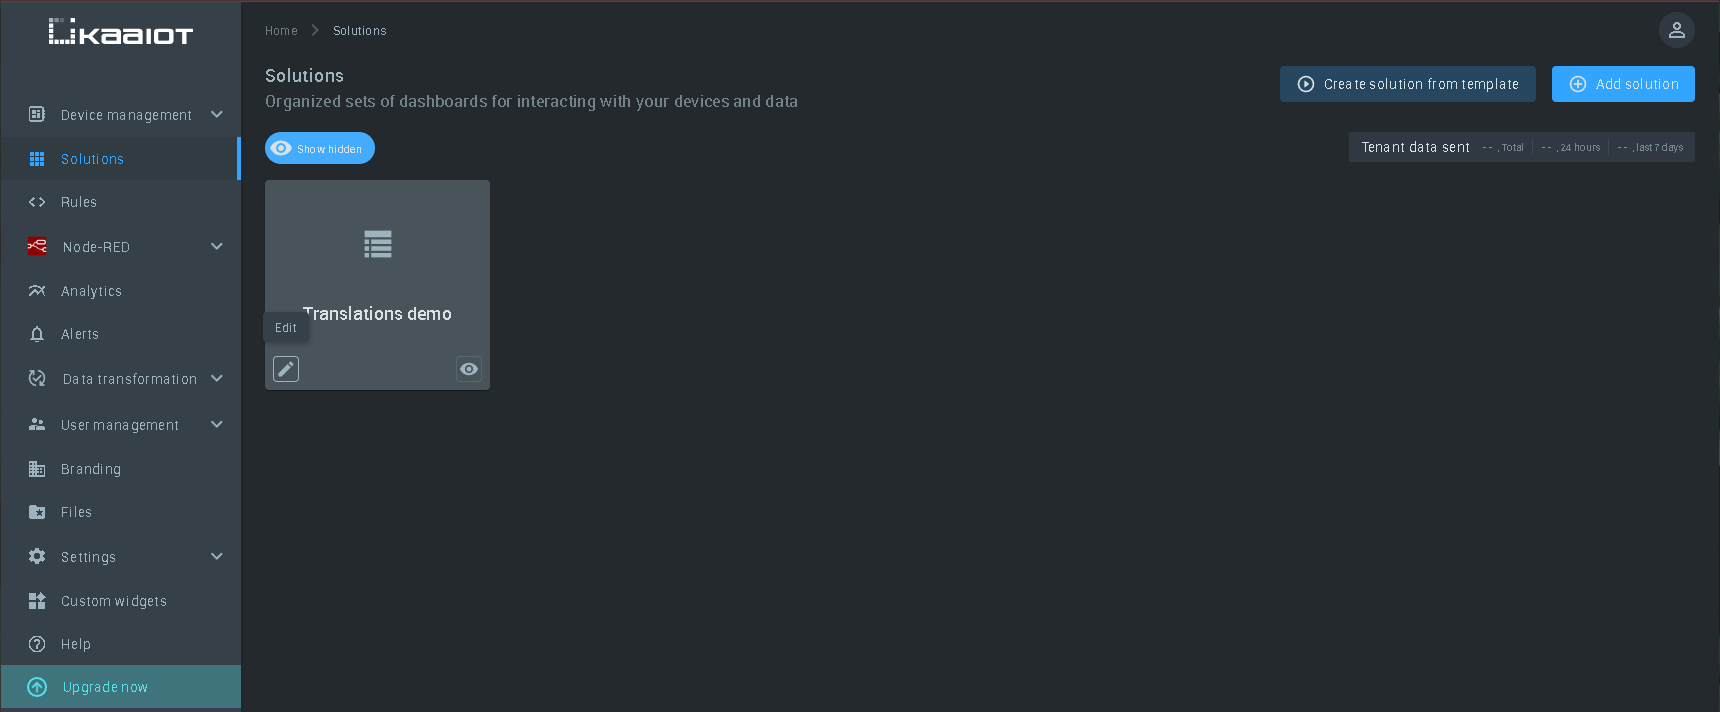
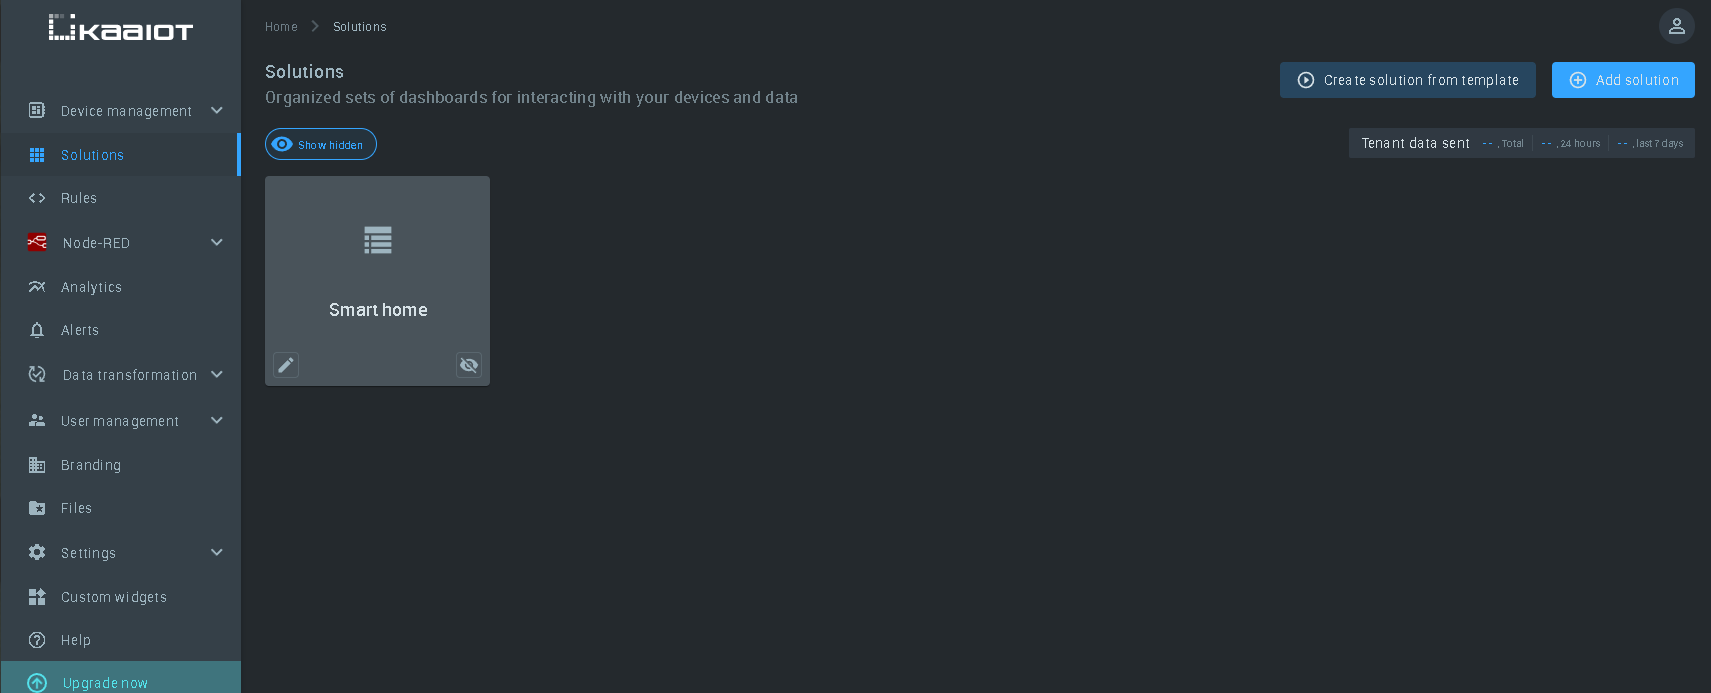
- In the left side menu, go to the "Solutions" tab
- Move the cursor over the label of the solution to which you want to apply custom translation settings, a button with a pencil icon called "Edit" will appear in the lower-left corner of the label, click on it (for demonstration purposes, we have already created a solution called "Translations demo")
- You will see a pop-up window called "Edit solution". In the line called "Display name", you need to specify the path to our translation key (which was the custom smart home):
@{custom.smartHome}
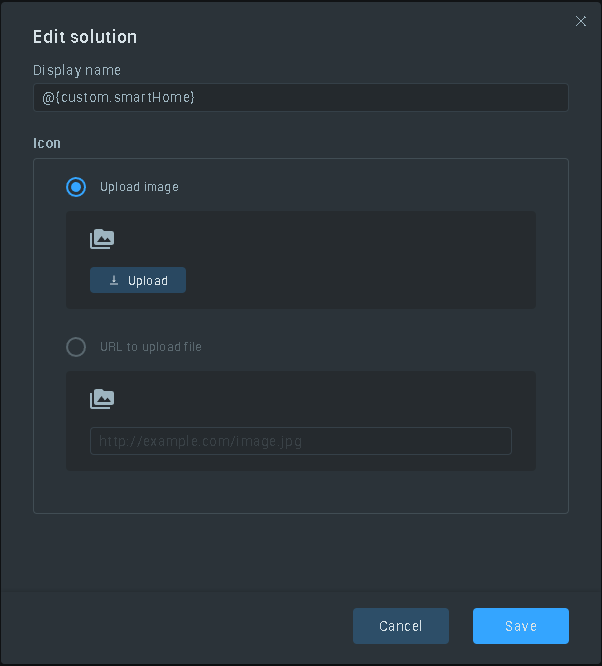
- In the same pop-up window, click on the "Save" button
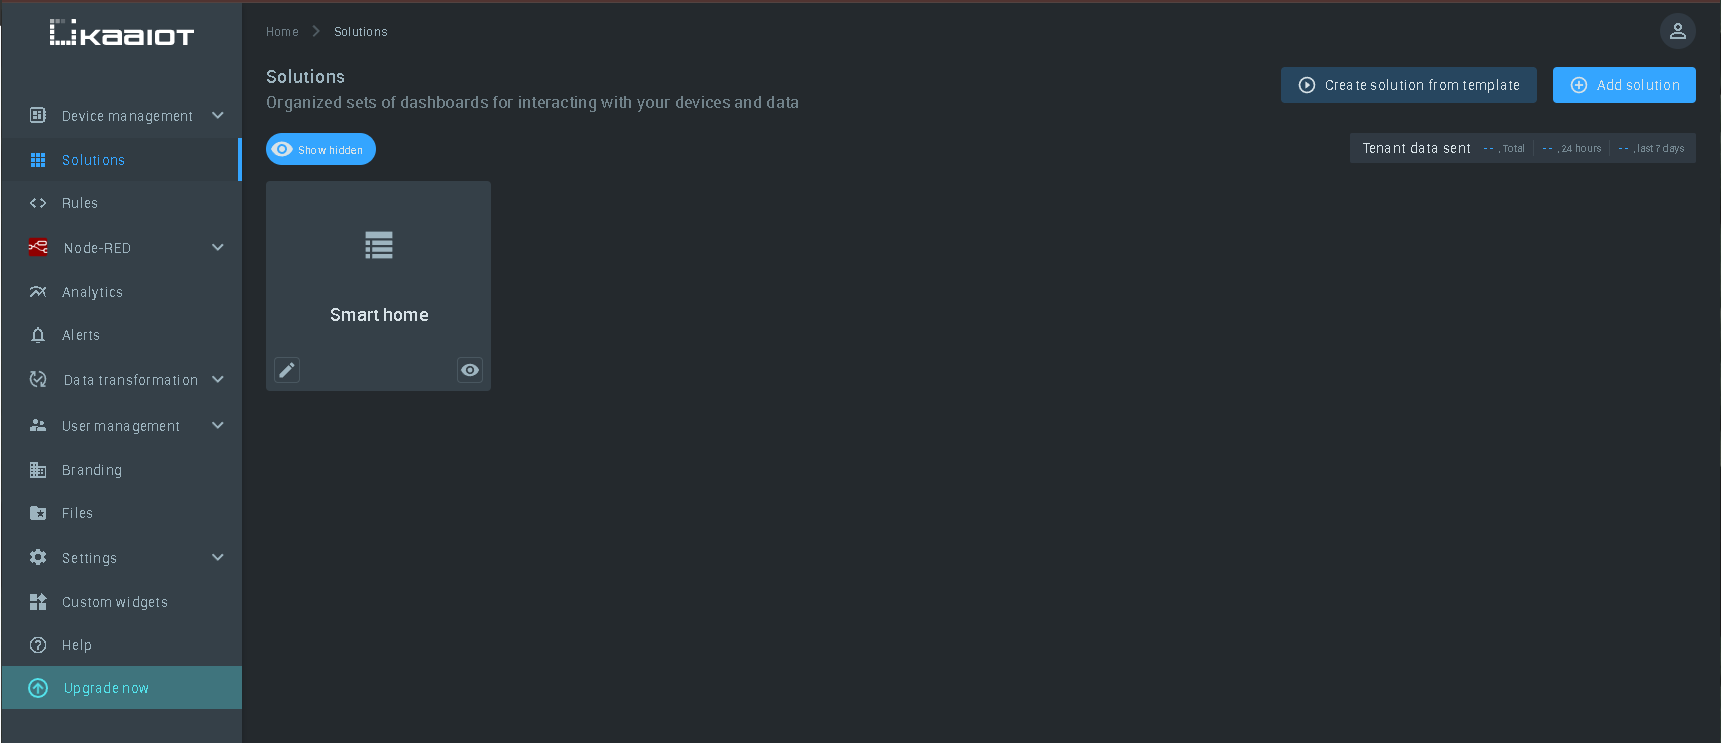
After saving, you can see that the name of the solution label has changed according to the language we selected. Now we can apply the same settings to our dashboard. To do this, we need to:
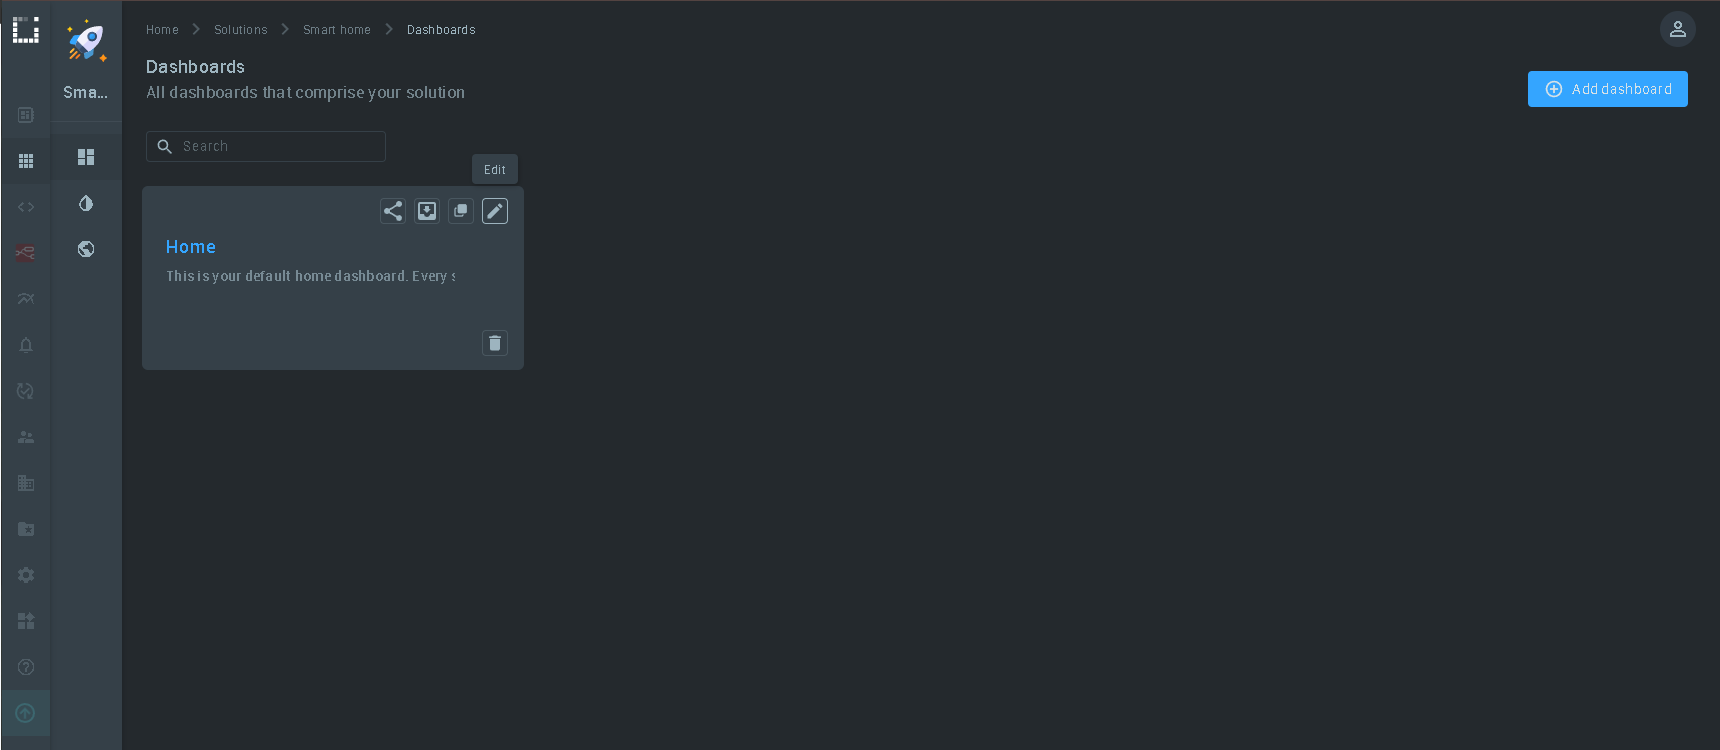
- Click on the solution shortcut (in our case, it's the shortcut called "Smart home")
- You will be taken to a page with a list of your dashboards. Select the dashboard for which you want to apply the translation options (for the sake of demonstration, we will select a pre-created dashboard called "Home"). To edit its translation parameters, move the mouse cursor over the shortcut, a button with a pencil icon called "Edit" will appear in the upper right corner of the shortcut, click it.
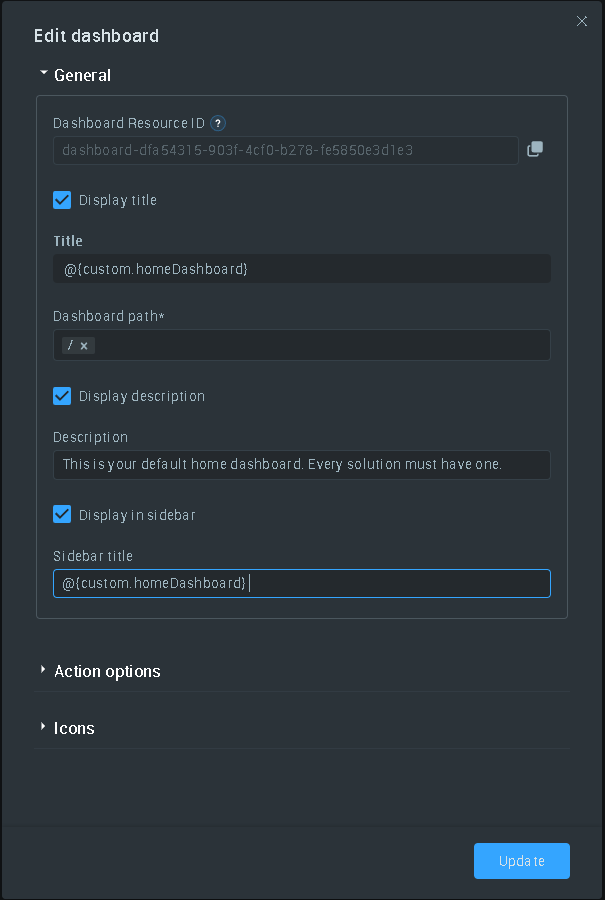
- You will see a pop-up window called "Edit dashboard". In the line called "Title" and in the line called "Sidebar title" you need to specify the path to our translation key:
@{custom.homeDashboard} - After that, click on the "Update" button
Great, after saving, you can see that the name of your dashboard has changed to the language you selected. Now let's apply these translation settings to a widget. To do this, we need:
- Select the dashboard we need by clicking on it
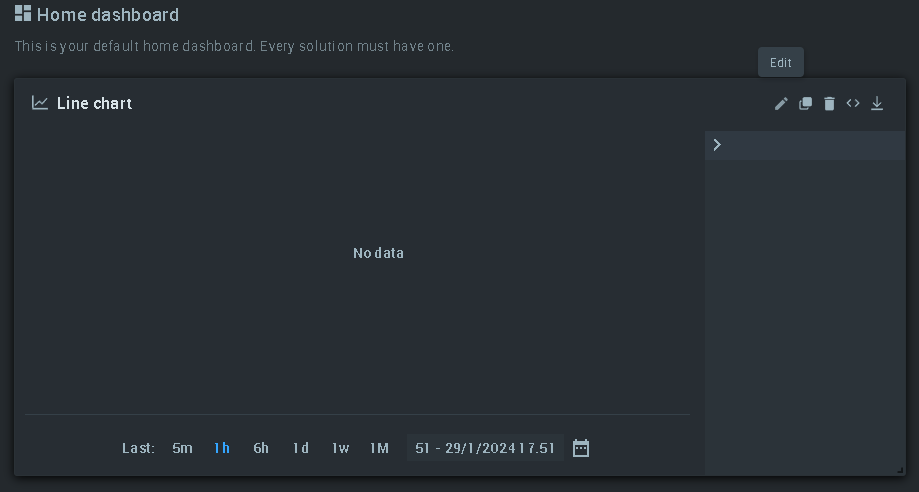
- Select the widget you need from the list (for clarity, we have created a widget that is responsible for displaying the temperature fluctuation graph)
- Click on the button with the pencil icon called "Edit"
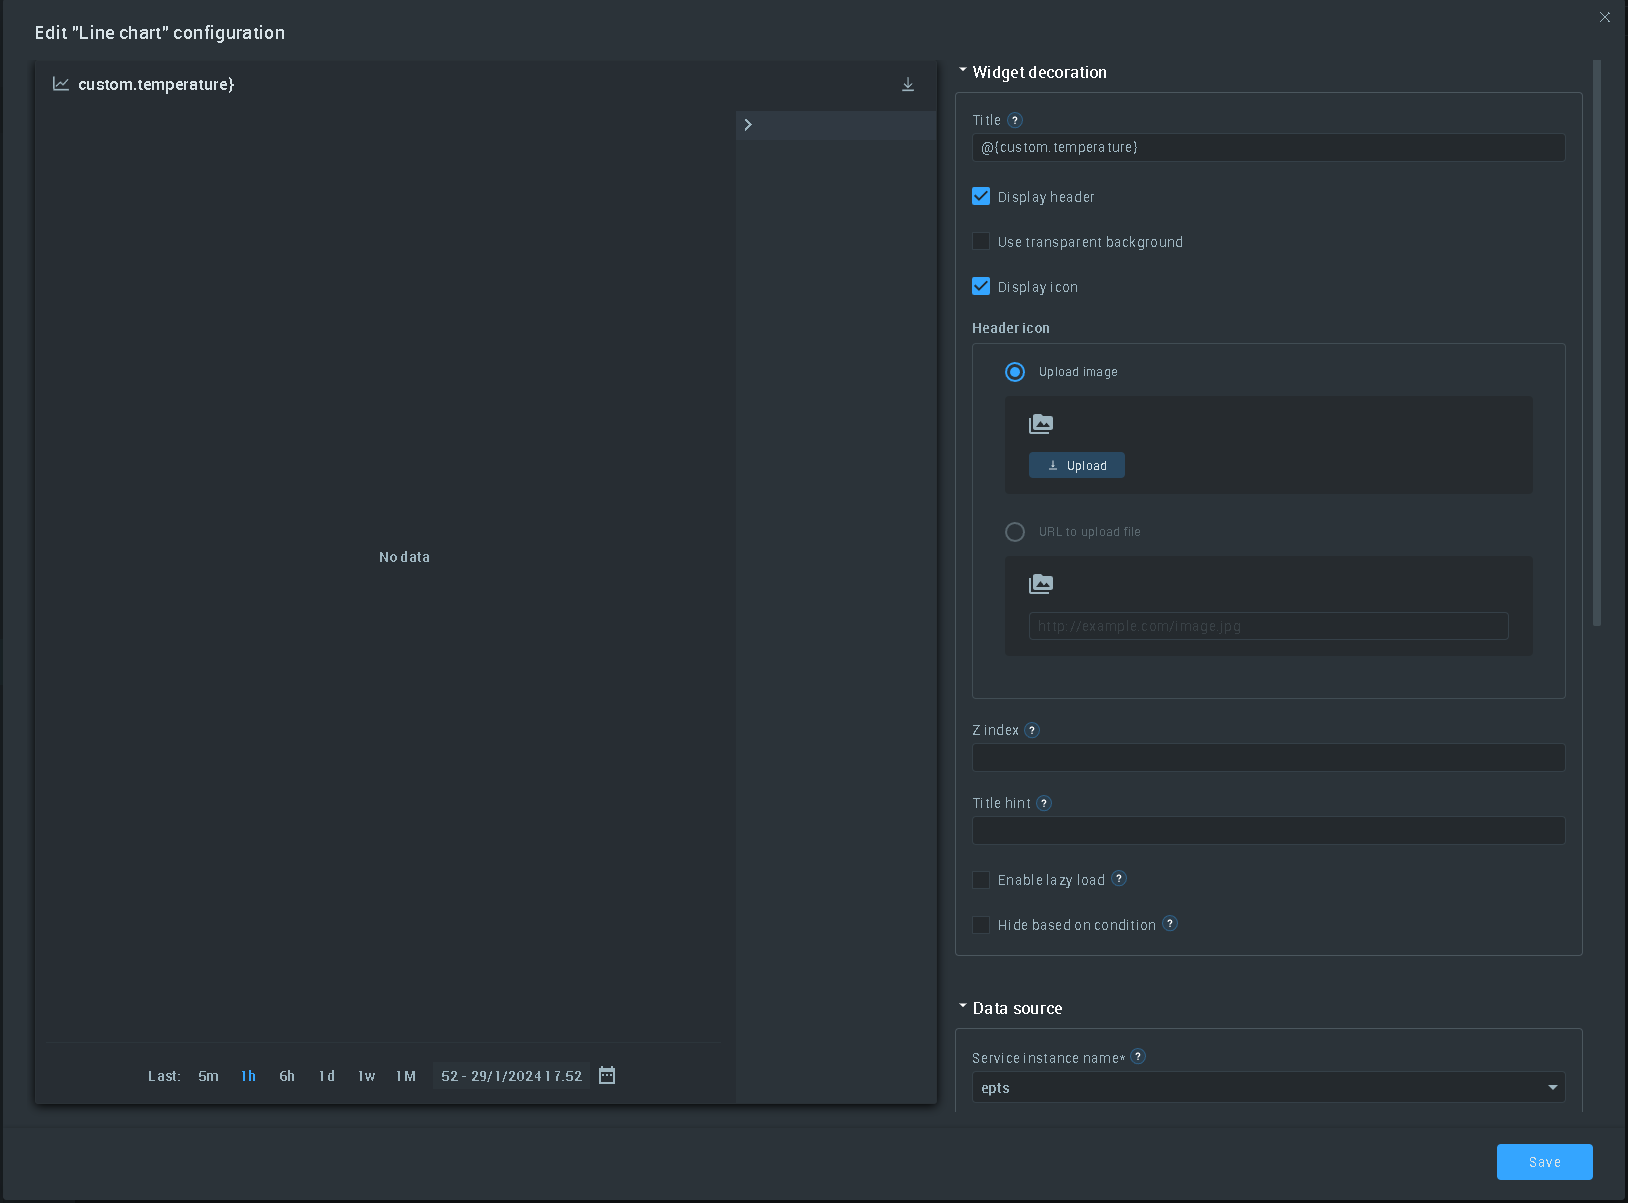
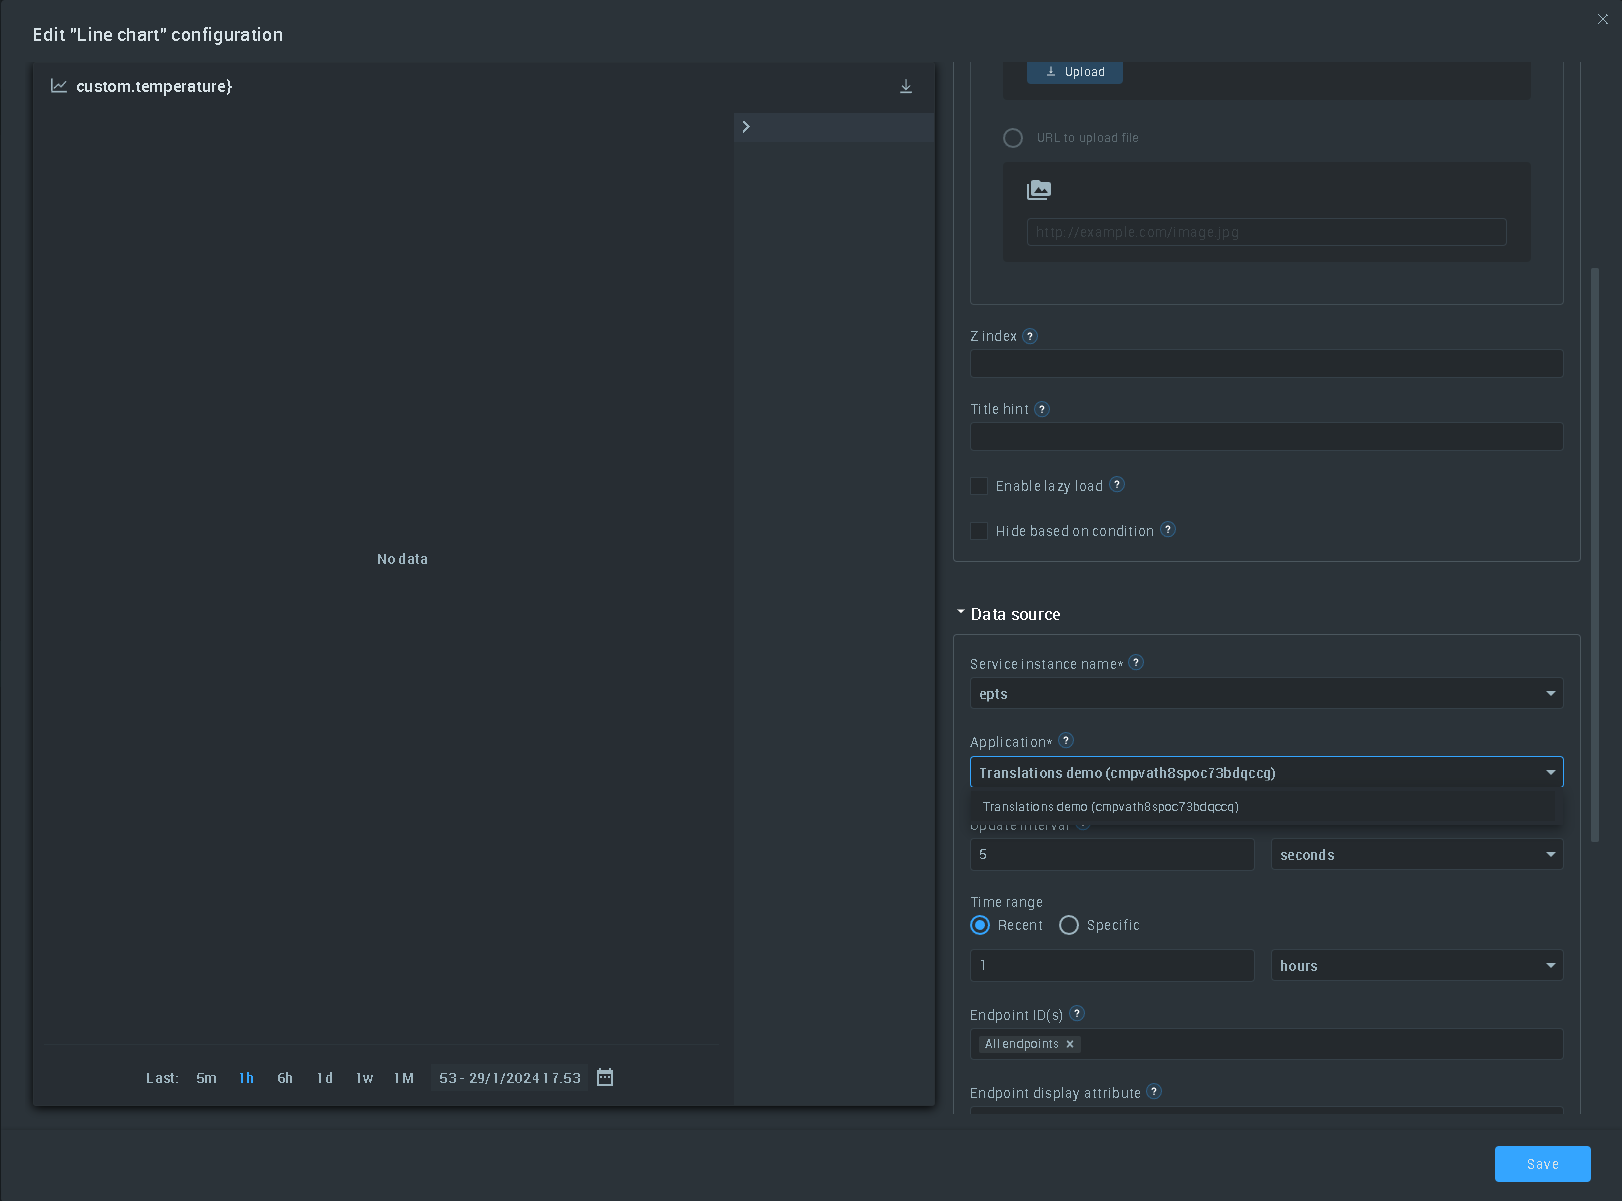
- We have opened a window called "Edit "Line chart" configuration", where we are interested in the settings menu called "Widget decoration". In the text box called "Title", we need to specify the path to our translation key:
@{custom.temperature} - Do not close the window and scroll down, we need to find the option called "Application*" located in the "Data source" section, in the drop-down menu of this option, select the option "Translations demo (...)"
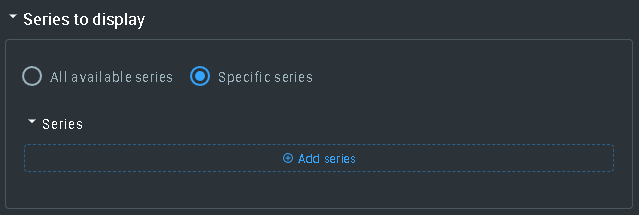
- Scroll down even further and in the section called "Series to display" we find 2 options to choose from, these are "All available series" and "Specific series", activate the "Specific series" option
- In the "Series" tab, click on the "Add series" button
- Next, we need to apply 3 parameters:
- in the section "Time series*" the parameter "auto-temperature"
- in the section "Path to data value*" the parameter "values.value"
- in the "Label in legend" section, paste the code we used earlier in the text box:
@{custom.temperature}
- Click on the "Save" button
After following these steps, you can see that the translation has been successfully applied. Next, we need to save our settings by clicking here:
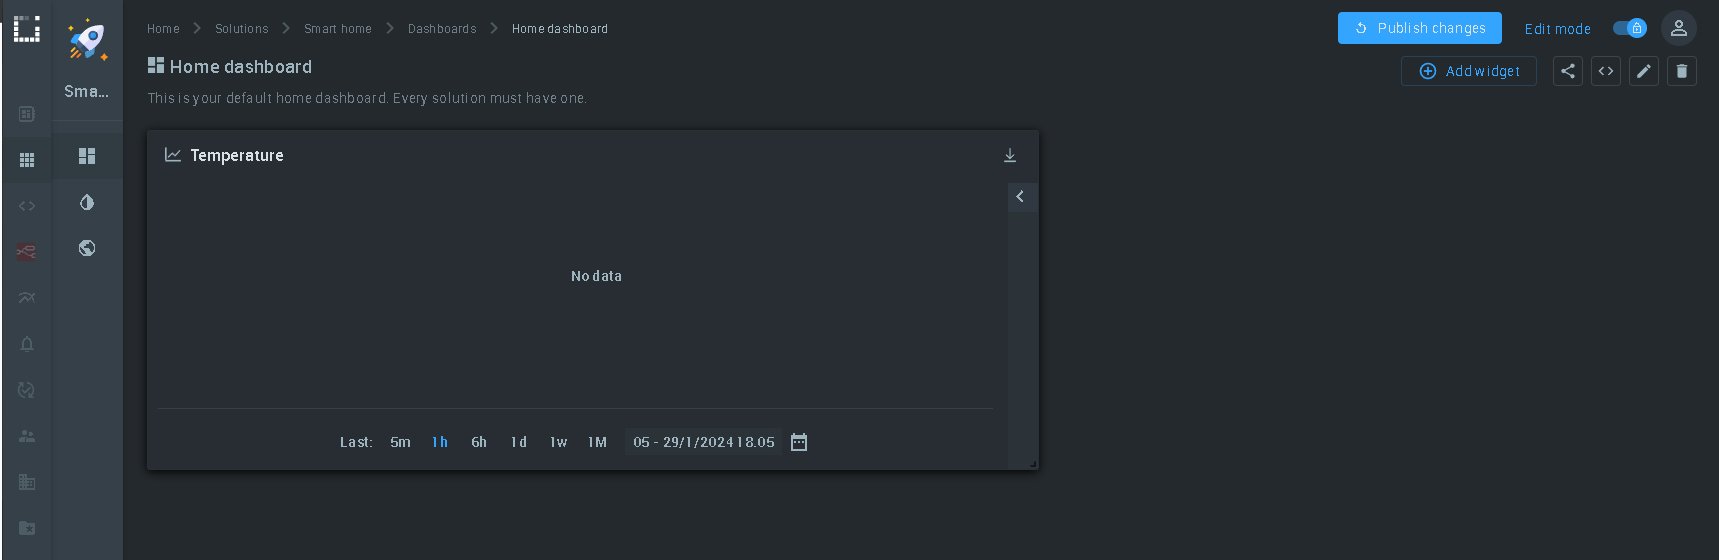
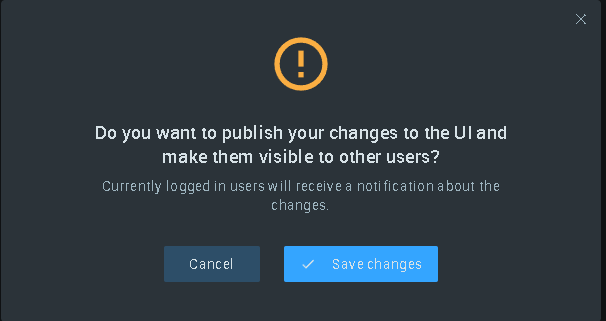
- Click on the "Publish changes" button
- In the pop-up window, select the "Save changes" option
4.4 Checking the correctness of the translation in the public control panel
So, we've gone through all the intricacies of setting up a custom translation step by step, and now we can evaluate the result of our work. Let's check out the public control panel, which is what we need to do:
- Go to the "Solution" tab
- Click on the solution tab (in our case, it is a label called "Smart home")
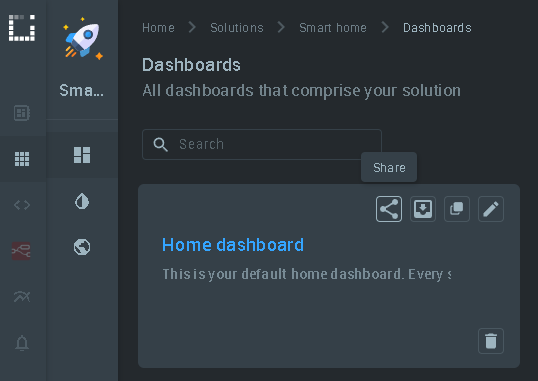
- Select our dashboard, hover over it, and click on the button with the 3 dots icon called "Share"
- In the "Share with people" pop-up window, change the position of the switch called "Shared" to active
- You will see a line with the web address, click on the button to the right of it
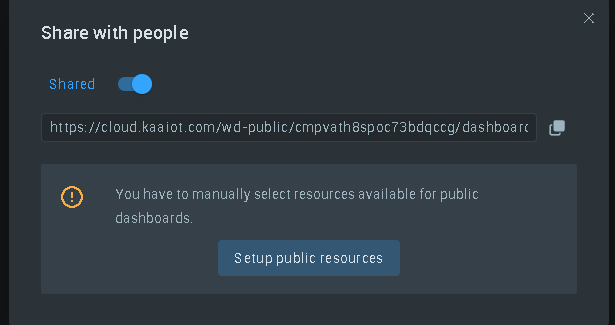
Congratulations, you now have a link to your widget's public dashboard in your clipboard. You can share it in any way you like. You can also open it in a new tab to double-check that all the settings are working correctly. You can see that we have our widget titles and labels. Also, as expected, and in the right corner we have a language selection. You can change the language of the current public dashboard and see how the translation display changes.


5. Custom translation settings for Raw HTML and Vega widgets
We've covered the basics of working with custom translations on the Kaa IoT platform. You've learned how to add custom translations and how to apply them to your dashboards, solutions, and widgets, but working with some widgets, such as Raw HTML and Vega, has some peculiarities.
5.1 Applying custom language settings to the Raw HTML widget
The first widget we will consider in this section is the "Raw HTML" widget. Let's start by adding it. To do this, we need:
- Go to the "Solutions" tab
- Select the solution we need (for clarity, we will select the "Smart home" solution we created earlier)
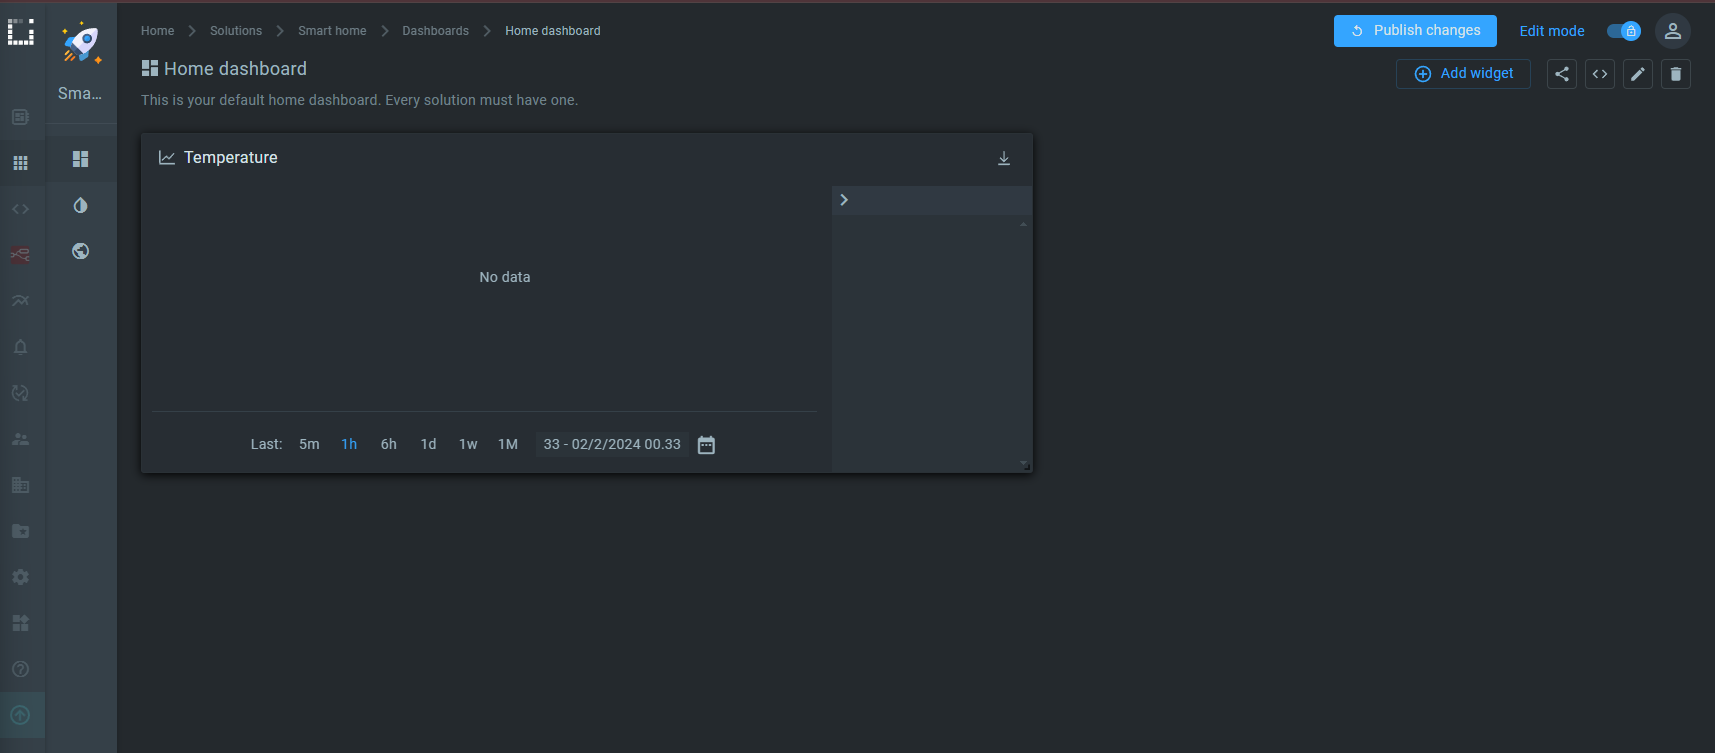
- We are now on the list of dashboards. We need to select the dashboard we need (for clarity, we will select the "Home dashboard" dashboard we created earlier)
- Now let's create the "Raw HTML" widget. To do this, we need to click on the "Add widget" button located on this page in the upper right corner (Note: if you do not see the "Add widget" button, make sure that the "Edit mode" switch located in the upper right corner is in the active position)
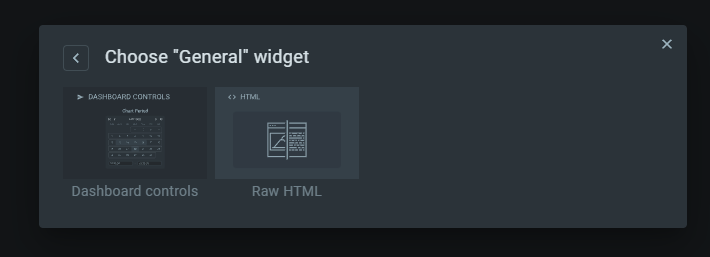
- Go to the "General" section and select the "Raw HTML" widget
Great, we've added the Raw HTML widget. Now we need to specify the translation key in the parameters of this widget. To do this, you need to:
- Move the cursor over the widget label (in our case, the "Raw HTML" widget). A set of buttons will appear in the upper right corner of the widget label, we are interested in the button with the pencil icon called "Edit", click on it
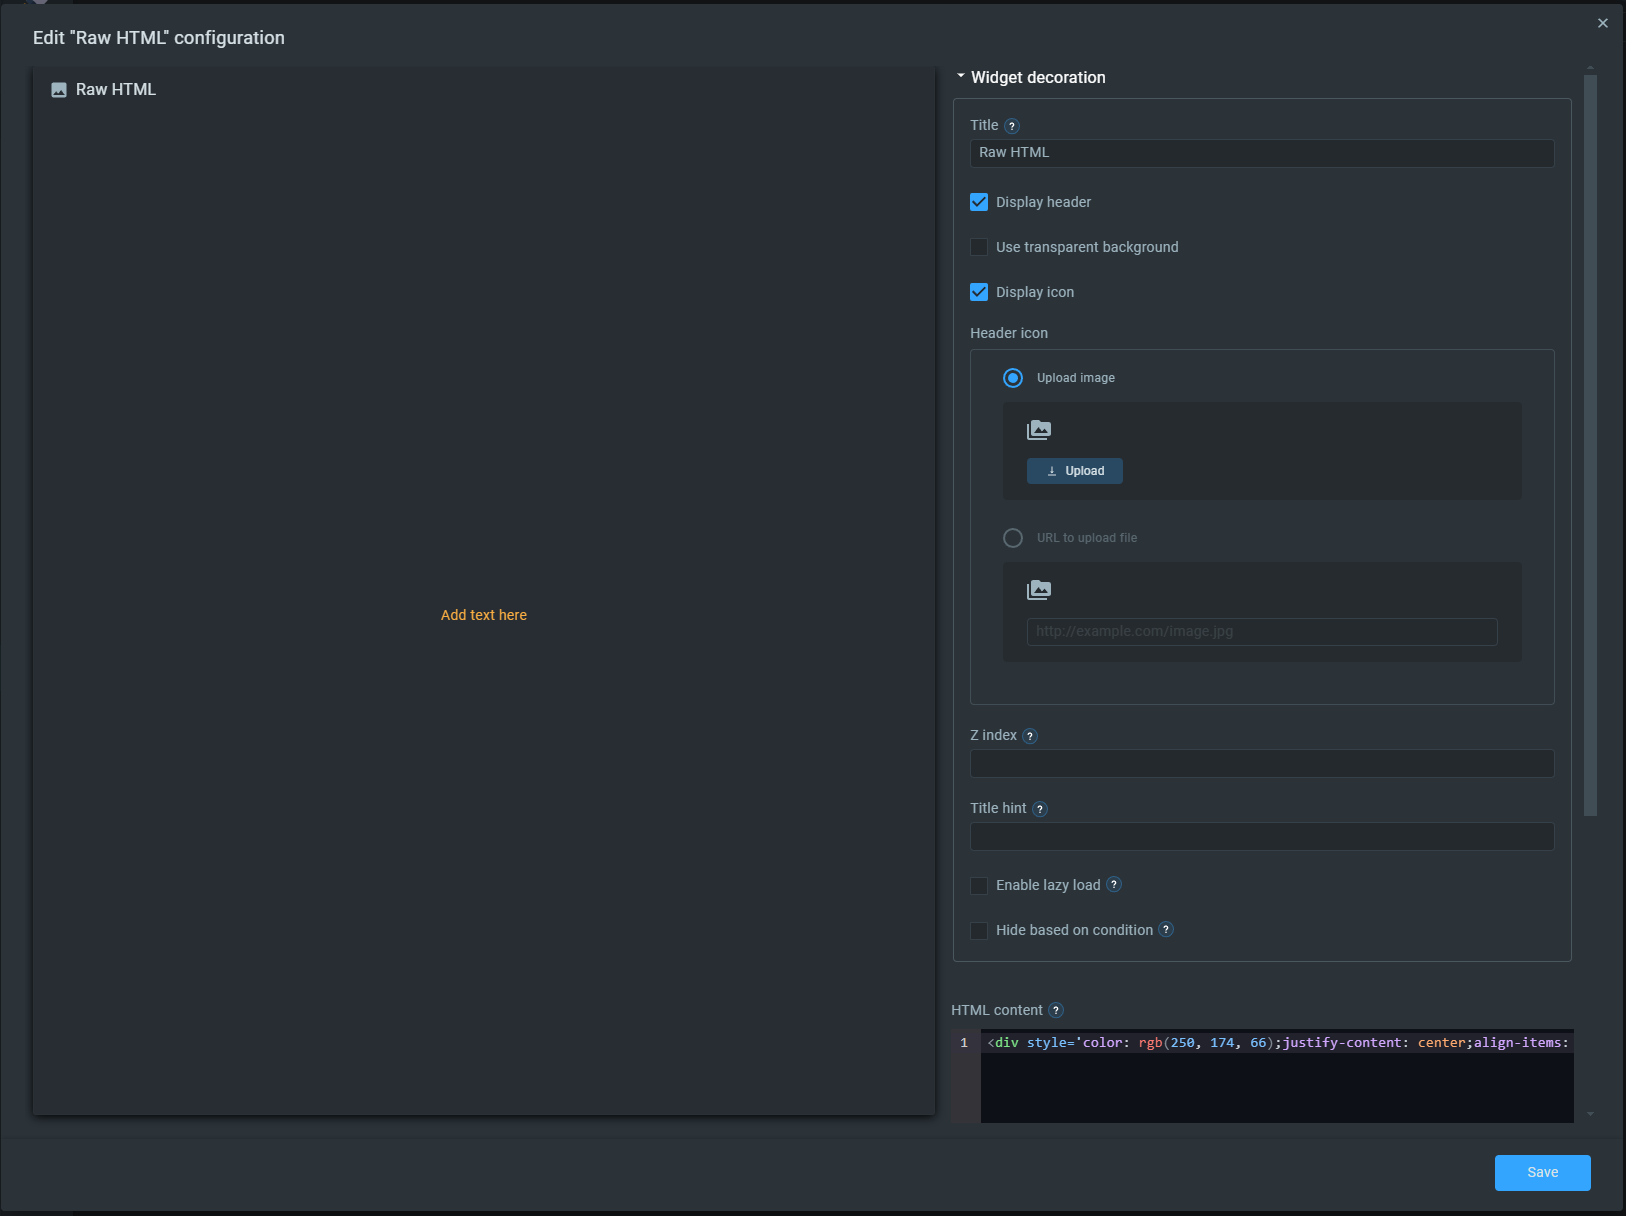
- We have opened the "Raw HTML" widget settings window called "Edit "Raw HTML configuration", we are interested in the text field called "HTML content"
- In the text field "HTML content" we have the code that is responsible for the parameters of text display in our widget, this code looks like this:
<div style='color: rgb(250, 174, 66);justify-content: center;align-items: center;display: flex;height: 100%'>Add text here</div>
- We are interested in the parameter "Add text here</div>", press the "Enter" button on the keyboard to move this parameter to a new line, and you should get the following code:
<div style='color: rgb(250, 174, 66);justify-content: center;align-items: center;display: flex;height: 100%'>Add text here</div>
- We need to add our translation key instead of the line "Add text here", it looks like this - "${'custom.humidity' | translate}". That is, on this line, we call the "translate" function and it adds the correct translation. Your code should look like this:
<div style='color: rgb(250, 174, 66);justify-content: center;align-items: center;display: flex;height: 100%'>${'custom.humidity' | translate}</div> - Click the "Save" button to save the changes
- After saving, when you are on your dashboard page (in our case, it's "Home dashboard"), click on the "Publish changes" button to make our settings take effect


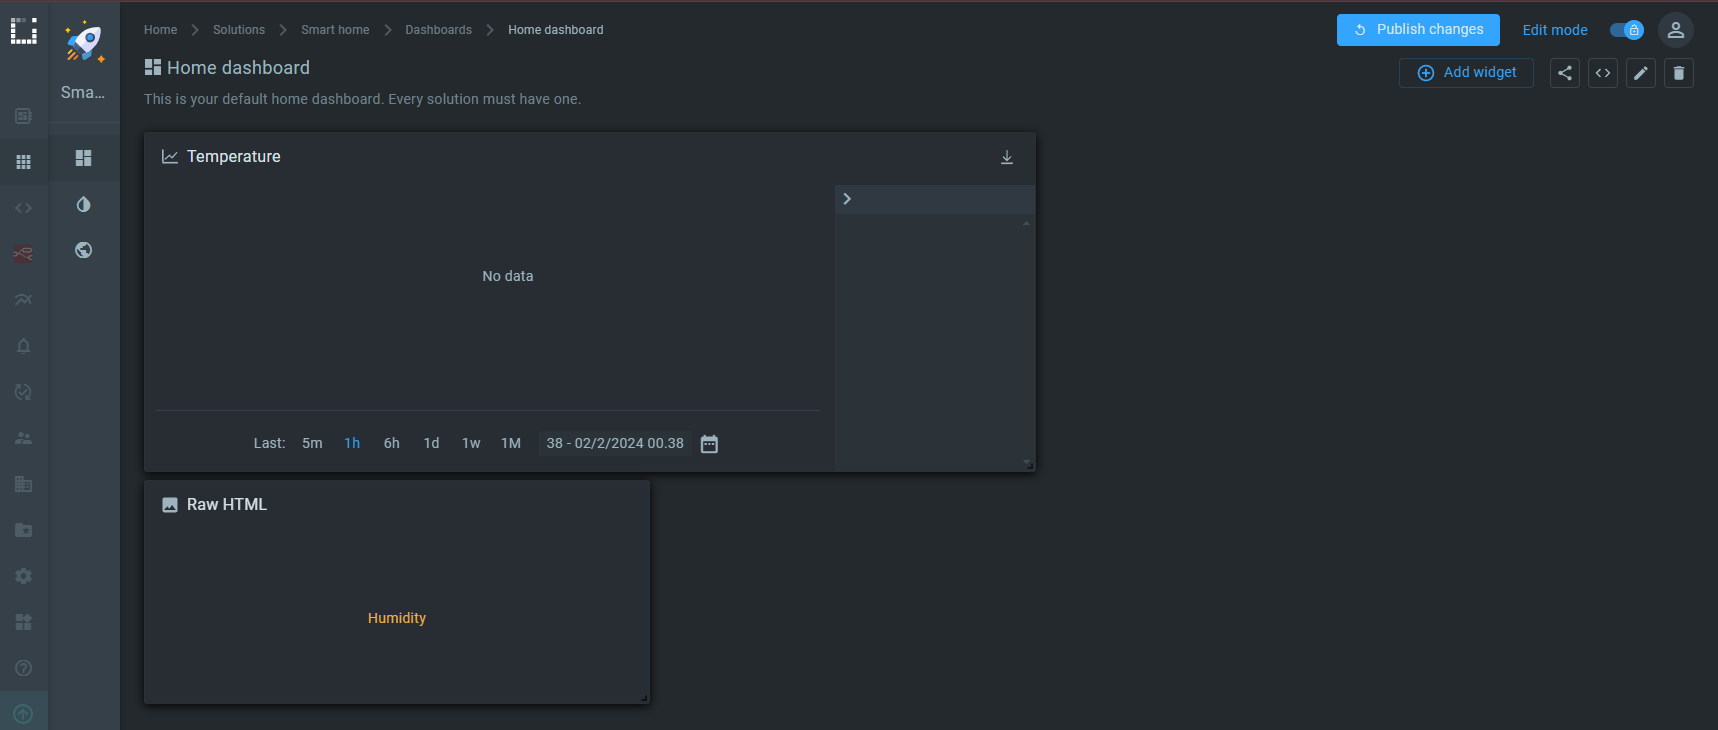
Congratulations, you have learned how to apply custom translation options to the Raw HTML widget.
5.2 Applying custom language settings to the Vega widgets
We've already looked at the “Raw HTML” widget, and now we're going to look at the Vega widgets. To do this, we need:
- Go to the "Solutions" tab
- Select the solution we need (for clarity, we will select the "Smart home" solution we created earlier)
- We are now on the list of dashboards. We need to select the dashboard we need (for clarity, we will select the "Home dashboard" dashboard we created earlier)
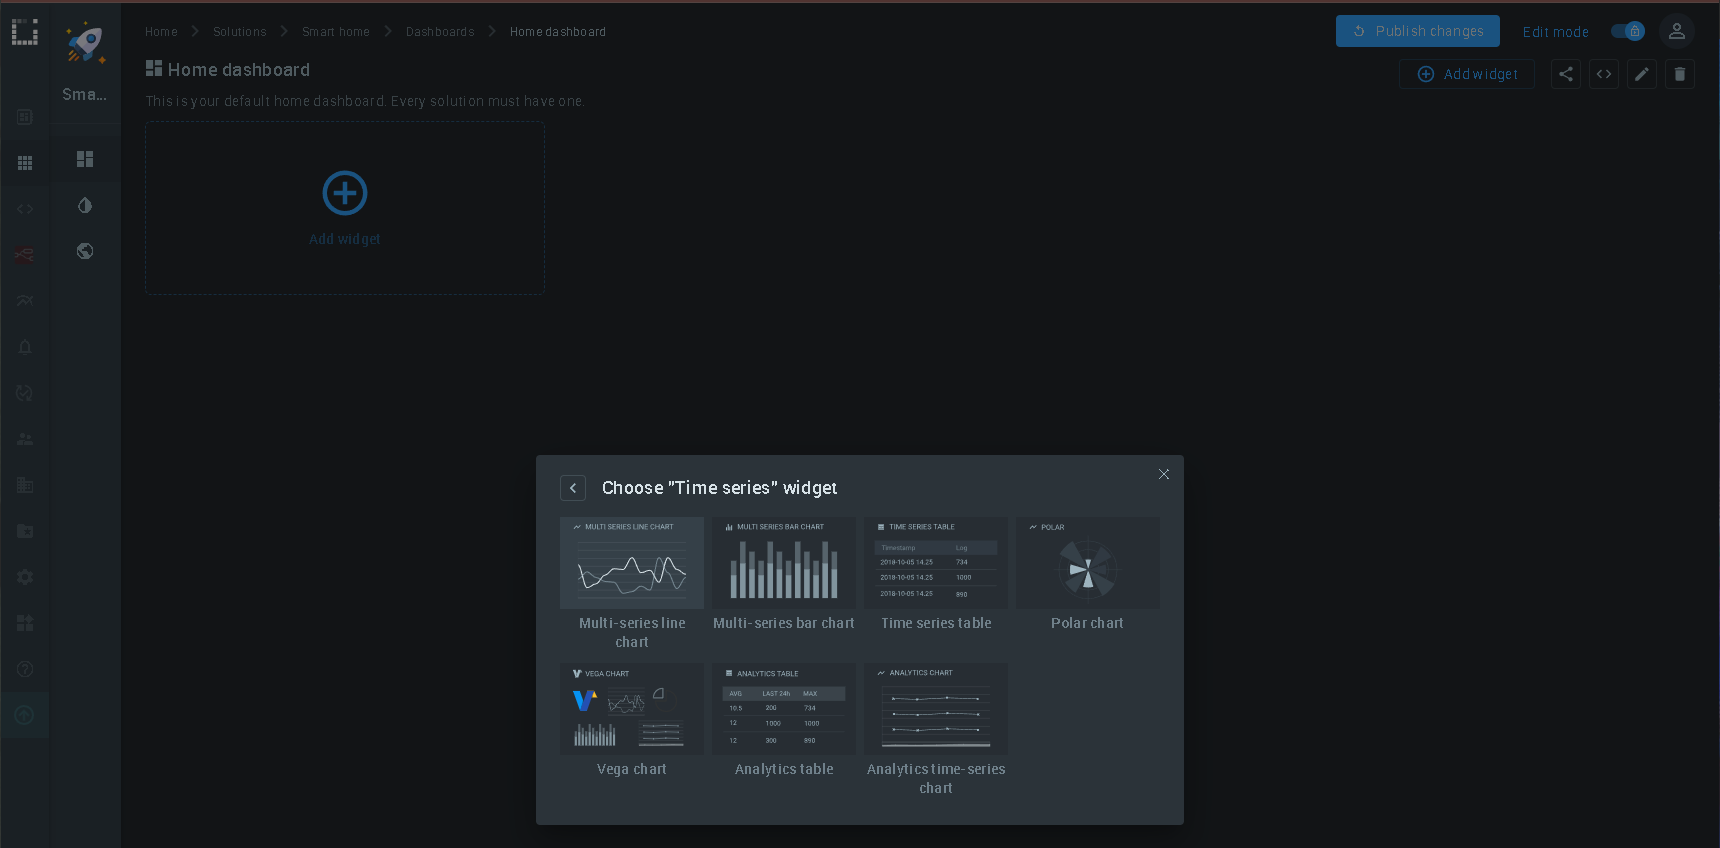
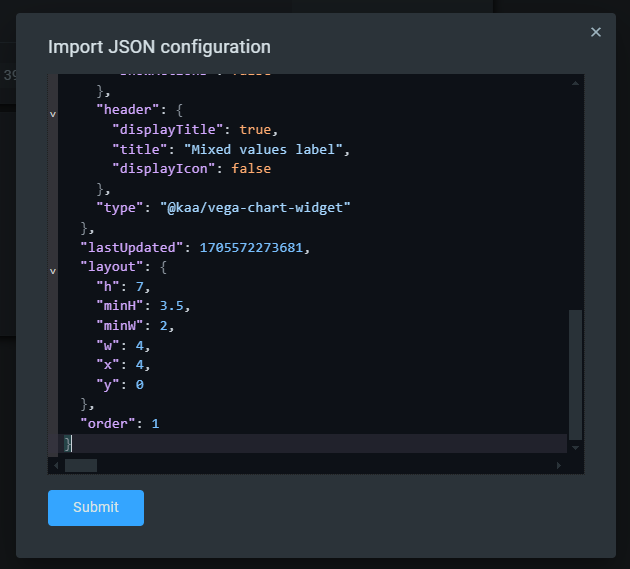
- Now let's create the "Vega" widget. To do this, in the upper right corner, find the widget with the icon of two triangular brackets, it is called "Import JSON configuration" (Note: if you do not see the button with the icon of two square brackets, make sure that the "Edit mode" switch in the upper right corner is in the active position). Click on this button
- You will see a pop-up window with a text field called "Import JSON configuration". We need to paste the config that is responsible for our widget into the text field of this popup. It looks like this:
{ "config": { "datasets": [ { "dataSource": "last-timeseries", "lastTsServiceInstanceName": "epts", "lastTsTimeseries": [ { "columnName": "Speed", "timeSeriesName": "auto~speed", "timeSeriesValue": "values.value" }, { "timeSeriesName": "tiers", "timeSeriesValue": "values.front_left" }, { "timeSeriesName": "tiers", "timeSeriesValue": "values.front_right" }, { "columnName": "Whhel", "timeSeriesName": "auto~wheel_pressure_fr", "timeSeriesValue": "values.value" } ], "name": "timeseries", "updateInterval": 10000 } ], "specification": "{\n \"$schema\": \"https://vega.github.io/schema/vega/v5.json\",\n \"padding\": 20,\n \"marks\": [\n {\n \"type\": \"rect\",\n \"encode\": {\n \"enter\": {\n \"x\": {\"signal\": \"0\"},\n \"y\": {\"signal\": \"height * 0.1\"},\n \"width\": {\"signal\": \"width\"},\n \"height\": {\"signal\": \"height * 0.8\"},\n \"fill\": {\"value\": \"#303942\"},\n \"cornerRadius\": {\"value\": 20}\n }\n }\n },\n {\n \"type\": \"text\",\n \"encode\": {\n \"enter\": {\n \"x\": {\"signal\": \"width / 2\"},\n \"y\": {\"signal\": \"height / 2\"},\n \"text\": {\"value\": \"Text\"},\n \"font\": {\"value\": \"Digital-7\"},\n \"fontSize\": {\"value\": 30},\n \"align\": {\"value\": \"center\"},\n \"baseline\": {\"value\": \"middle\"},\n \"fill\": {\"value\": \"white\"}\n }\n }\n }\n ]\n}\n", "appearance": { "showActions": false }, "header": { "displayTitle": true, "title": "Mixed values label", "displayIcon": false }, "type": "@kaa/vega-chart-widget" }, "lastUpdated": 1705572273681, "layout": { "h": 7, "minH": 3.5, "minW": 2, "w": 4, "x": 4, "y": 0 }, "order": 1 } - After you paste the code, click the "Submit" button.
- You now have a shortcut to a new widget. To apply the custom translation settings to it, move the cursor over it and click the button with the pencil icon called "Edit"
- You will see a window called "Edit "Mixed values label" configuration", we need a text box called "Vega specification" to make changes to the code that is in it. This code looks like this:
{
  "$schema": "https://vega.github.io/schema/vega/v5.json",
  "padding": 20,
  "marks": [
	{
  	"type": "rect",
  	"encode": {
    	"enter": {
      	"x": {"signal": "0"},
      	"y": {"signal": "height * 0.1"},
      	"width": {"signal": "width"},
      	"height": {"signal": "height * 0.8"},
      	"fill": {"value": "#303942"},
      	"cornerRadius": {"value": 20}
    	}
  	}
	},
	{
  	"type": "text",
  	"encode": {
    	"enter": {
      	"x": {"signal": "width / 2"},
      	"y": {"signal": "height / 2"},
      	"text": {"value": "Text"},
      	"font": {"value": "Digital-7"},
      	"fontSize": {"value": 30},
      	"align": {"value": "center"},
      	"baseline": {"value": "middle"},
      	"fill": {"value": "white"}
    	}
  	}
	}
  ]
}
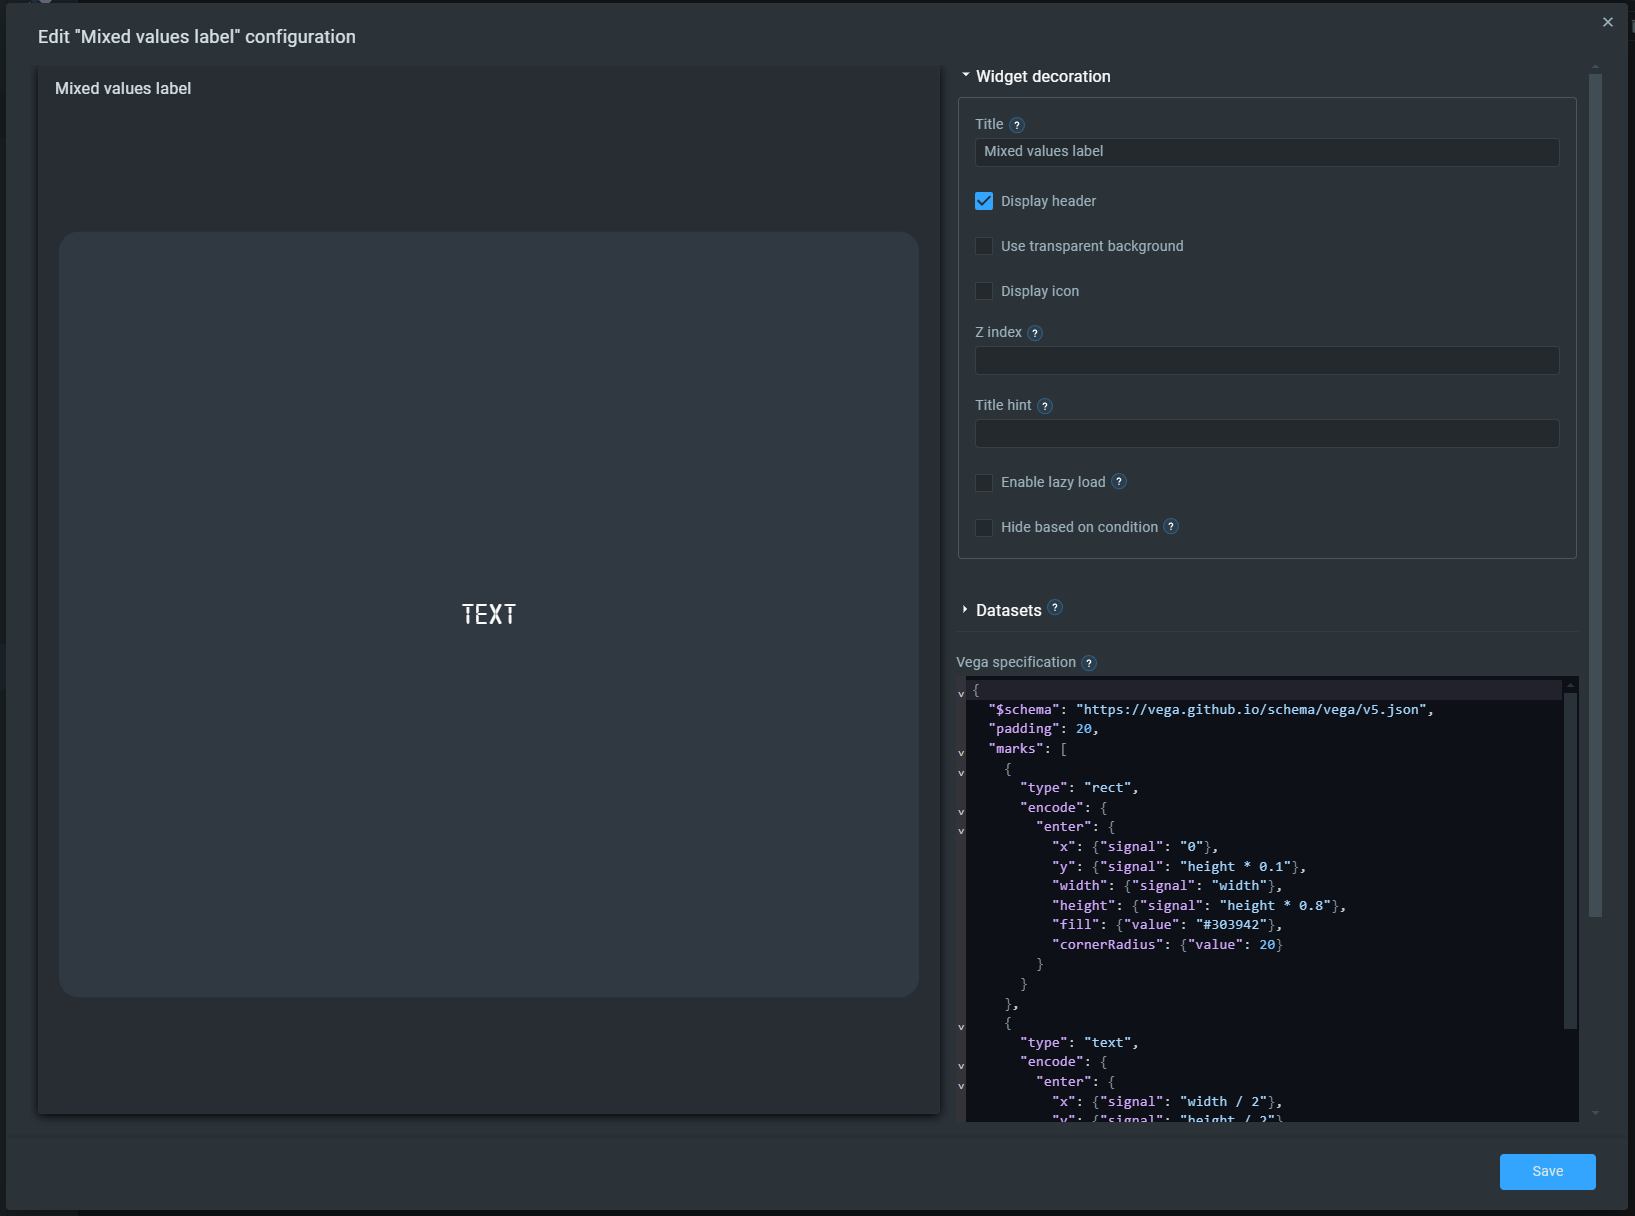
- In this code, we need to find the string that is responsible for the text displayed on the widget, namely ""text": {"value": "Text"},". We need to call the "translate" function. To do this, make the following changes to this line:
"text": {"signal": "translate('custom.humidity')"},
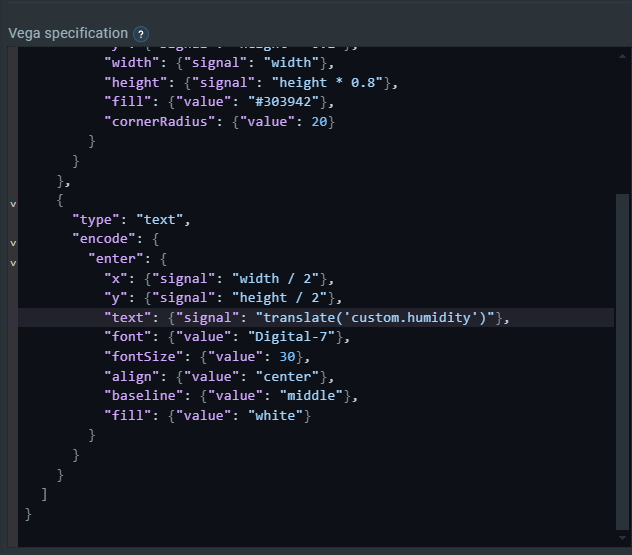
- Click the "Save" button to save the changes
- After saving, when you are on your dashboard page (in our case, it's "Home dashboard"), click on the "Publish changes" button to make our settings take effect

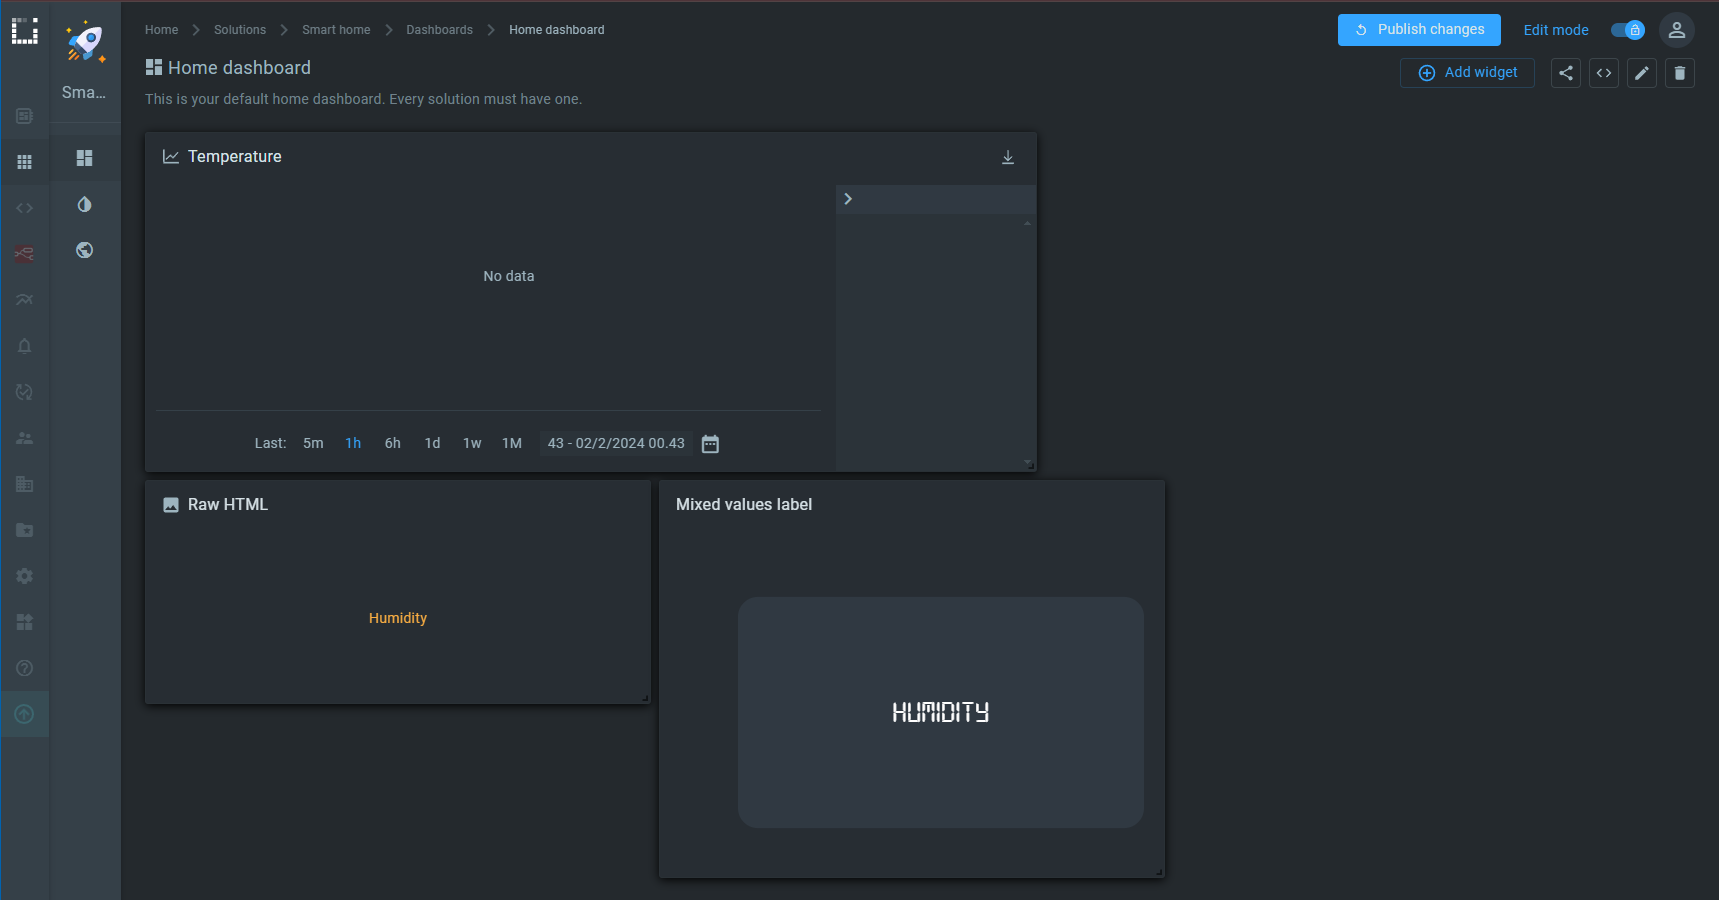
Great, you were able to apply custom translation options to the “Vega” widget.
Conclusion
Congratulations! You've now learned how to utilize the Custom Translations & Language Settings feature on the Kaa IoT platform to develop more inclusive and user-friendly applications. By incorporating various languages, custom fonts, and text direction options, you can expand your reach to a wider audience and improve the accessibility of your IoT solutions.
Remember, effective localization goes beyond simple translation. It's about adapting your application to the cultural and linguistic nuances of your target audience. With Kaa's flexible customization tools, you can customize every aspect of your IoT projects to meet the specific requirements of diverse users worldwide.
We hope this tutorial has empowered you to unlock the full potential of your IoT applications by utilizing custom translations and language settings. As you continue to develop and deploy your projects on the Kaa IoT platform, feel free to explore additional customization options and stay updated on new features and enhancements.
Thank you for joining us on this journey to create more inclusive and accessible IoT solutions with Kaa!
Related Stories

KaaIoT and ELSYS join forces to bring robust smart building solutions with real-time climate monitoring.

Exciting news! KaaIoT has teamed up with Roomsys to promote smart building management IoT solutions!

The KaaIoT and Sensative partnership tackles a common challenge: water & oil leaks.

Seeed offers a wide range of IoT hardware products. This article explores how KaaIoT and Seeed are joining...