
Can your network handle the constant chatter of millions of chatty devices? With a powerful IoT device management solution, you can realize the full potential of next-generation infrastructure.
The surge in IoT devices has changed the telecom landscape by pushing the limits of network infrastructure capabilities. With millions of devices at scale, managing this traffic and maintaining stable performance and reliability is a tough row. Robust IoT device management solutions can greatly help telecom companies that want to handle ever-increasing loads more effectively.
This tutorial will show you how to use the Kaa Cloud for effective IoT device management in enterprise networking, specifically with the MikroTik Knot LR 8 Kit. We will also discuss how IoT works with telecom and how the Kaa IoT platform can benefit telcos.
MQTT and HTTP are widely used protocols for transferring various data types in IoT setups, supported by RouterOS. This tutorial will guide you through connecting a MikroTik RB1100AHx4 router to the Kaa IoT platform, allowing you to post data via these protocols and visualize it on a dashboard. Follow these steps to ensure a smooth setup.
Prerequisites
1) Kaa Cloud account.
Check out the Kaa tutorial on connecting your first device to learn more about the main concepts of the Kaa IoT platform.
2) Connected MikroTik Knot LR 8 to the power adapter and your LAN network.
MikroTik Knot LR 8 Kit review
The KNOT LR8 kit is a turnkey IoT gateway solution for LoRa technology. It utilizes Narrow Band and CAT-M technologies. It can be used as a backup connection for Ethernet or as a control channel for your network.
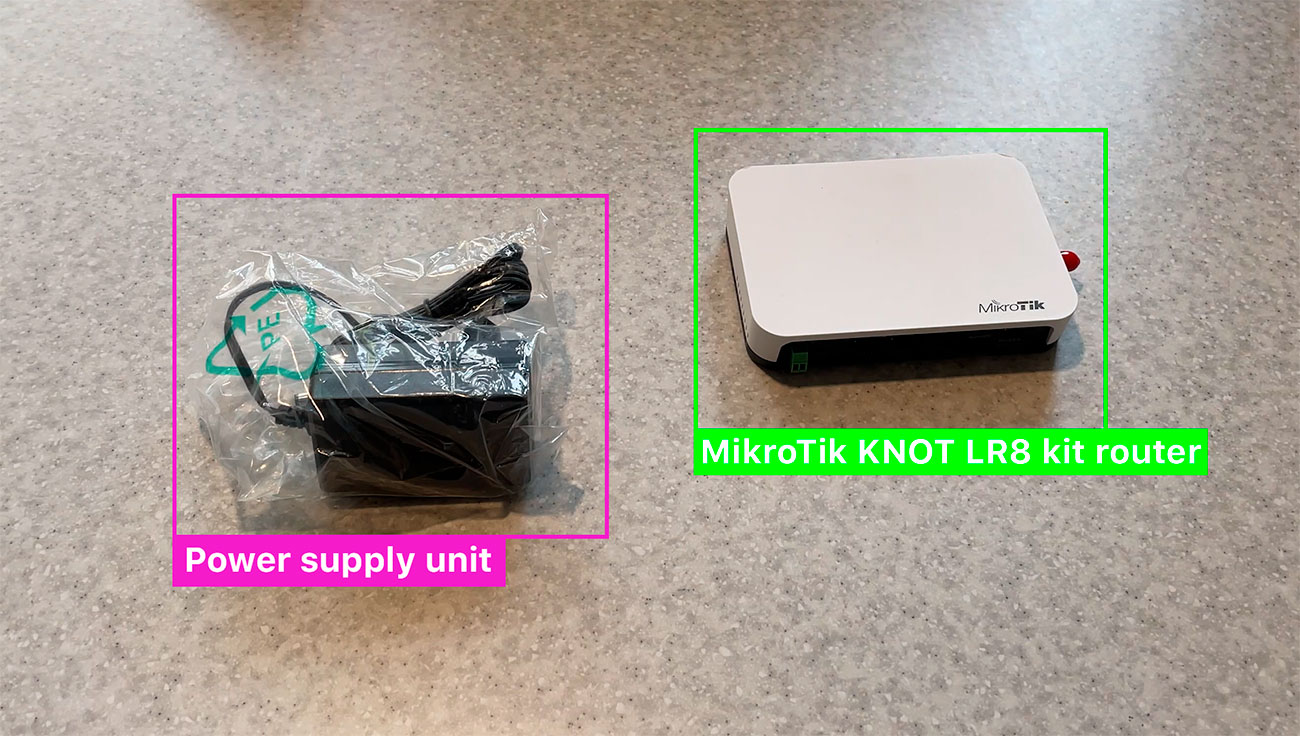
As you can see, the set includes a MikroTik router and a power adapter.
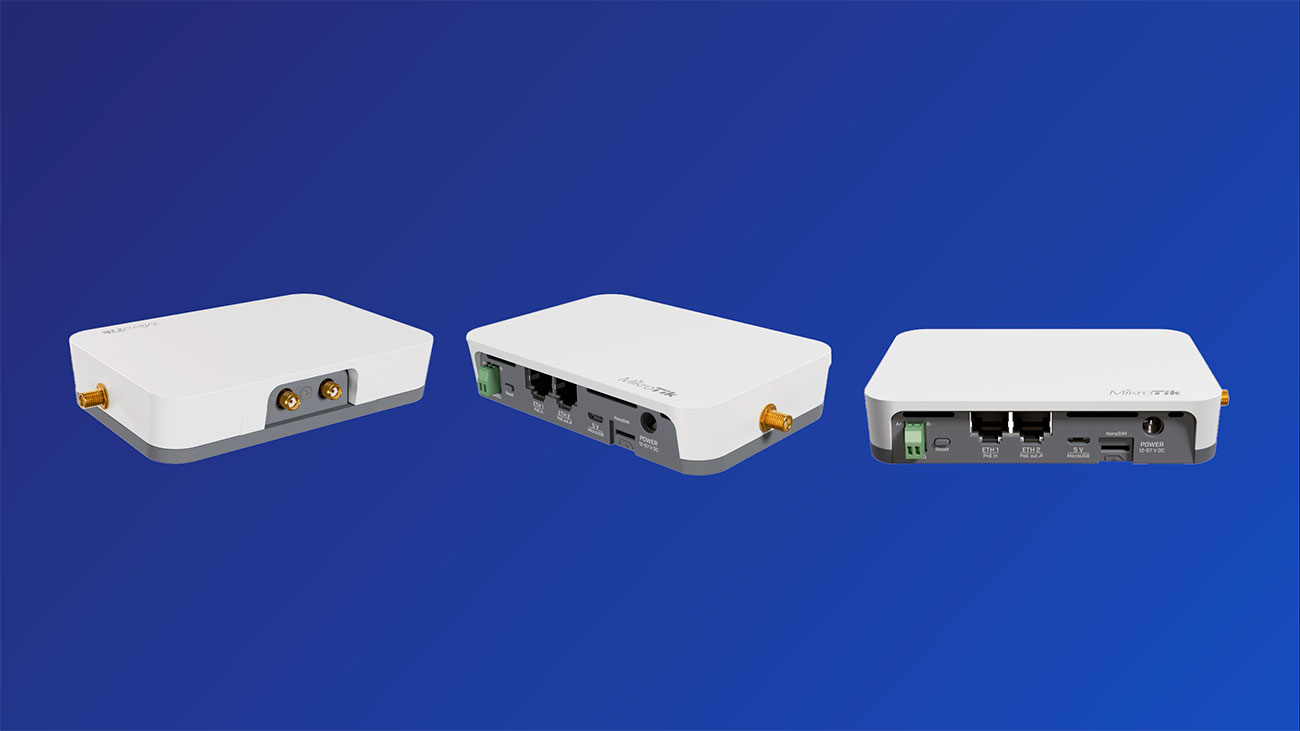
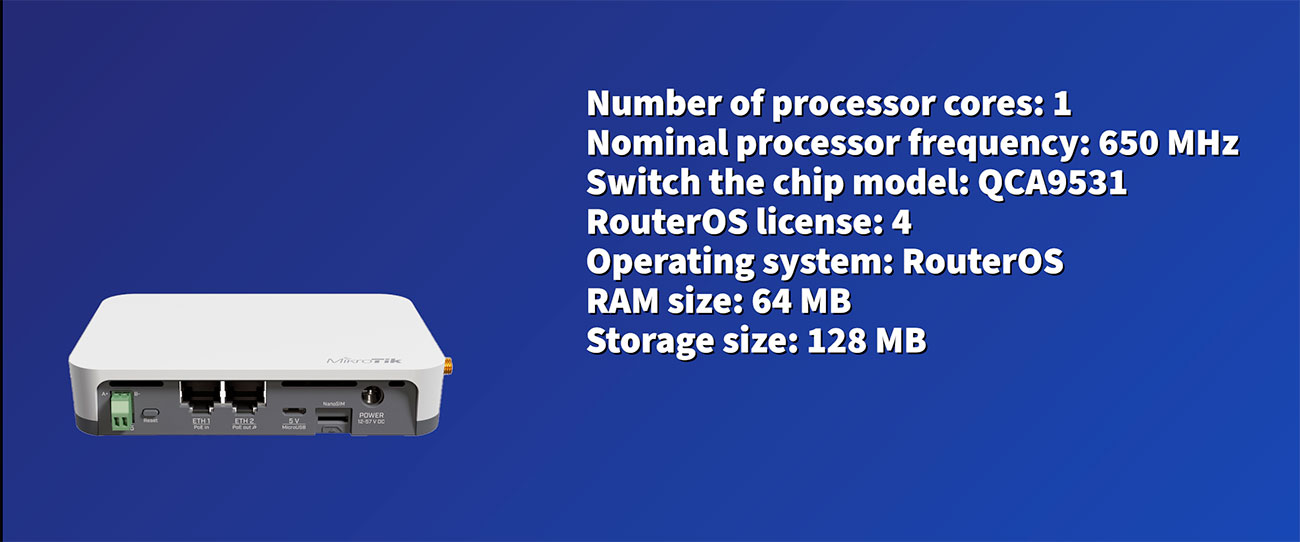
KNOT is a flexible and convenient solution for creating an IoT ecosystem. This router has the following parameters:
- Number of processor cores: 1
- Nominal processor frequency: 650 MHz
- Switch the chip model: QCA9531
- RouterOS license: 4
- Operating system: RouterOS
- RAM size: 64 MB
- Storage size: 128 MB
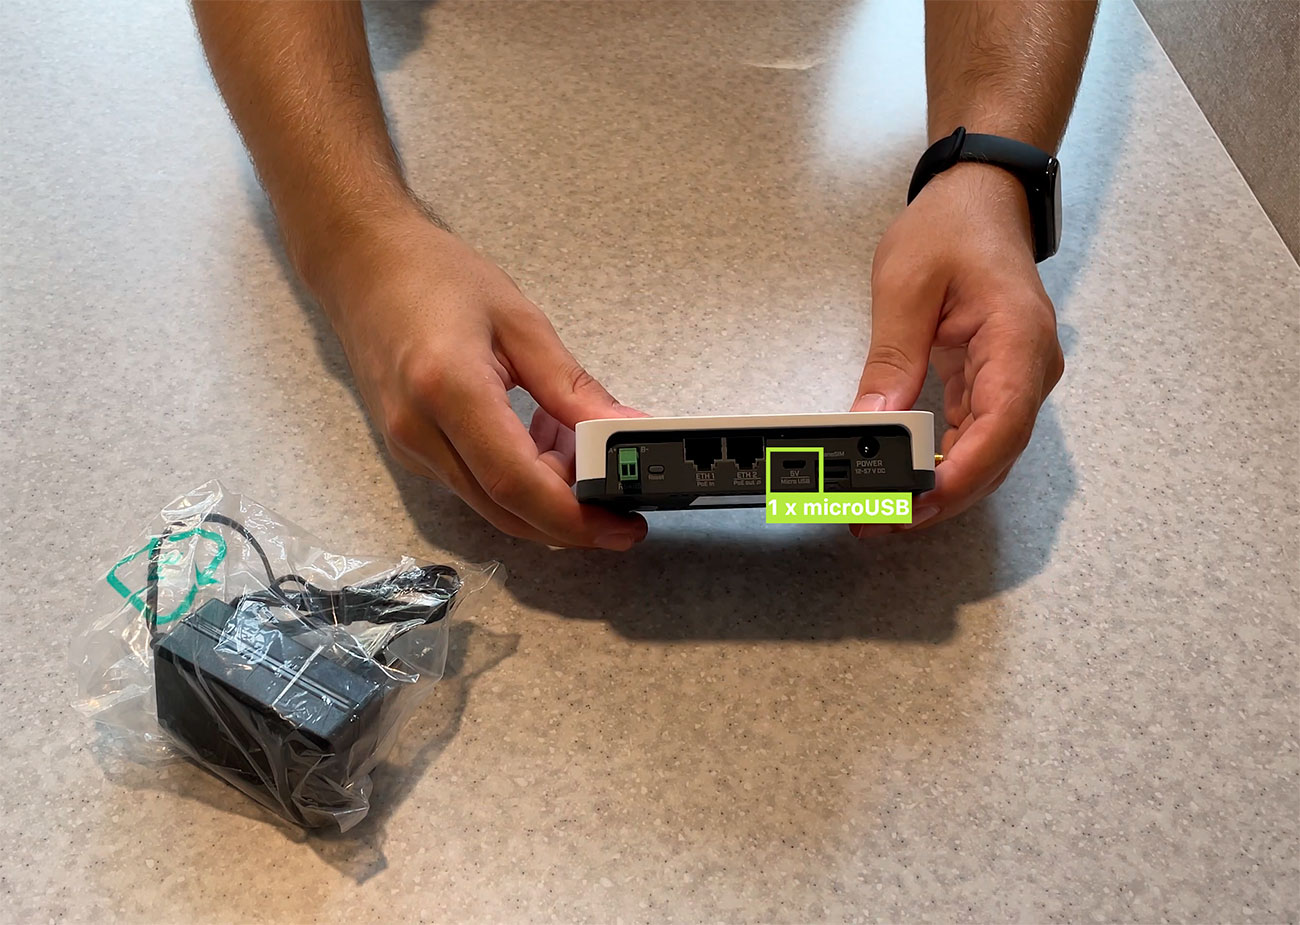
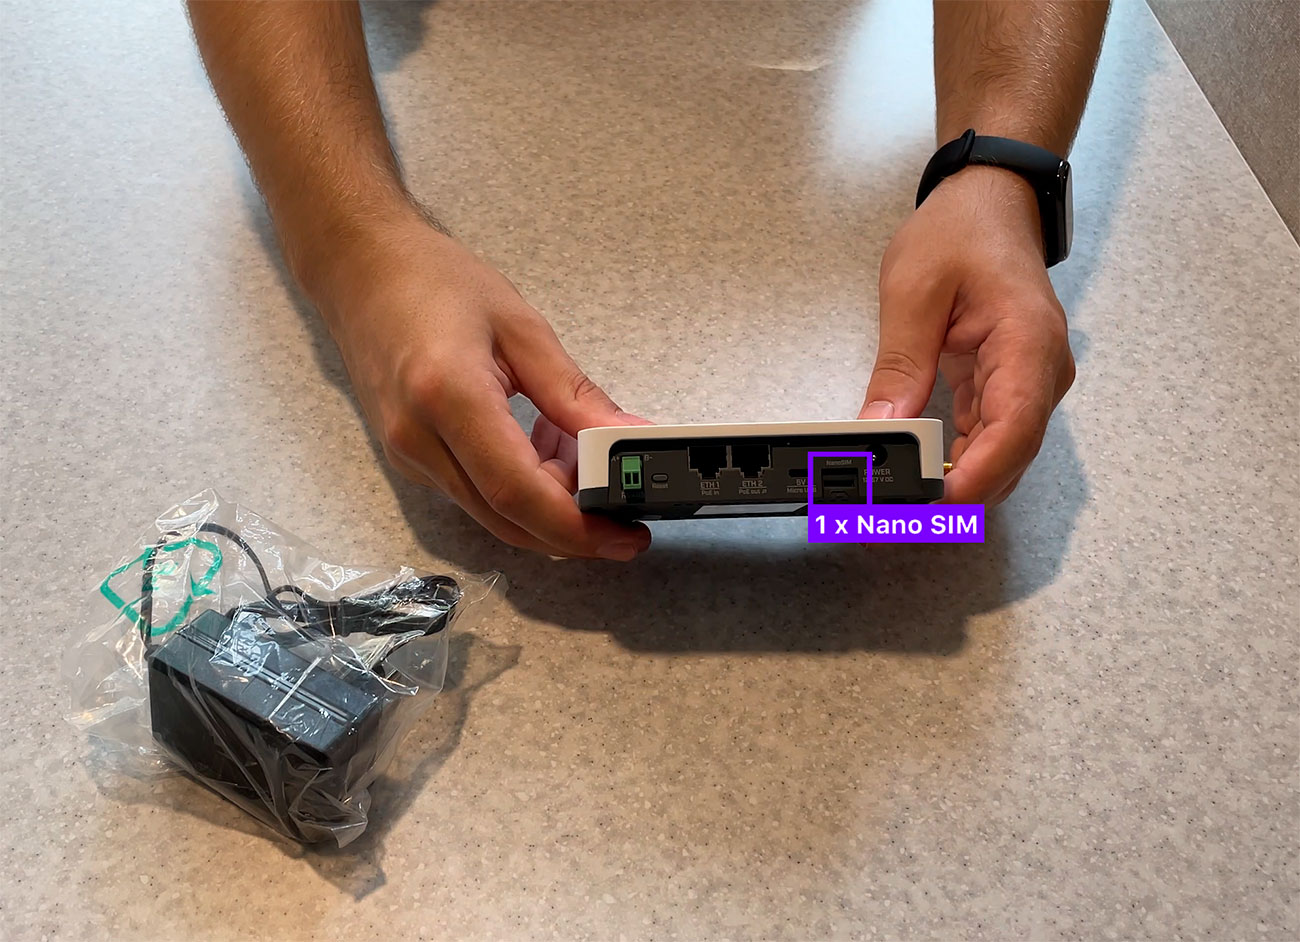
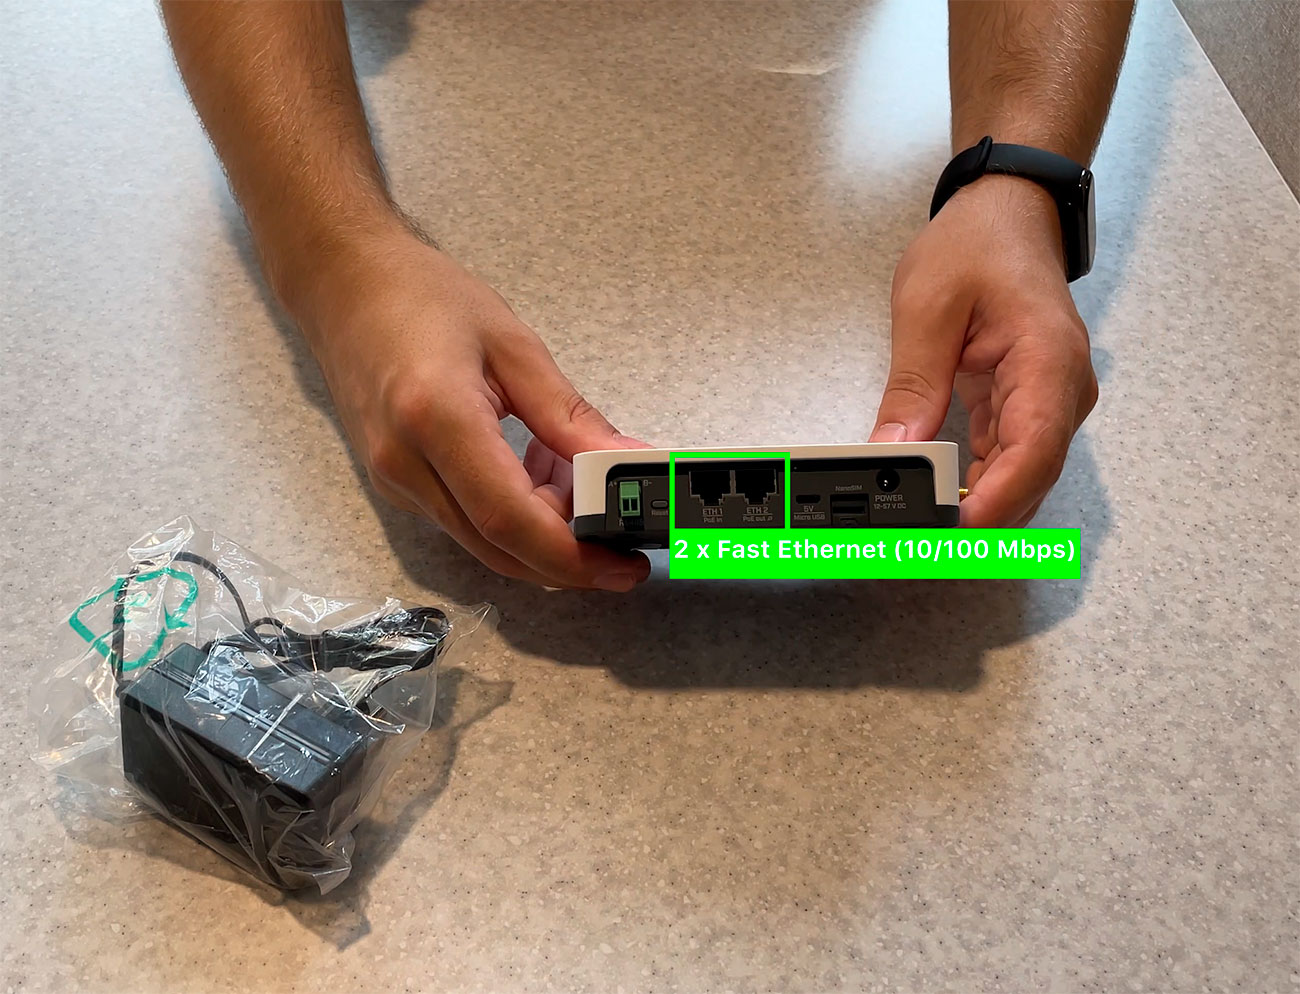
Now let's pay attention to the device interface. The device has one micro USB connector, one Nano-SIM connector, and two Ethernet ports.
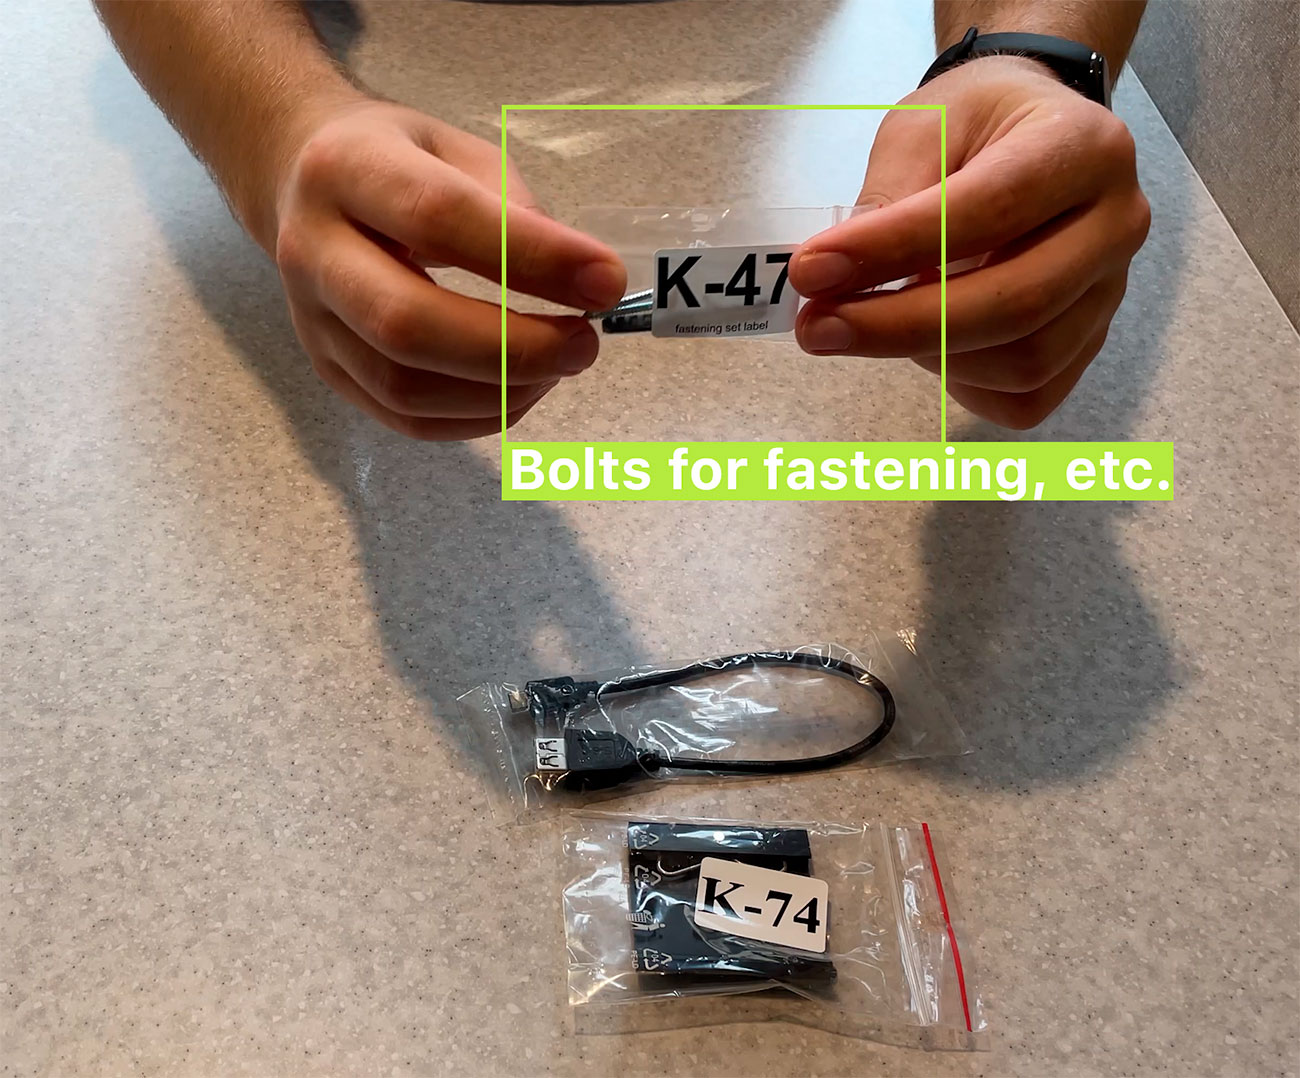
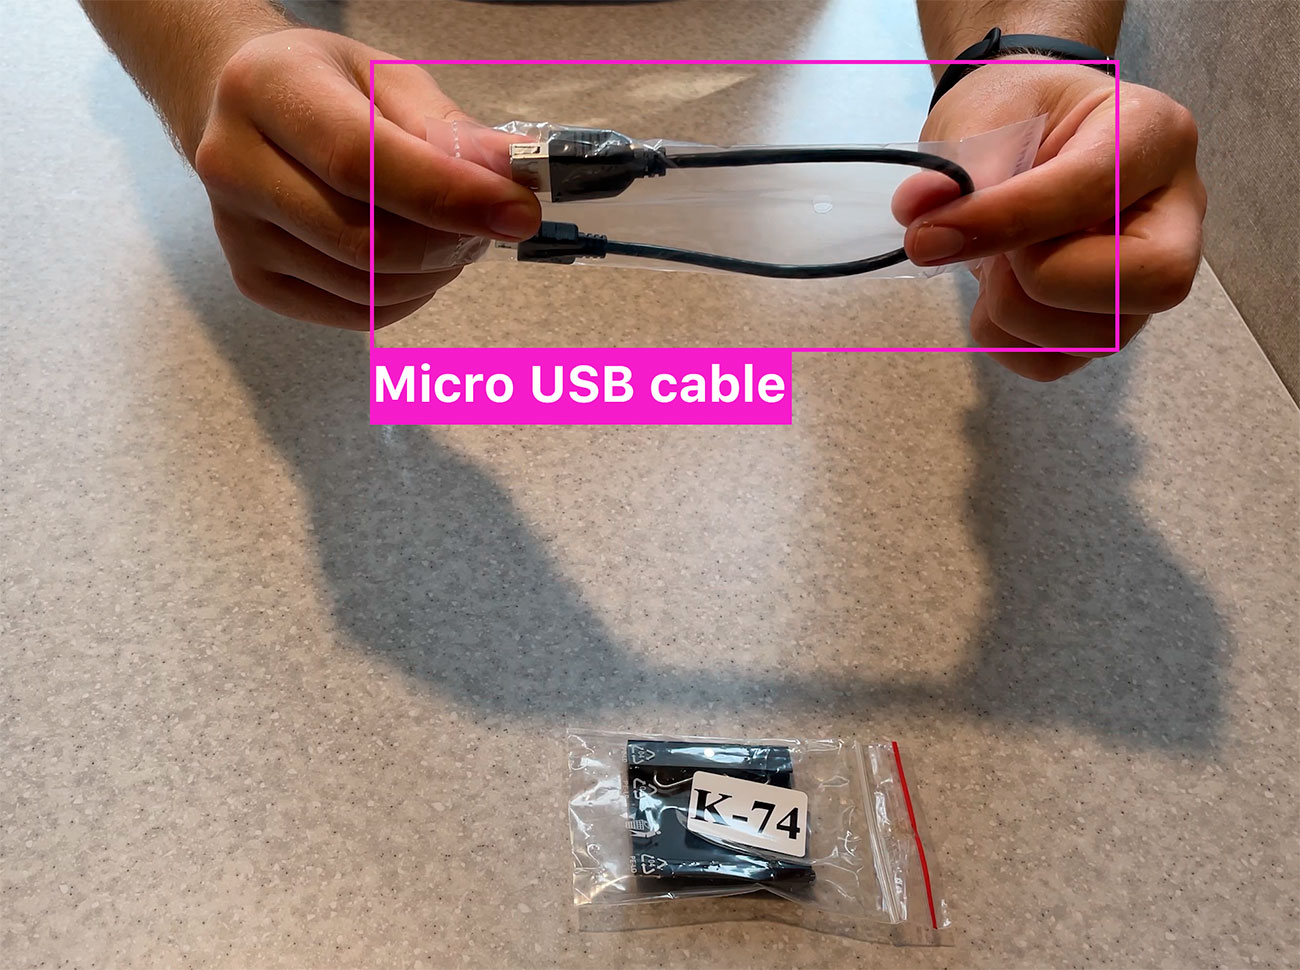

The router also comes with mounting bolts, a micro USB cable, and a Din-rail mount.
Creating the solution on Kaa Cloud
Step 1: After you have read the necessary information and fulfilled all the prerequisites in the “Prerequisites” section, go to the Kaa Cloud and select the Solutions tab.
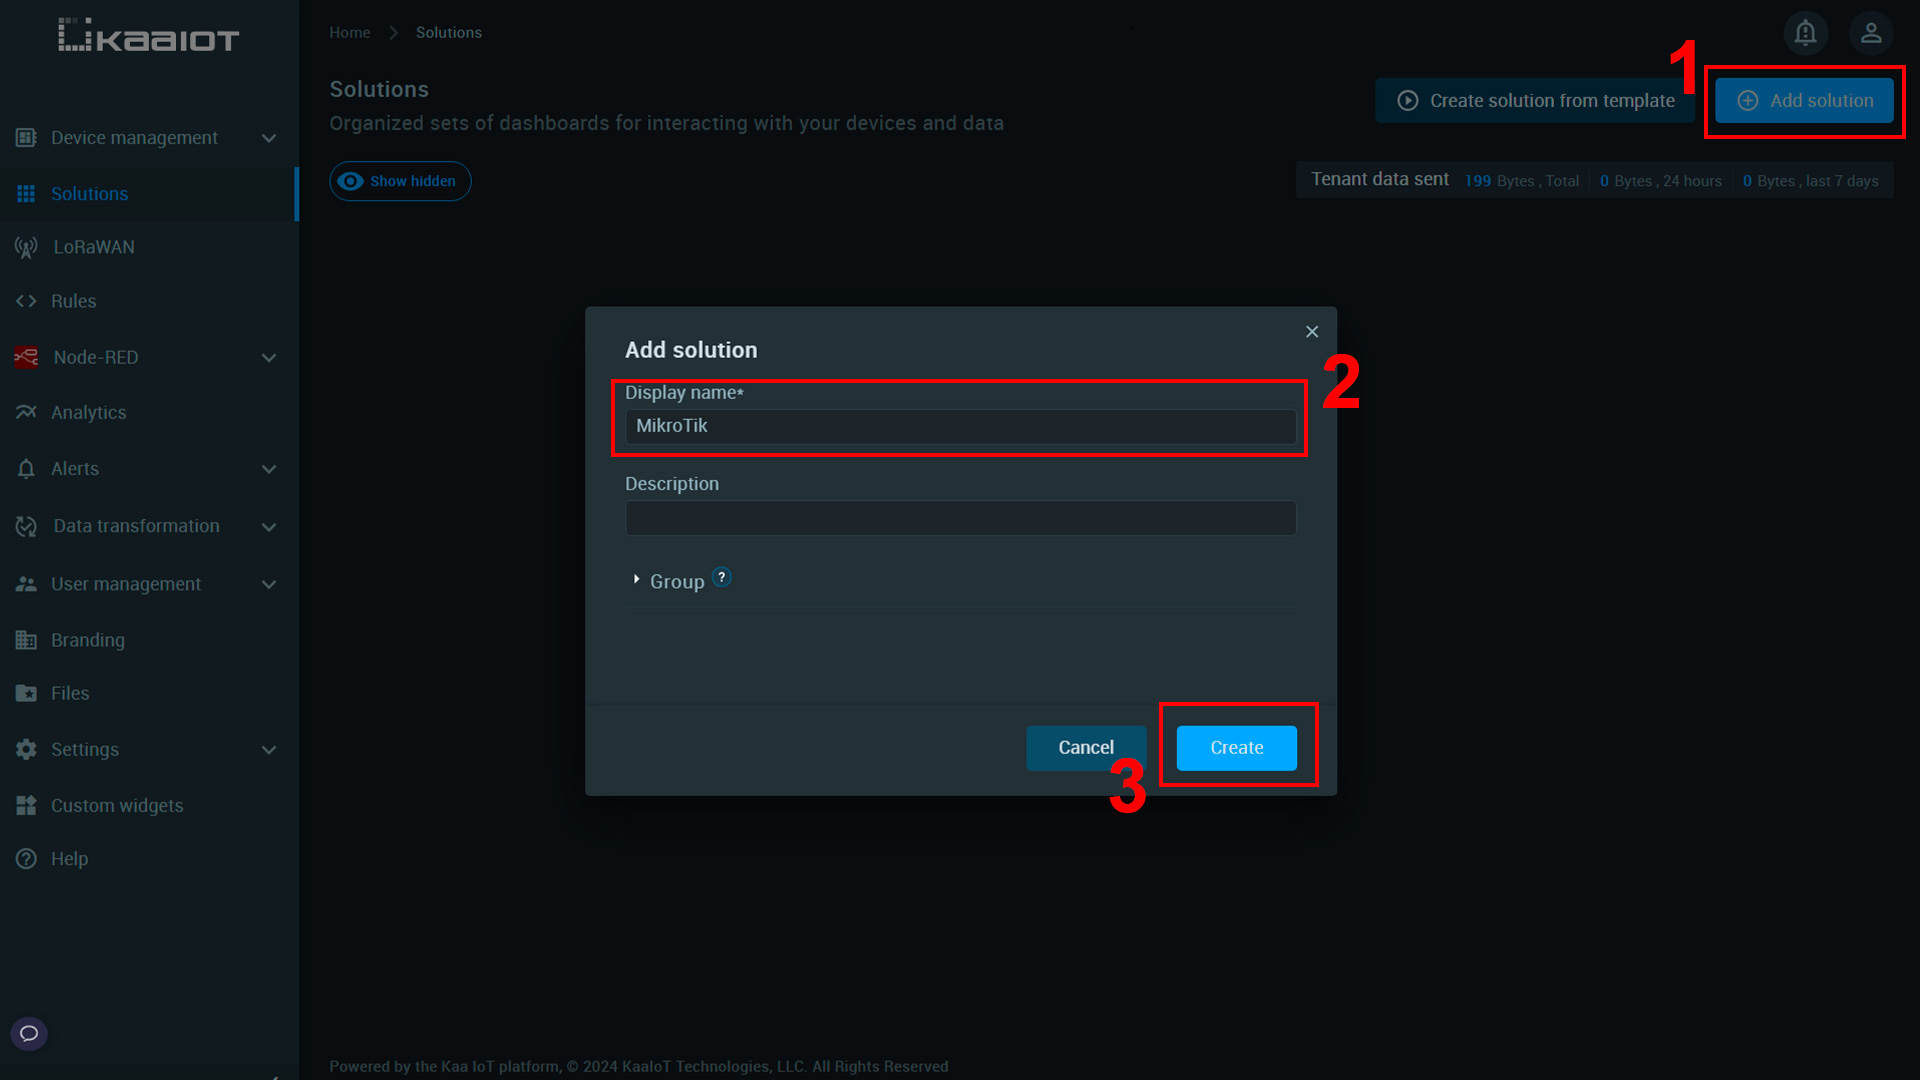
Step 2: Create a new solution and name it. For example, we will name our solution “MikroTik”. Then click “Create”.
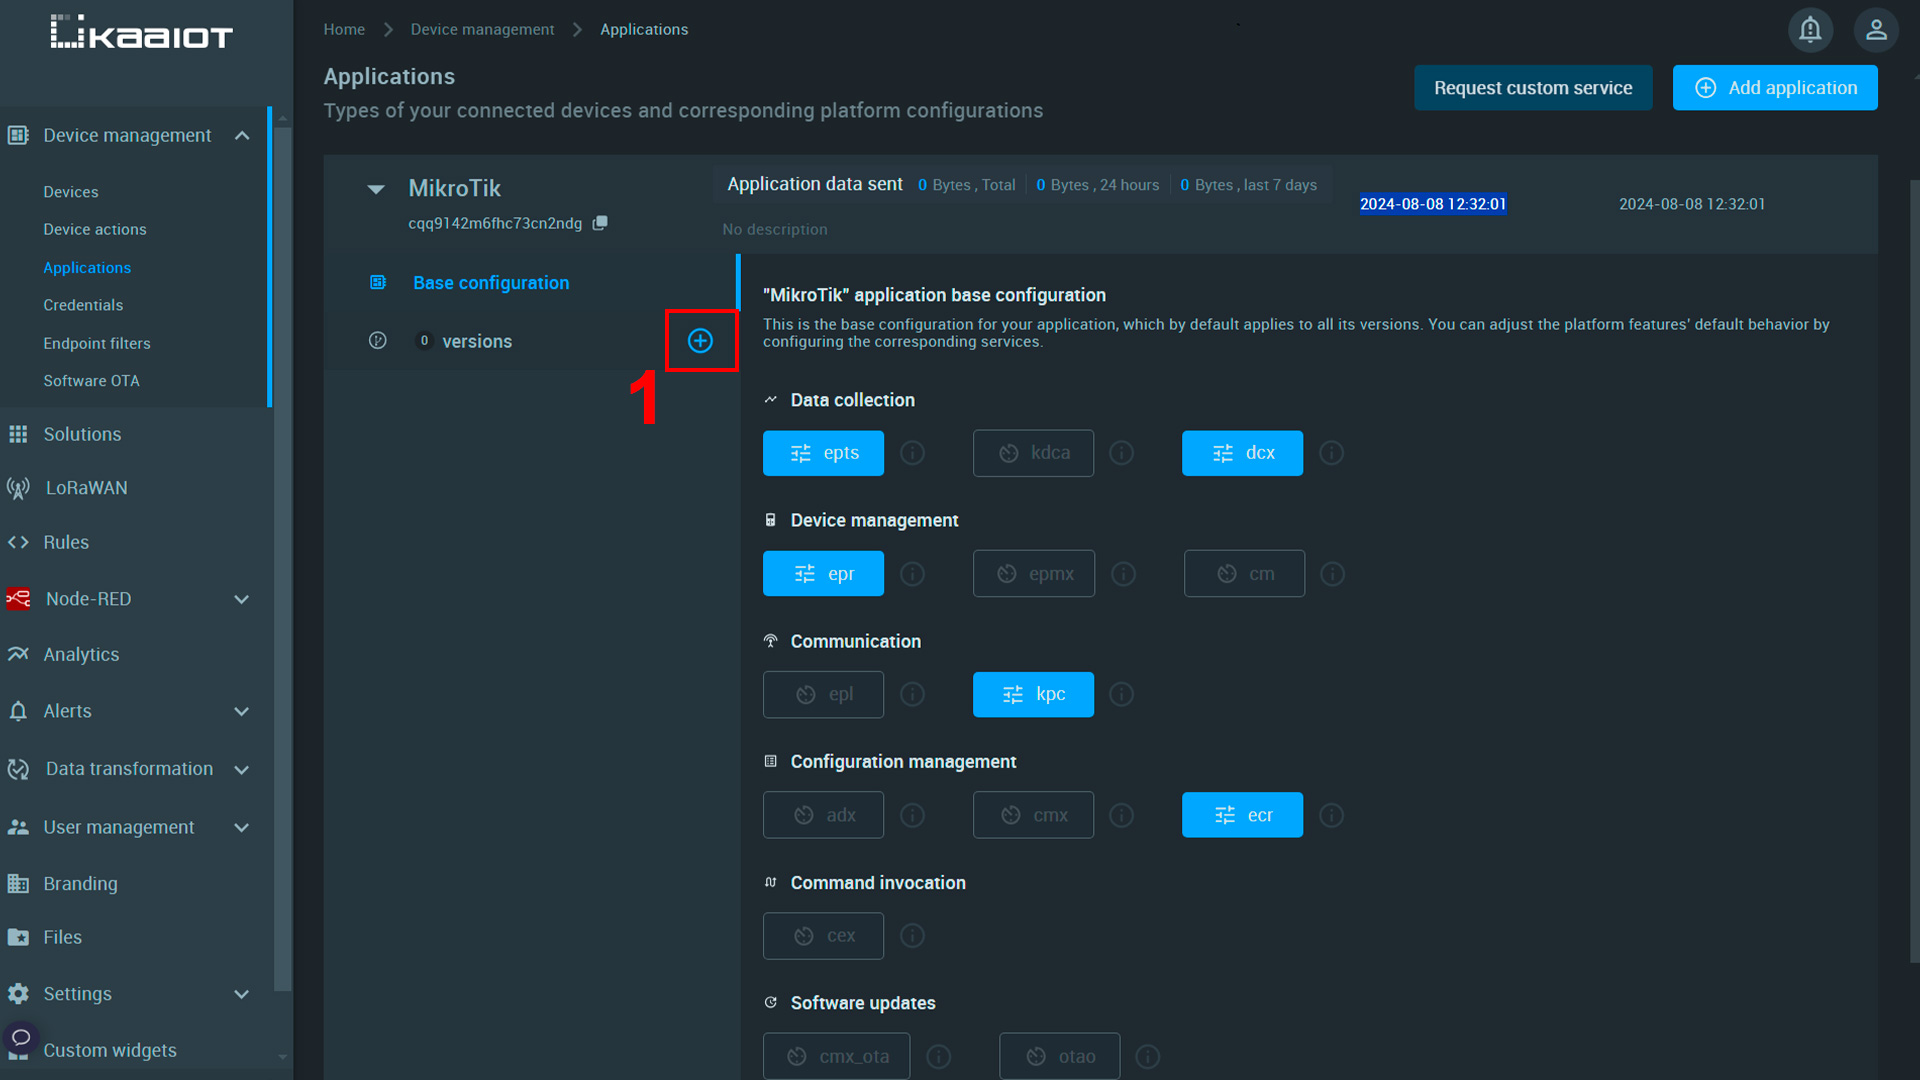
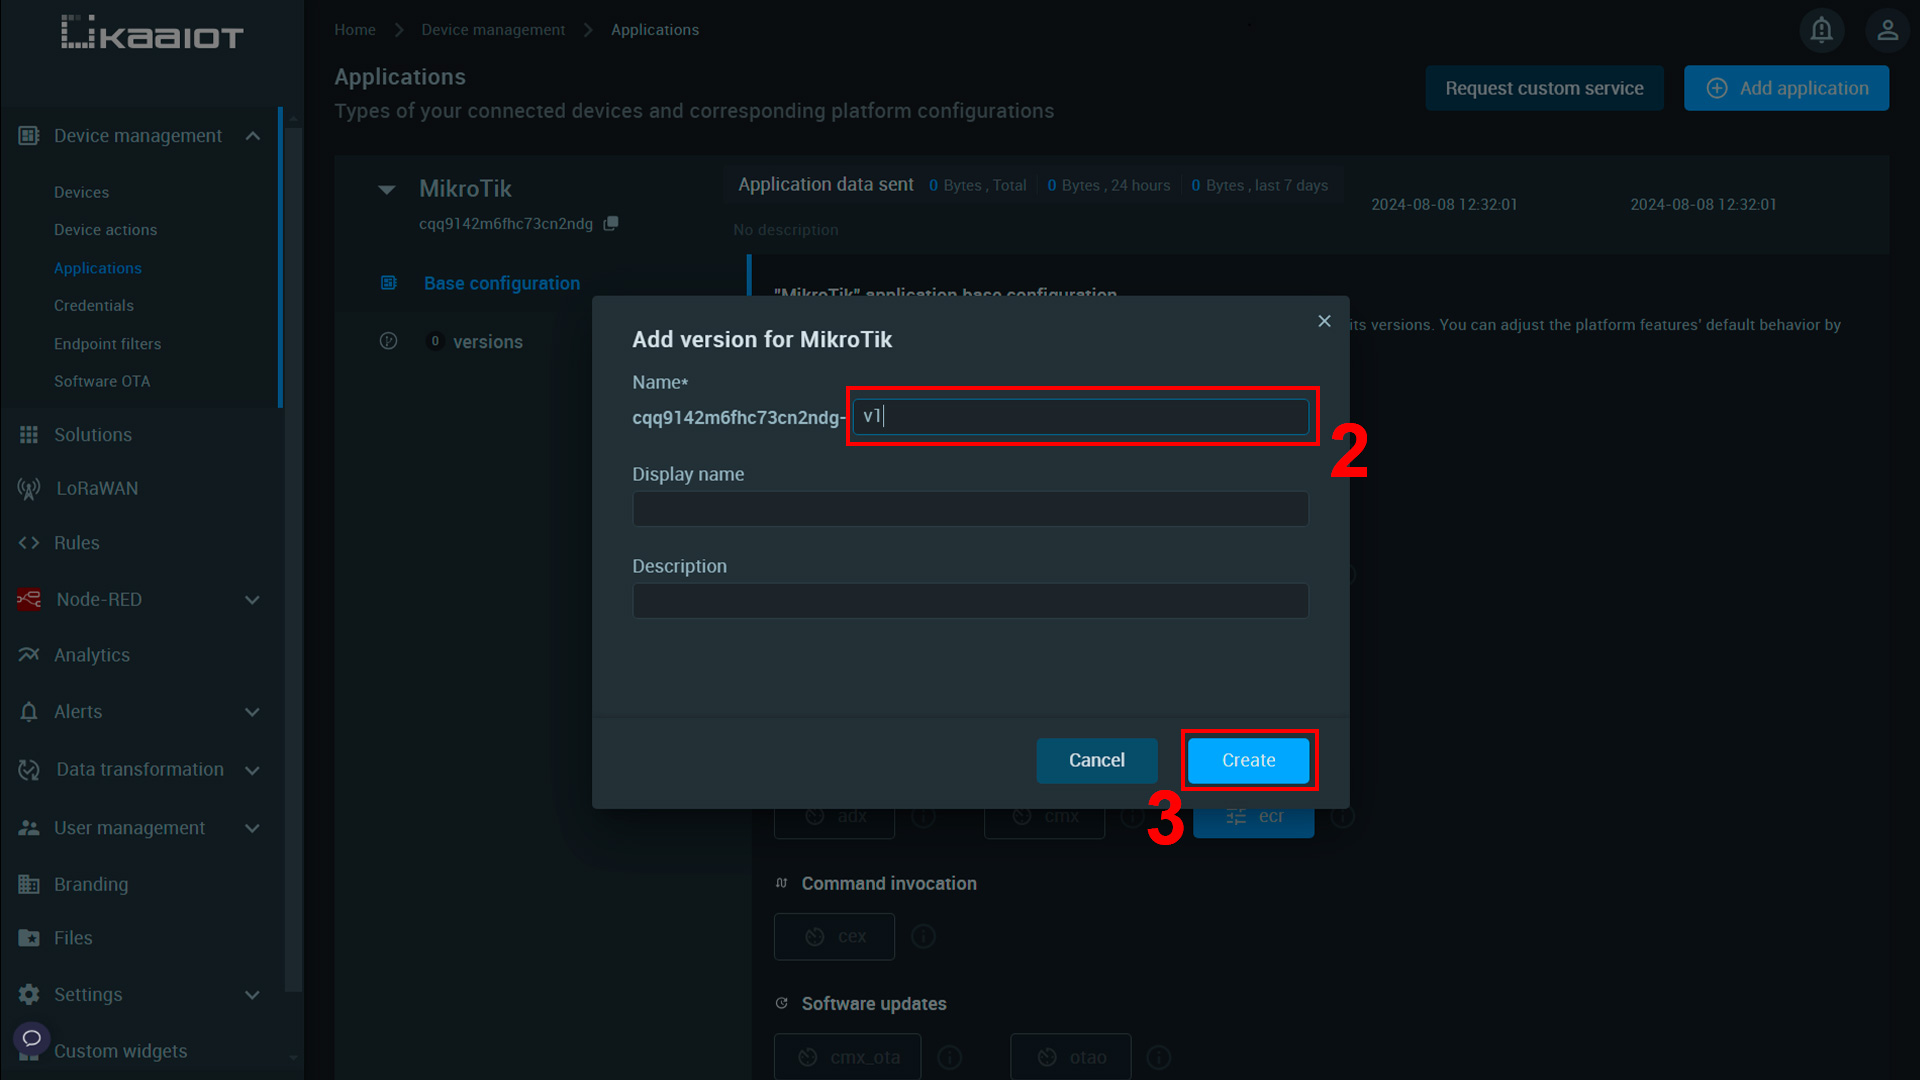
Step 3: Next, you need to go to the list of your applications, select your solution (in our case, MikroTik), and specify the version of the program. For example, we will specify “v1” - version 1. After that, click "Create".
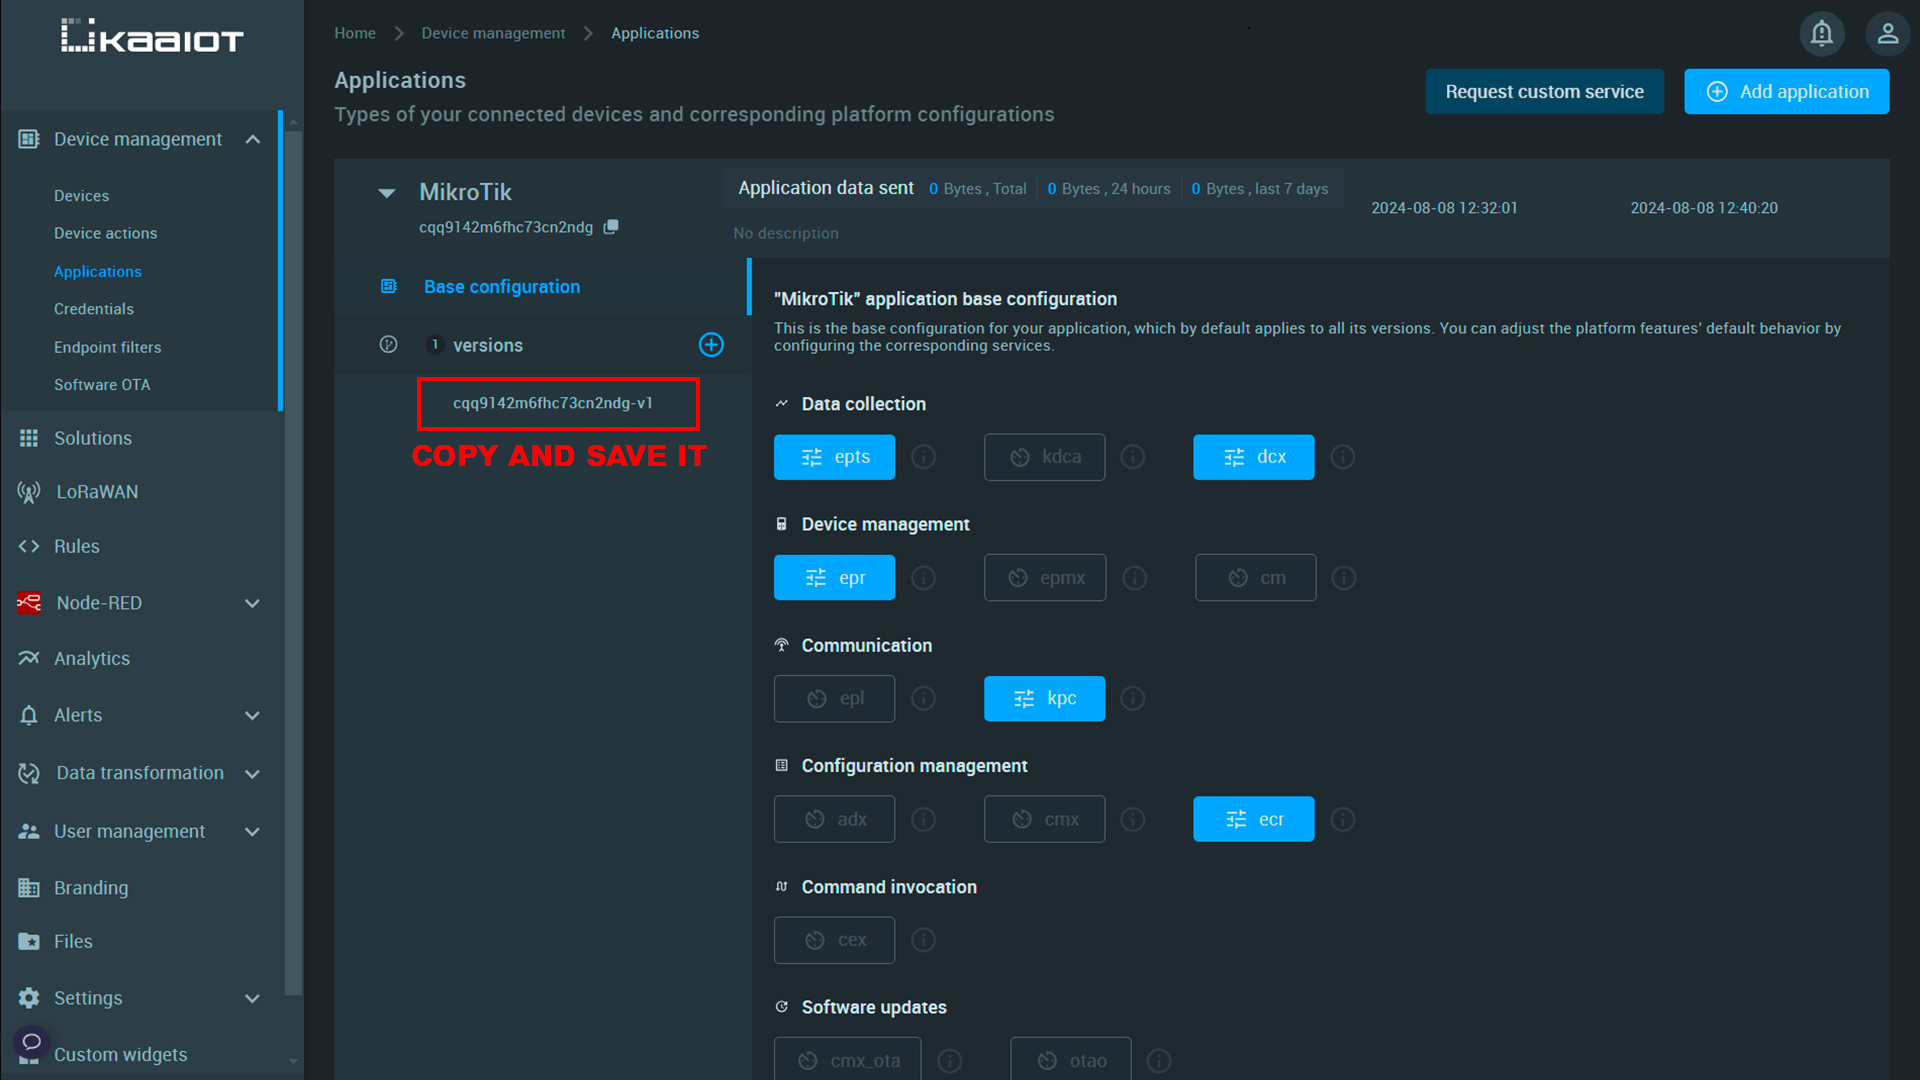
Step 4: Copy the version of the command, as this is the <app-version> value that we will need in further configuration.
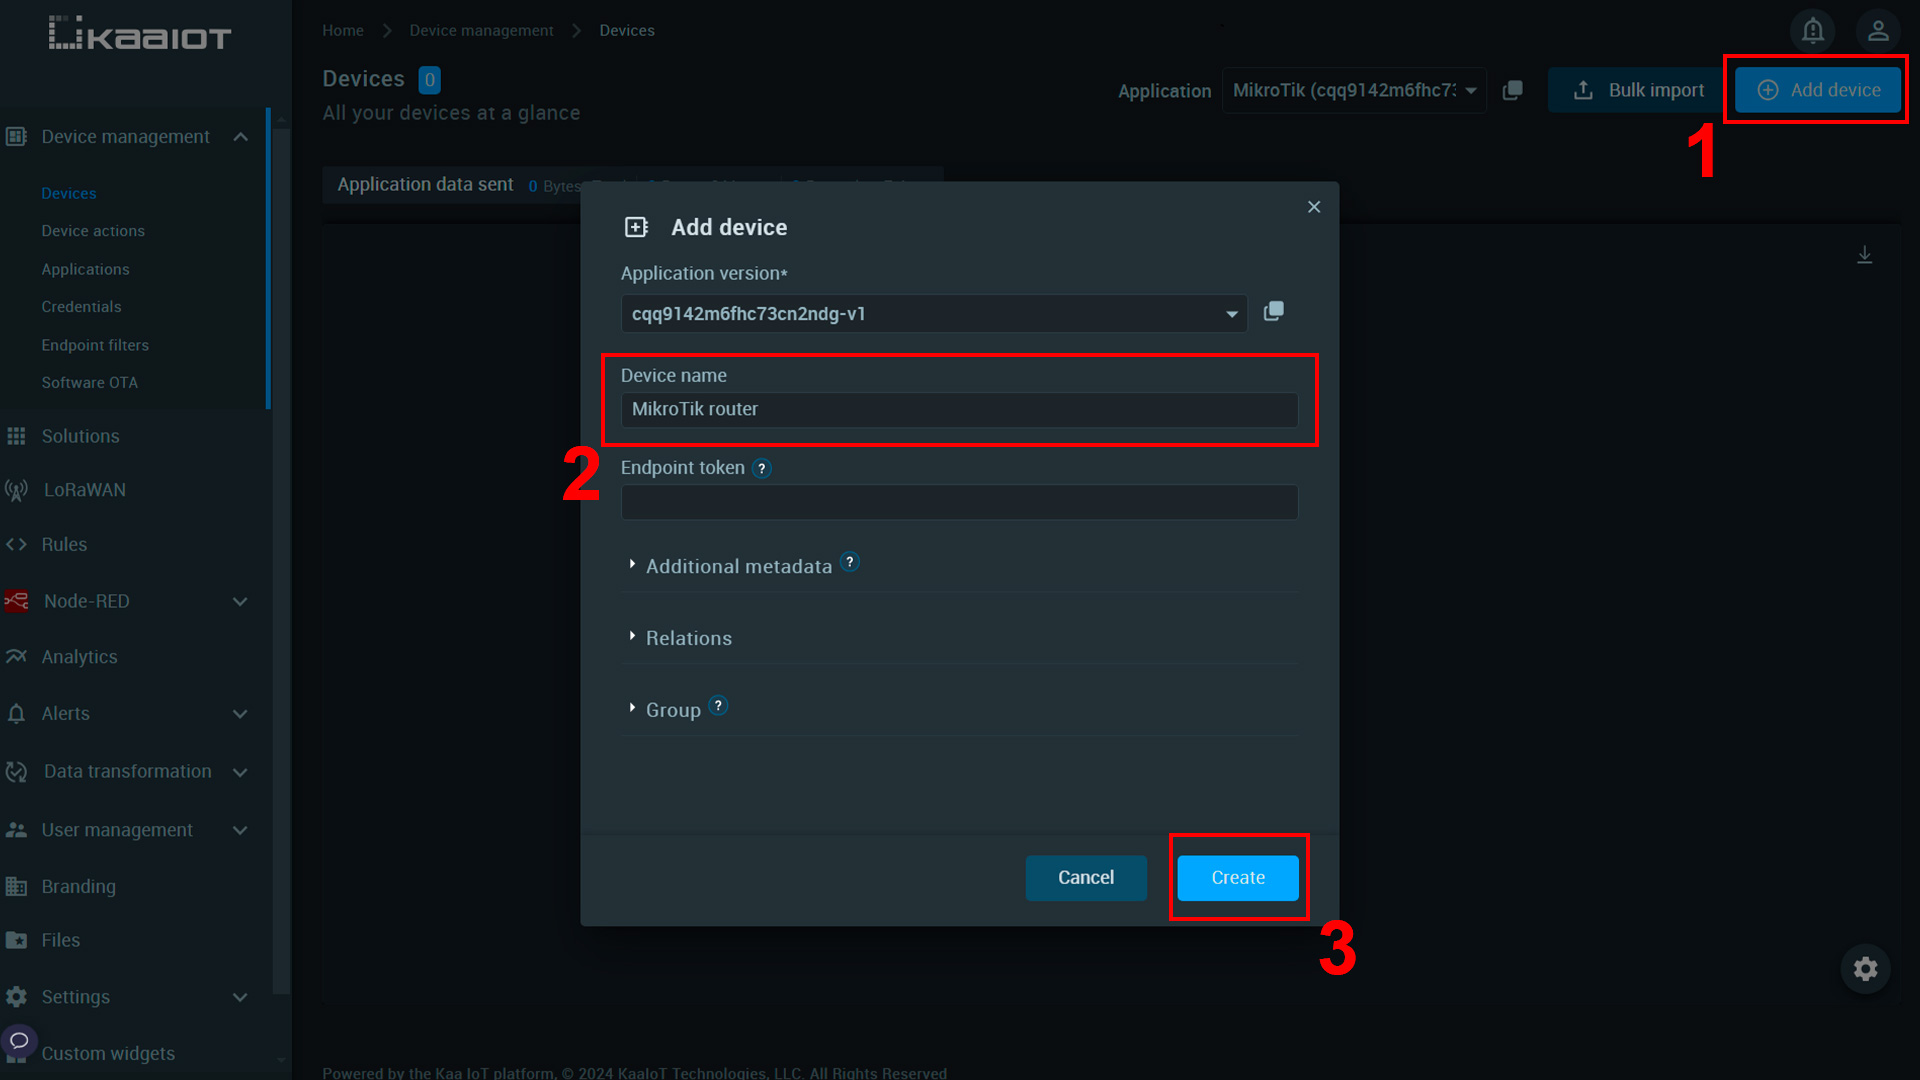
Step 5: Next, go to Kaa Cloud > Apps > Device Manager > Devices, and create a new device. For example, we will name it “MikroTik router”.
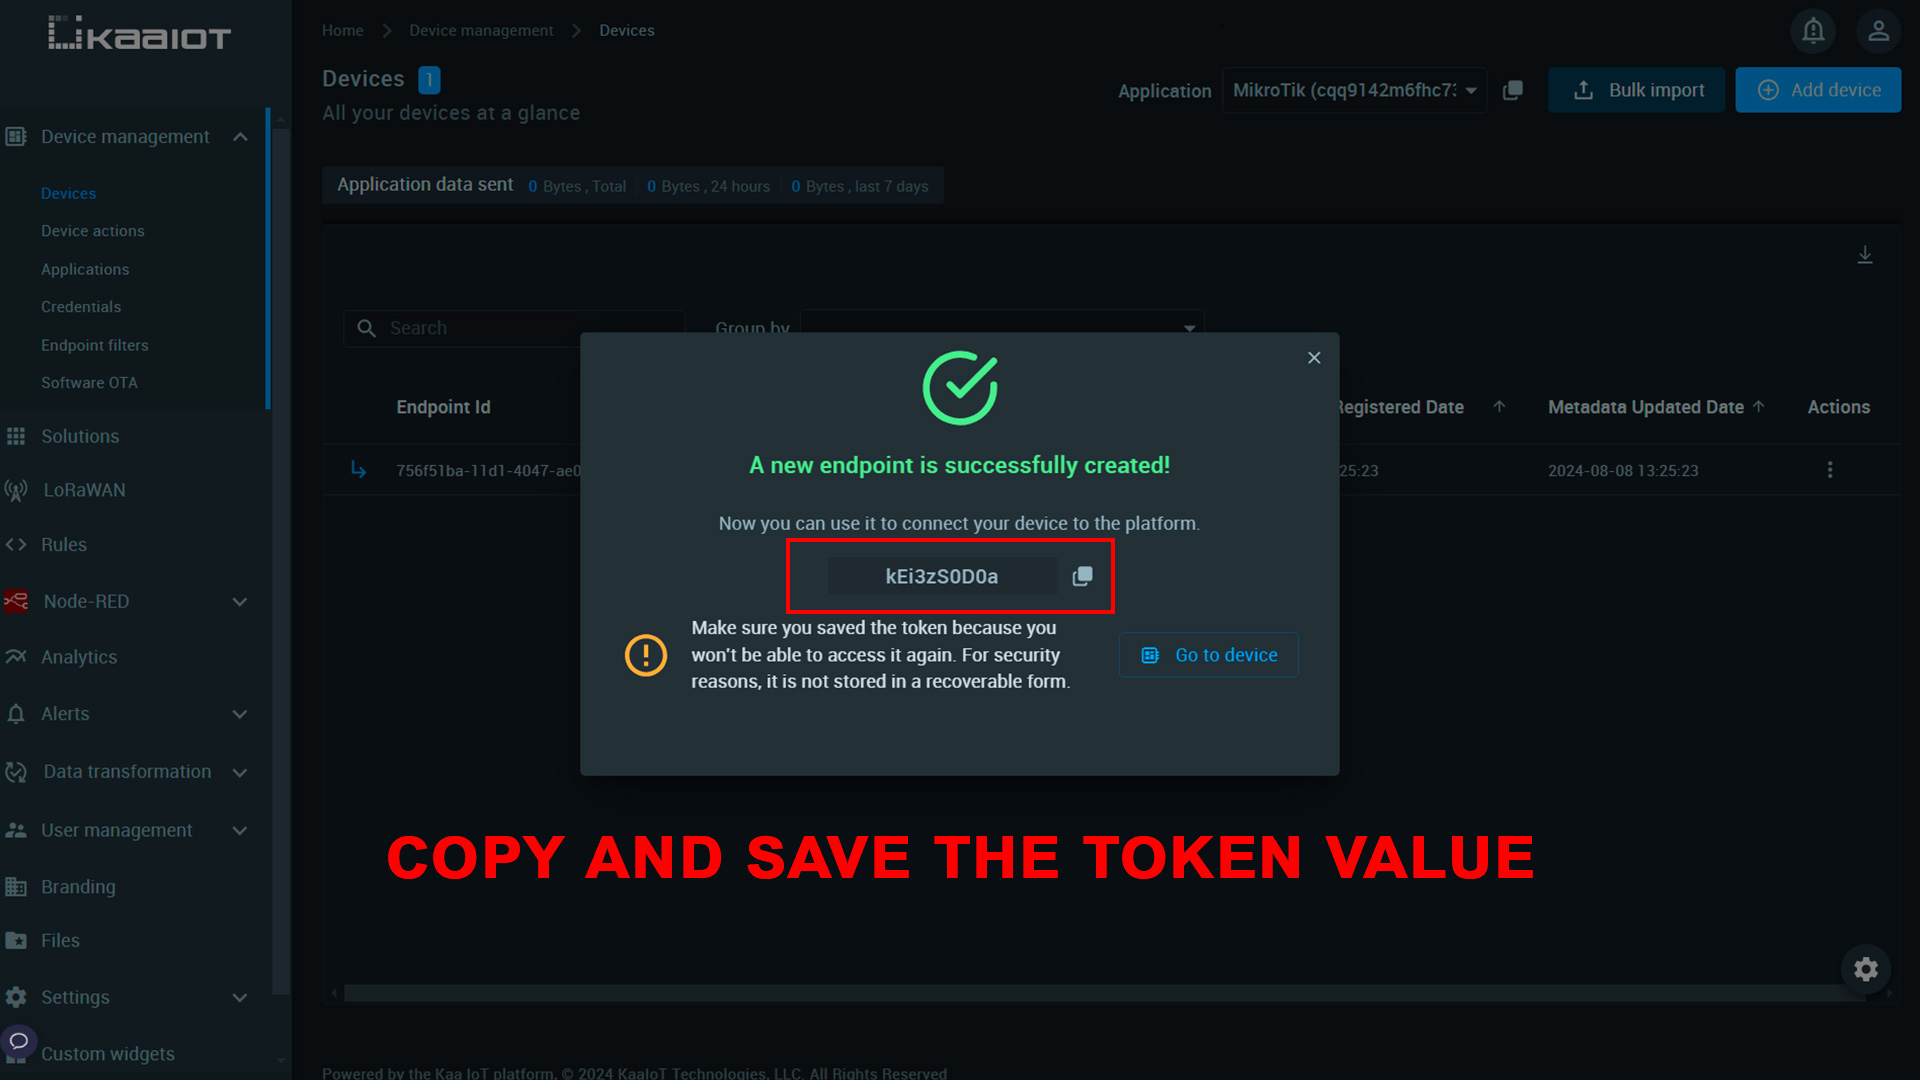
Step 6: You will see a pop-up window informing you that the endpoint has been successfully created. IMPORTANT: copy and save the token value, as we will need it for further configuration of the device.
You're done. We have successfully created a solution on the Kaa Cloud platform that we will use in the future to connect our devices.
Connecting MikroTik KNOT to Kaa Cloud
In this section, we will show you how to connect your MikroTik router to the Kaa Cloud platform.
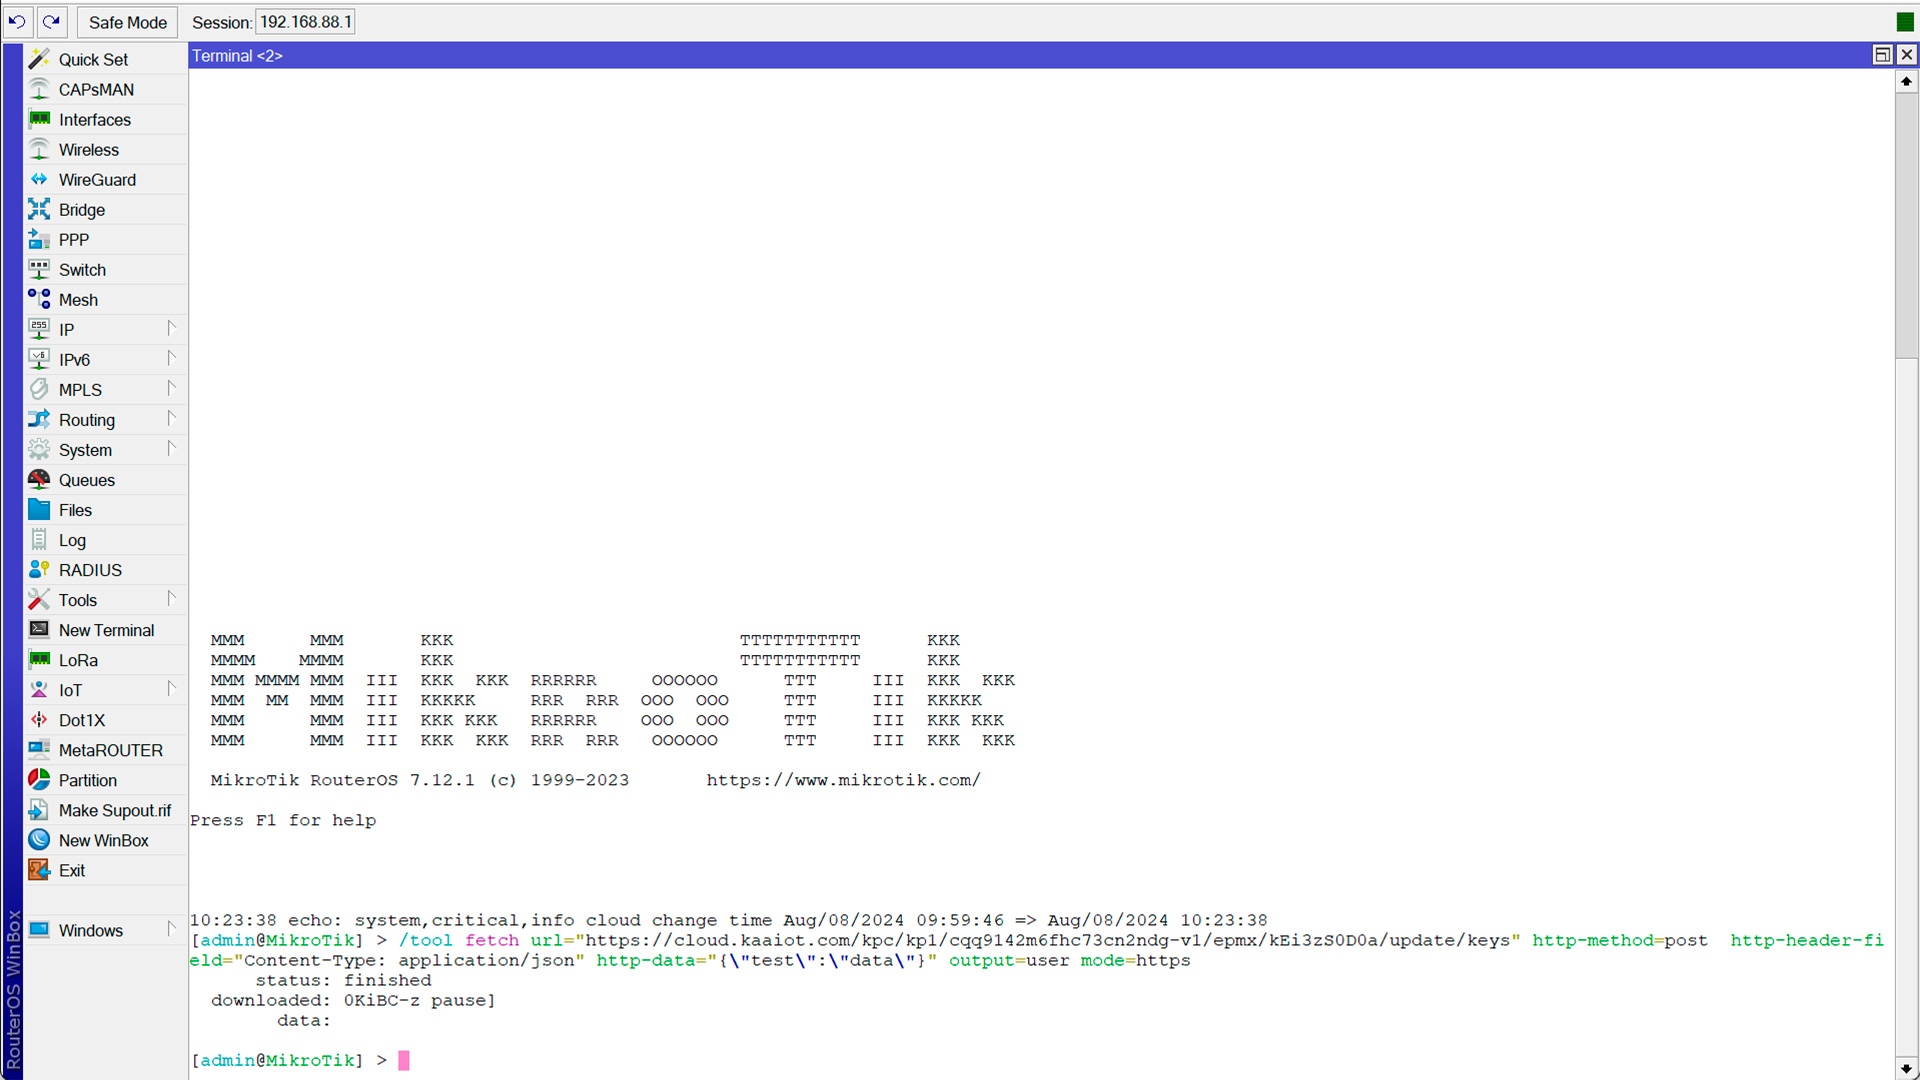
Step 1: First, we must use the HTTP protocol to publish the data. To do this, run the following command in the Mikro Tik terminal:
/tool fetch url="https://cloud.kaaiot.com/kpc/kp1//epmx/ /update/keys" http-method=post http-header-field="Content-Type: application/json" http-data="{\"test\":\"data\"}" output=user mode=https
In this code, we also need to substitute the <token> and <app-version> values in the placeholder.
Here we will need the <token> value that we saved earlier, you need to substitute it in the specified place in the code. You also need to substitute the <app-version> value in this code (we also saved it earlier, but you can also find it in the Devices section of the Kaa IoT platform).
Paste the received code into the MikroTik terminal and run it.
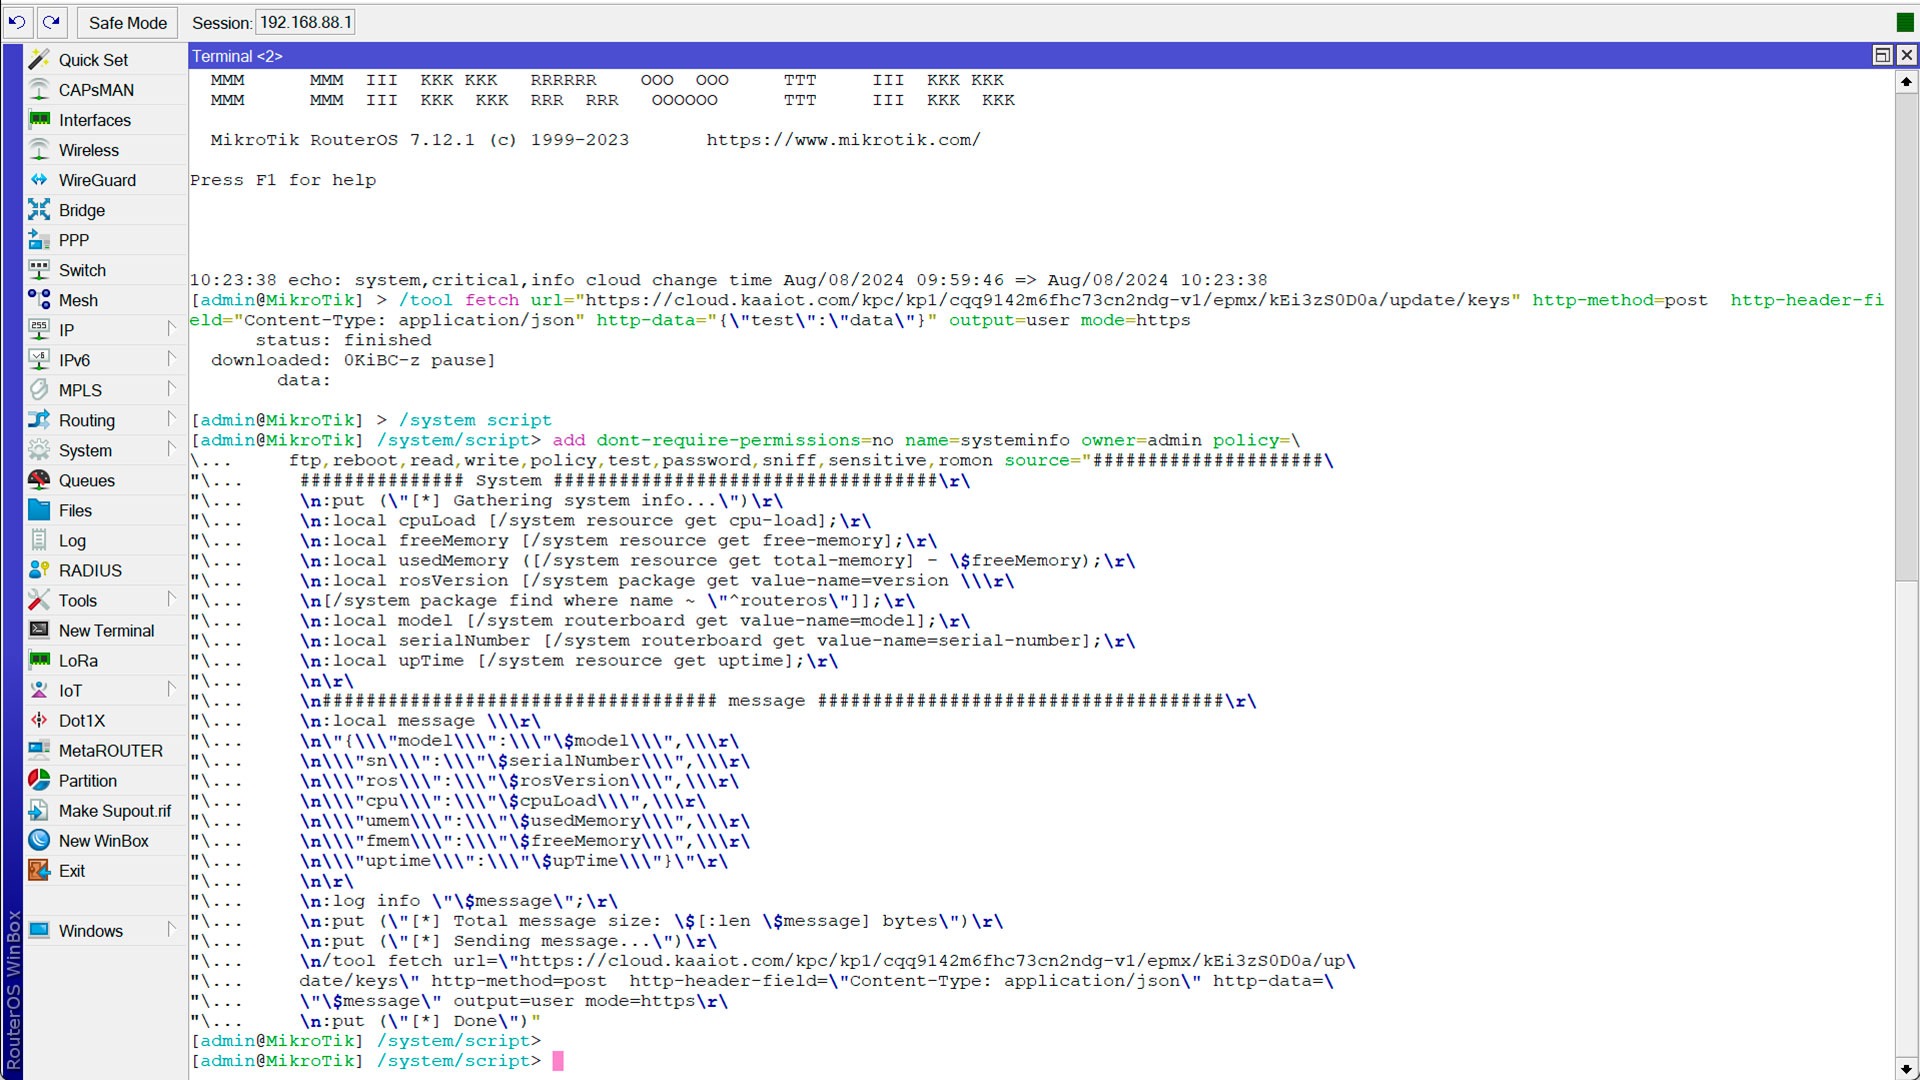
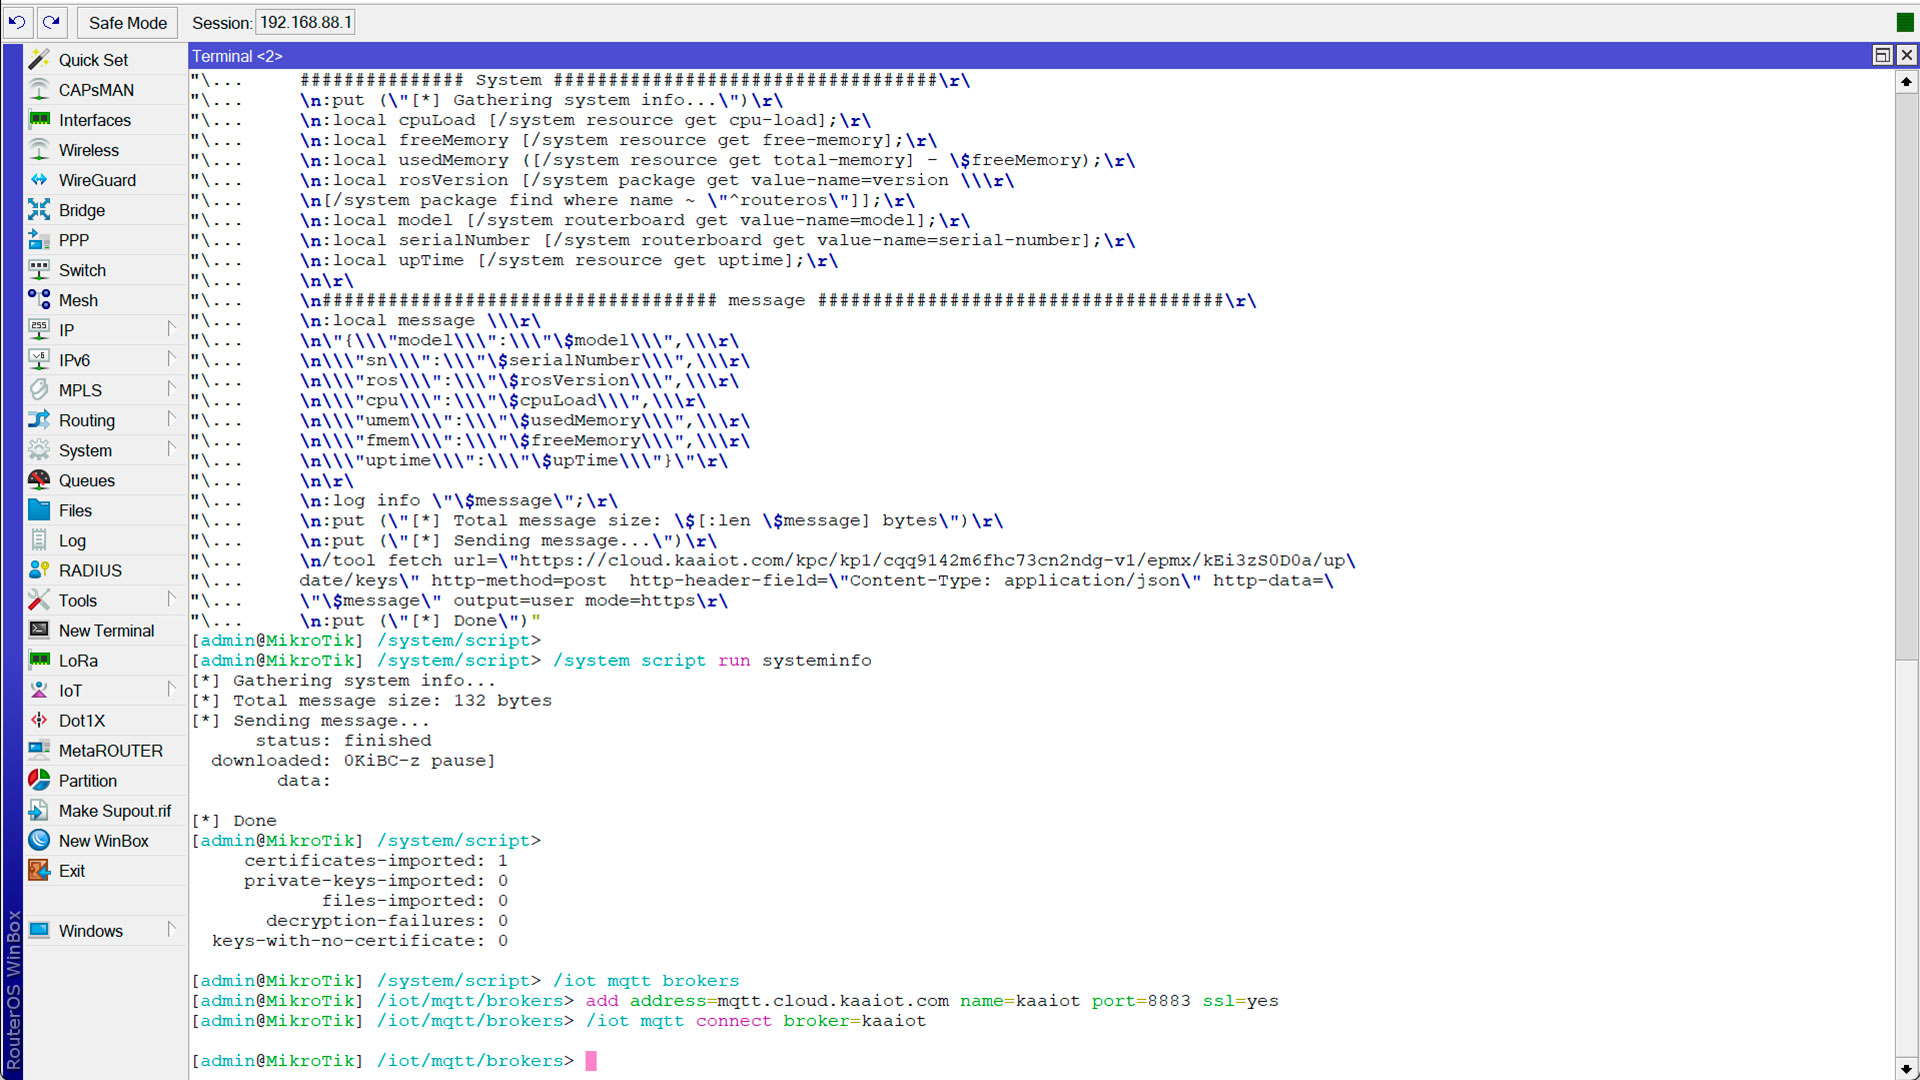
Step 2: To collect information about the /system resource print and publish it, we can use scripts. The next step is to run the command below:
/system script
add dont-require-permissions=no name=systeminfo owner=admin policy=\
    ftp,reboot,read,write,policy,test,password,sniff,sensitive,romon source="#####################\
    ############### System ###################################\r\
    \n:put (\"[*] Gathering system info...\")\r\
    \n:local cpuLoad [/system resource get cpu-load];\r\
    \n:local freeMemory [/system resource get free-memory];\r\
    \n:local usedMemory ([/system resource get total-memory] - \$freeMemory);\r\
    \n:local rosVersion [/system package get value-name=version \\\r\
    \n[/system package find where name ~ \"^routeros\"]];\r\
    \n:local model [/system routerboard get value-name=model];\r\
    \n:local serialNumber [/system routerboard get value-name=serial-number];\r\
    \n:local upTime [/system resource get uptime];\r\
    \n\r\
    \n#################################### message #####################################\r\
    \n:local message \\\r\
    \n\"{\\\"model\\\":\\\"\$model\\\",\\\r\
    \n\\\"sn\\\":\\\"\$serialNumber\\\",\\\r\
    \n\\\"ros\\\":\\\"\$rosVersion\\\",\\\r\
    \n\\\"cpu\\\":\\\"\$cpuLoad\\\",\\\r\
    \n\\\"umem\\\":\\\"\$usedMemory\\\",\\\r\
    \n\\\"fmem\\\":\\\"\$freeMemory\\\",\\\r\
    \n\\\"uptime\\\":\\\"\$upTime\\\"}\"\r\
    \n\r\
    \n:log info \"\$message\";\r\
    \n:put (\"[*] Total message size: \$[:len \$message] bytes\")\r\
    \n:put (\"[*] Sending message...\")\r\
    \n/tool fetch url=\"https://cloud.kaaiot.com/kpc/kp1//epmx//up\
    date/keys\" http-method=post  http-header-field=\"Content-Type: application/json\" http-data=\
    \"\$message\" output=user mode=https\r\
    \n:put (\"[*] Done\")"
In this code, we also need to substitute the <token> and <app-version> values in the placeholder.
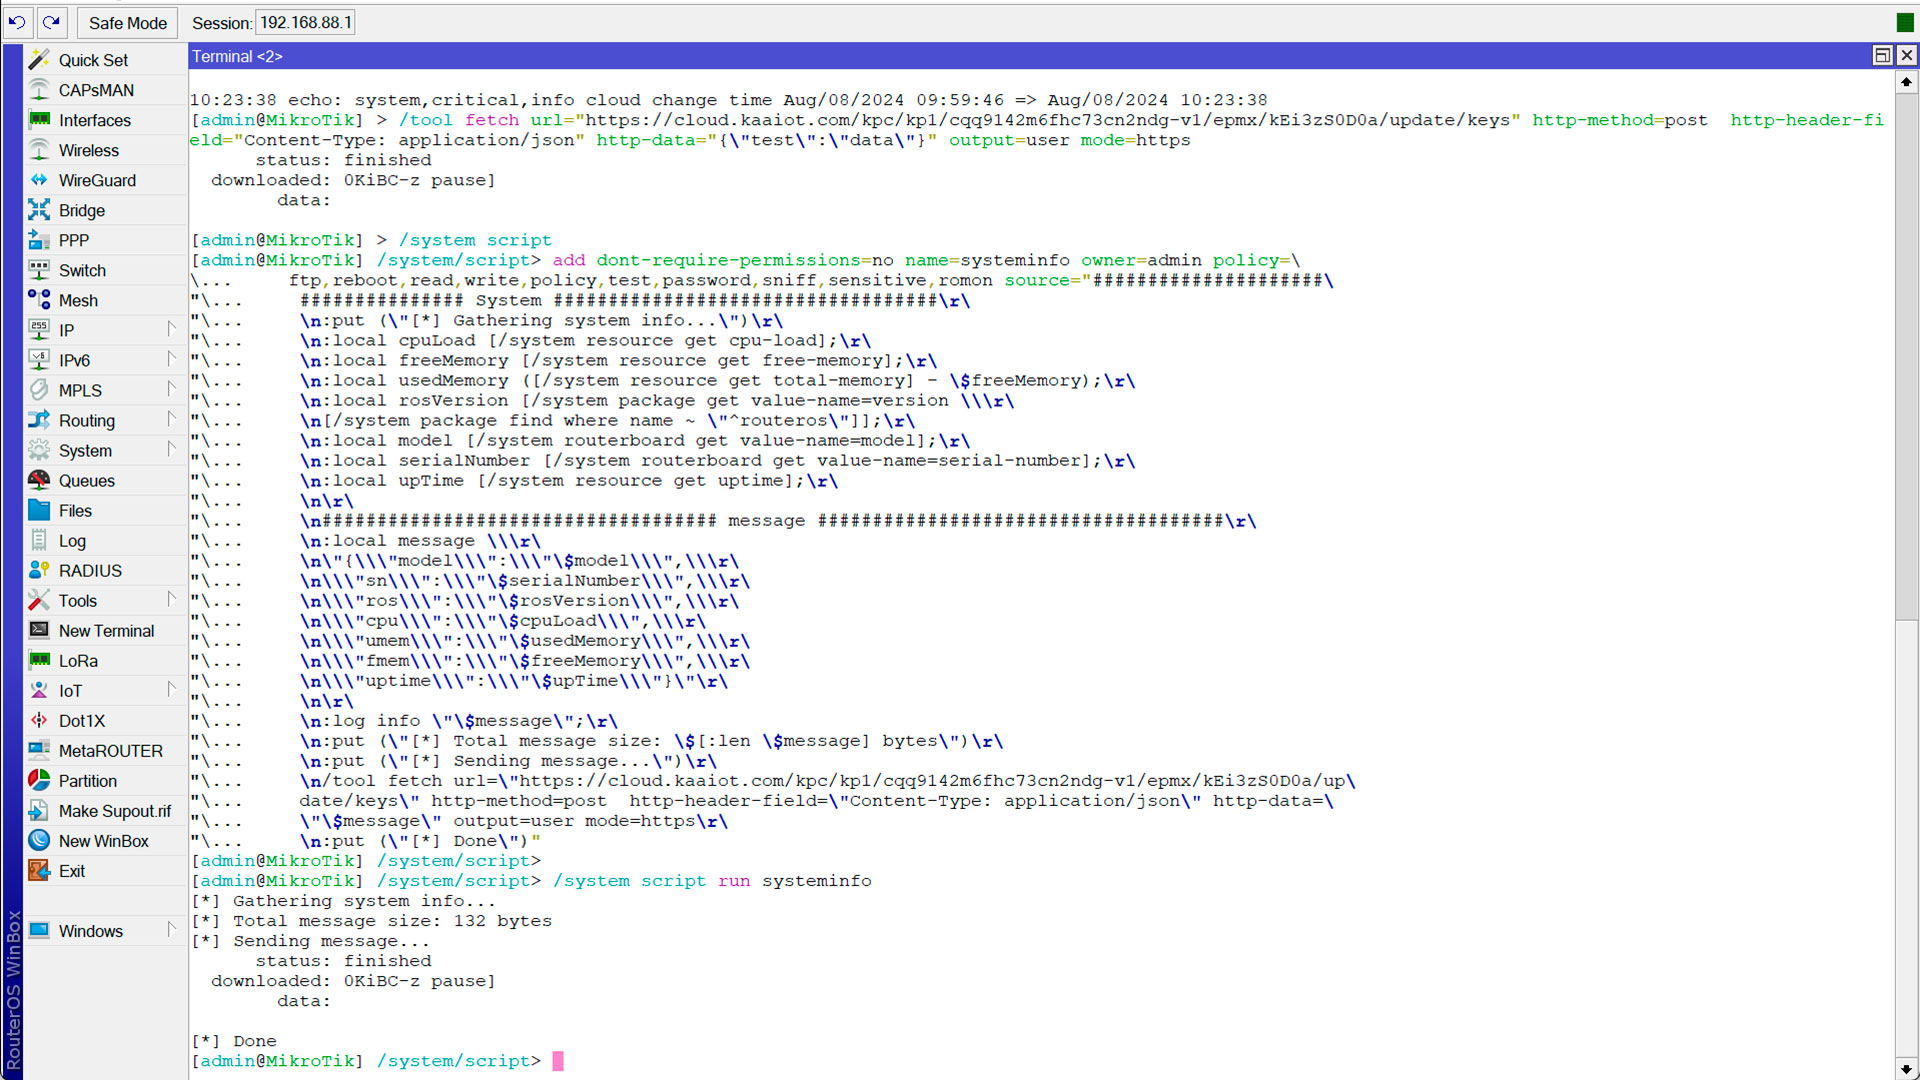
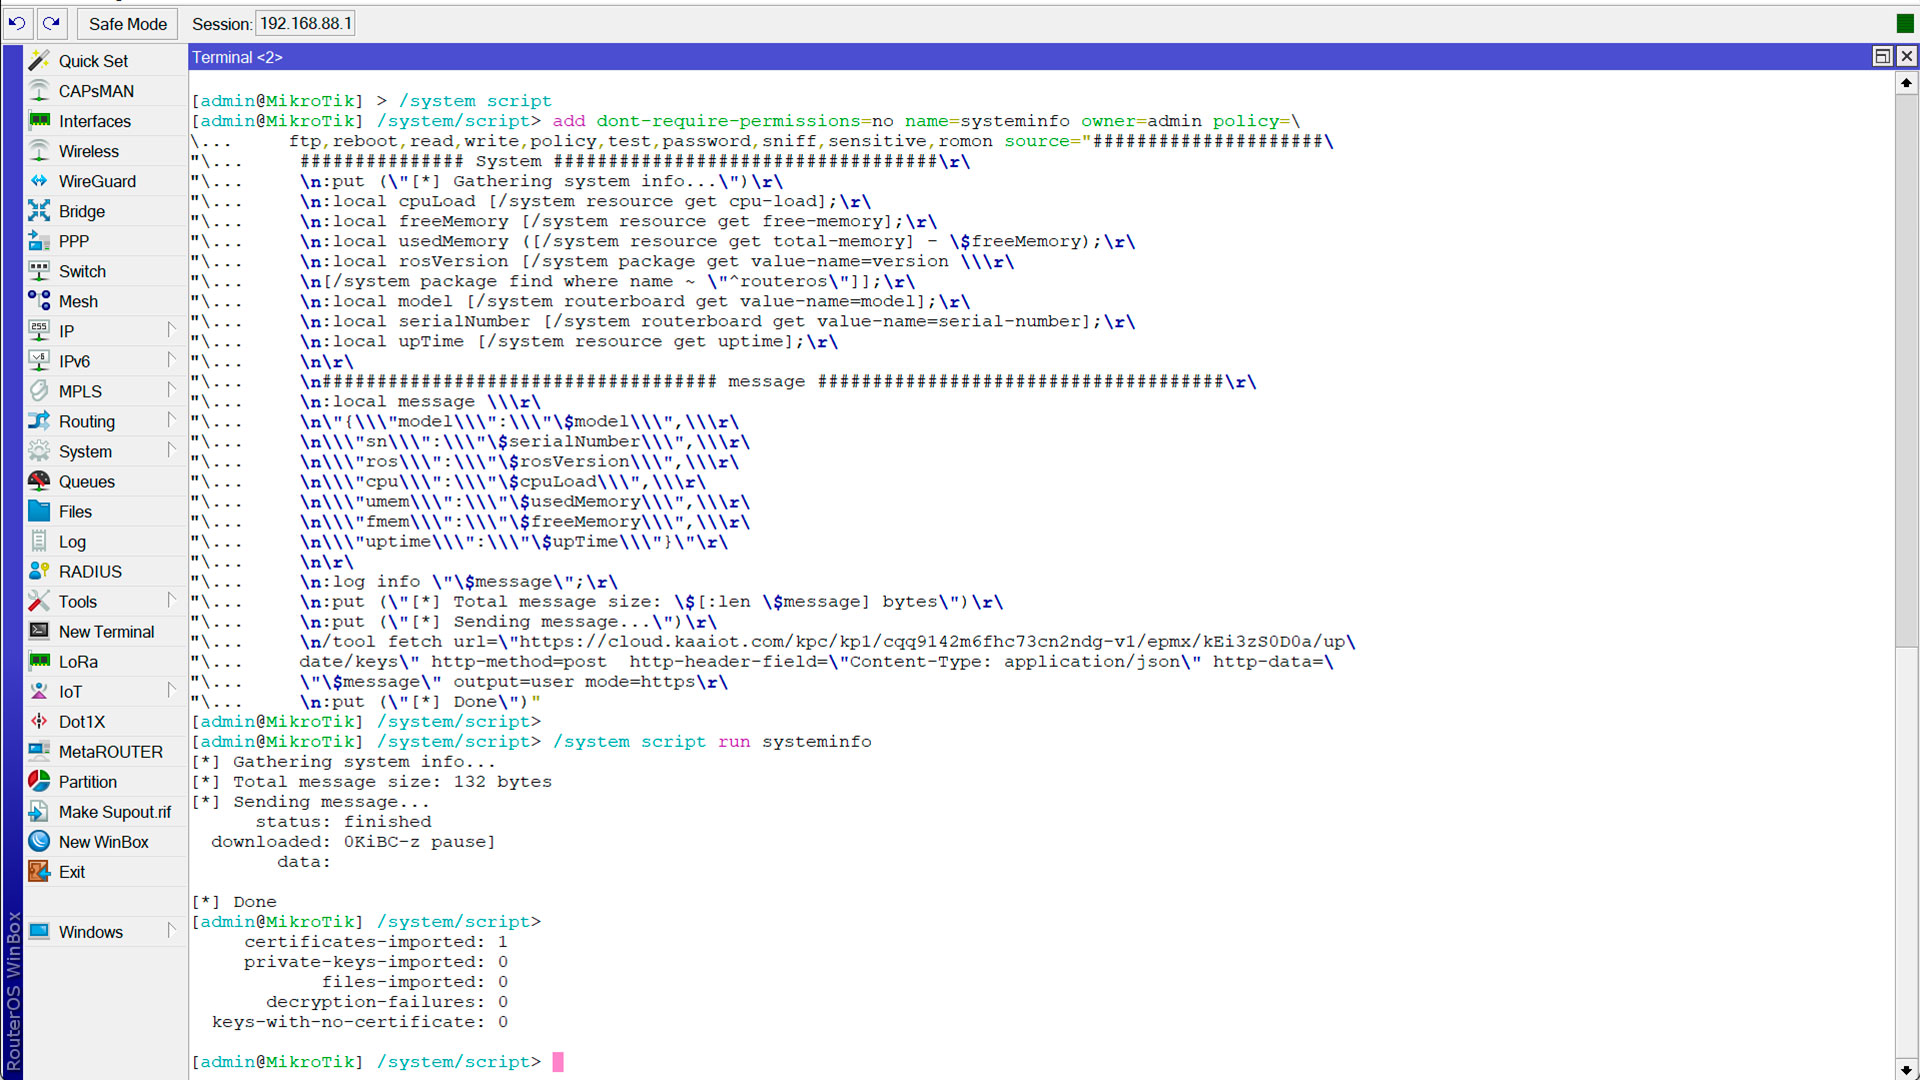
Step 3: Next, go back to the MikroTik admin panel instructions and run the following command in the terminal:
/system script run systeminfo
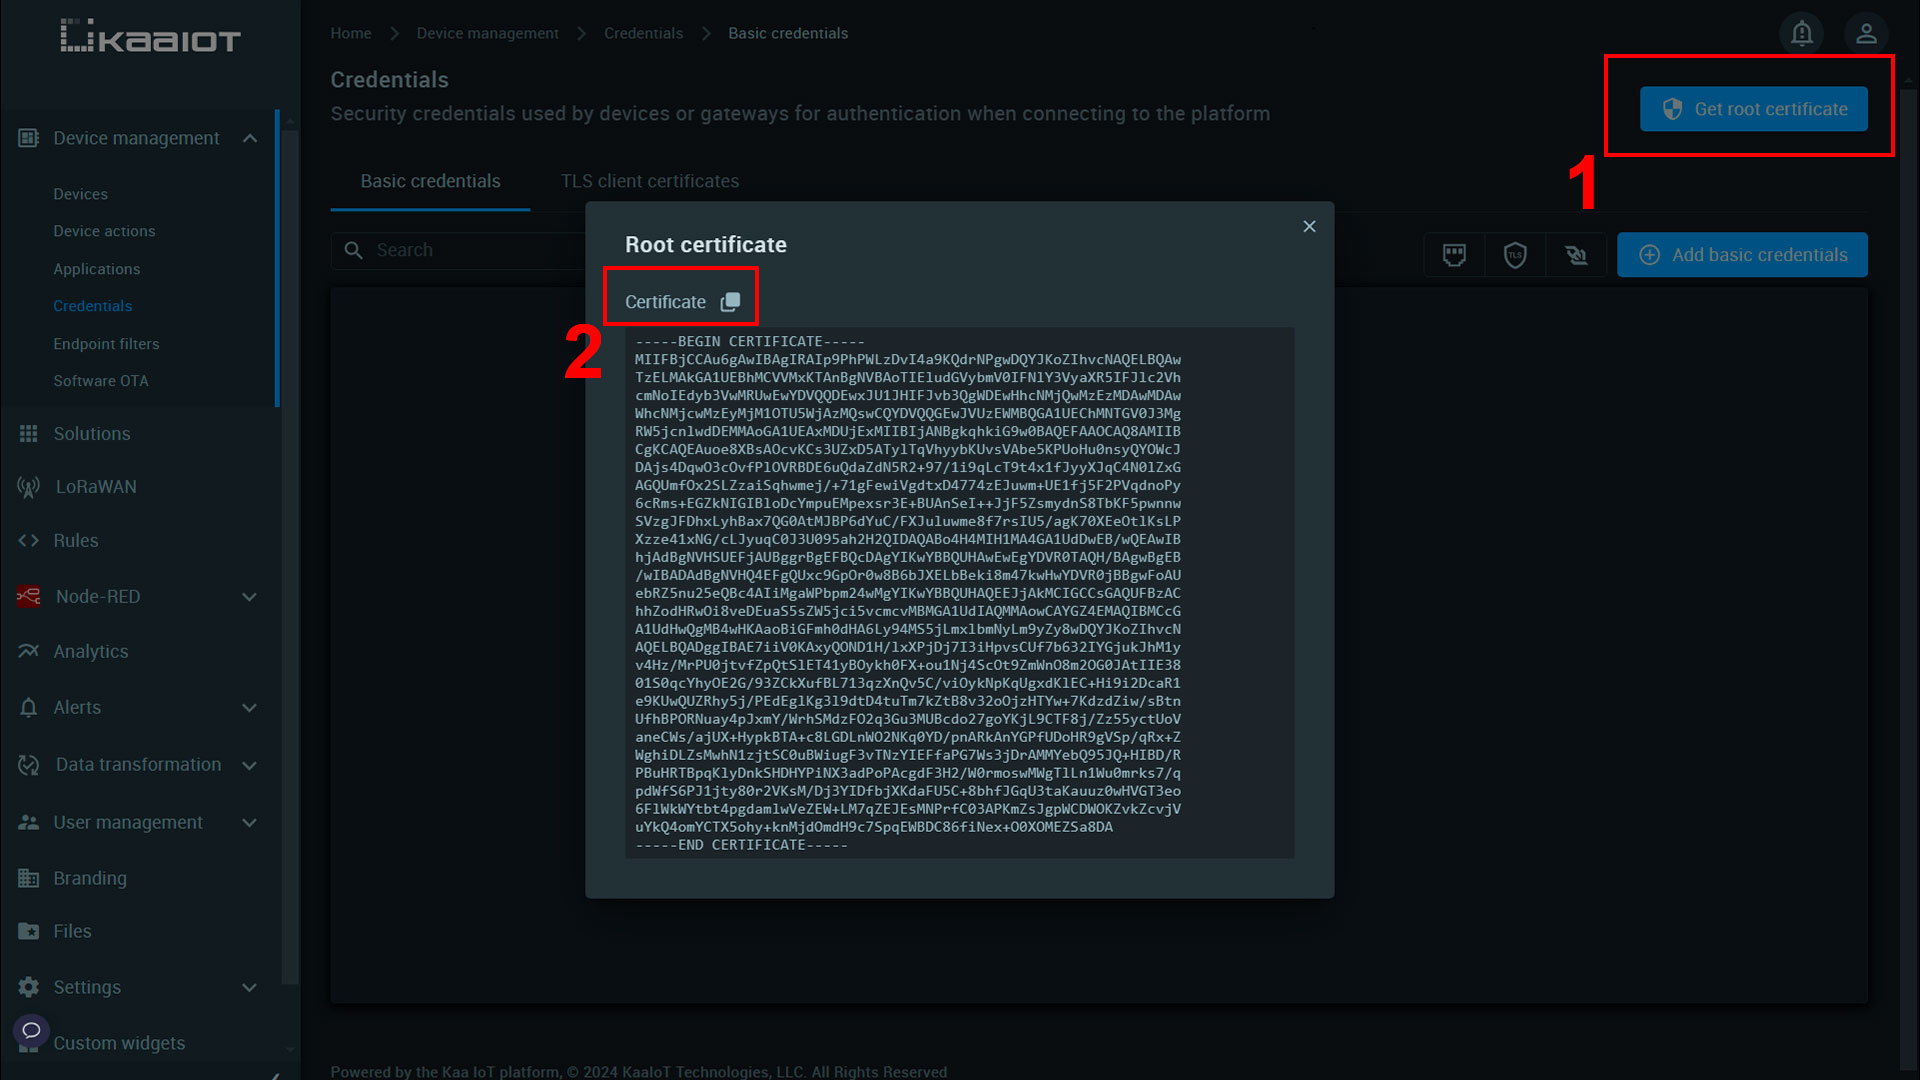
Step 4: The next important step is to import the certificate from Kaa Cloud. To import it, go back to Kaa Cloud > Device Manager > Credentials > Basic credentials. Click on the “Get a root certificate” button and copy the received certificate.
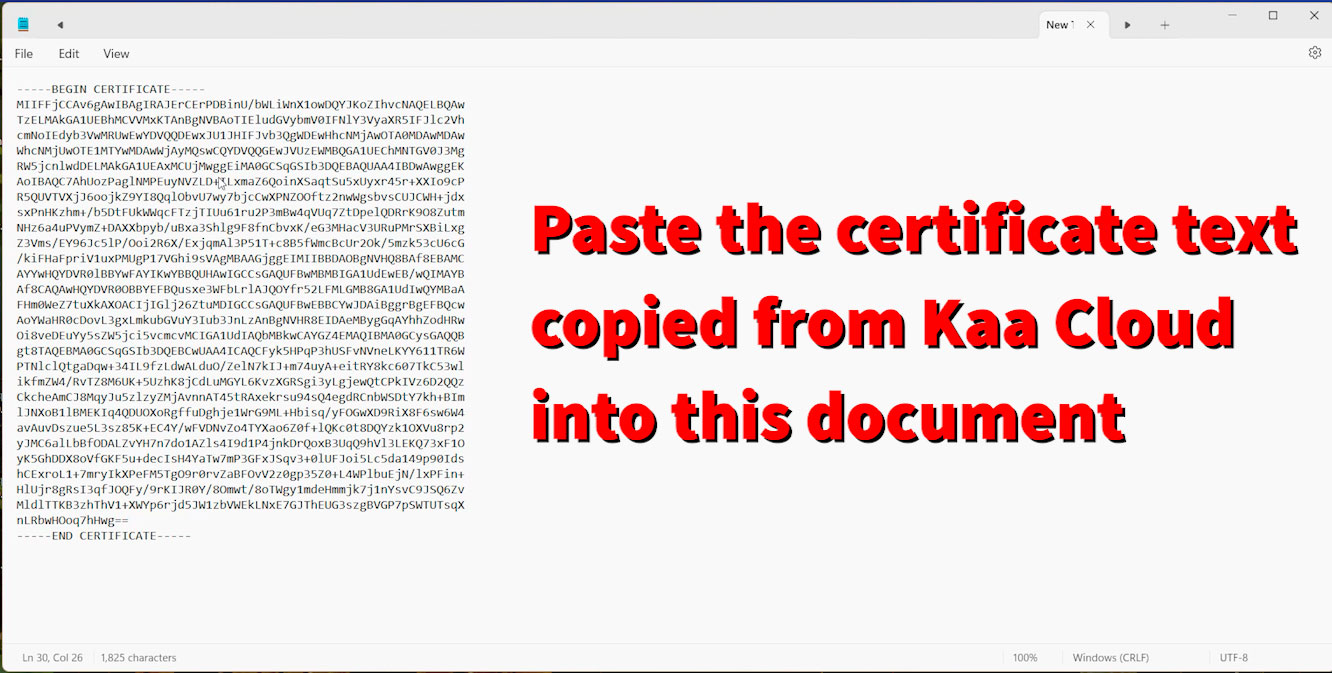
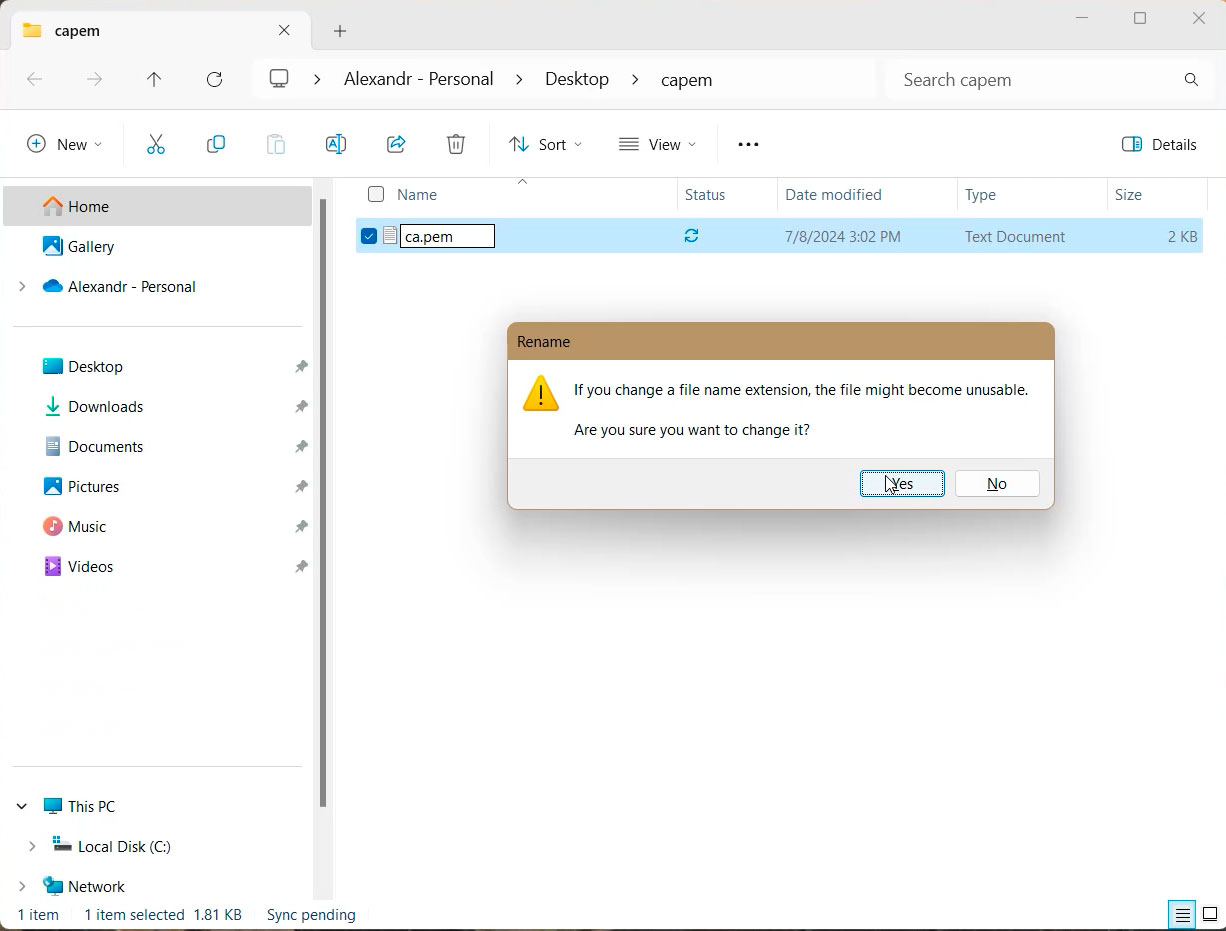
Step 5: Next, go to your computer's desktop and create a plain text document in the “.txt” format. Paste the certificate you copied from Kaa Cloud into this document. Save it and change its name to “ca” and its extension to “.pem”. Save the changes.
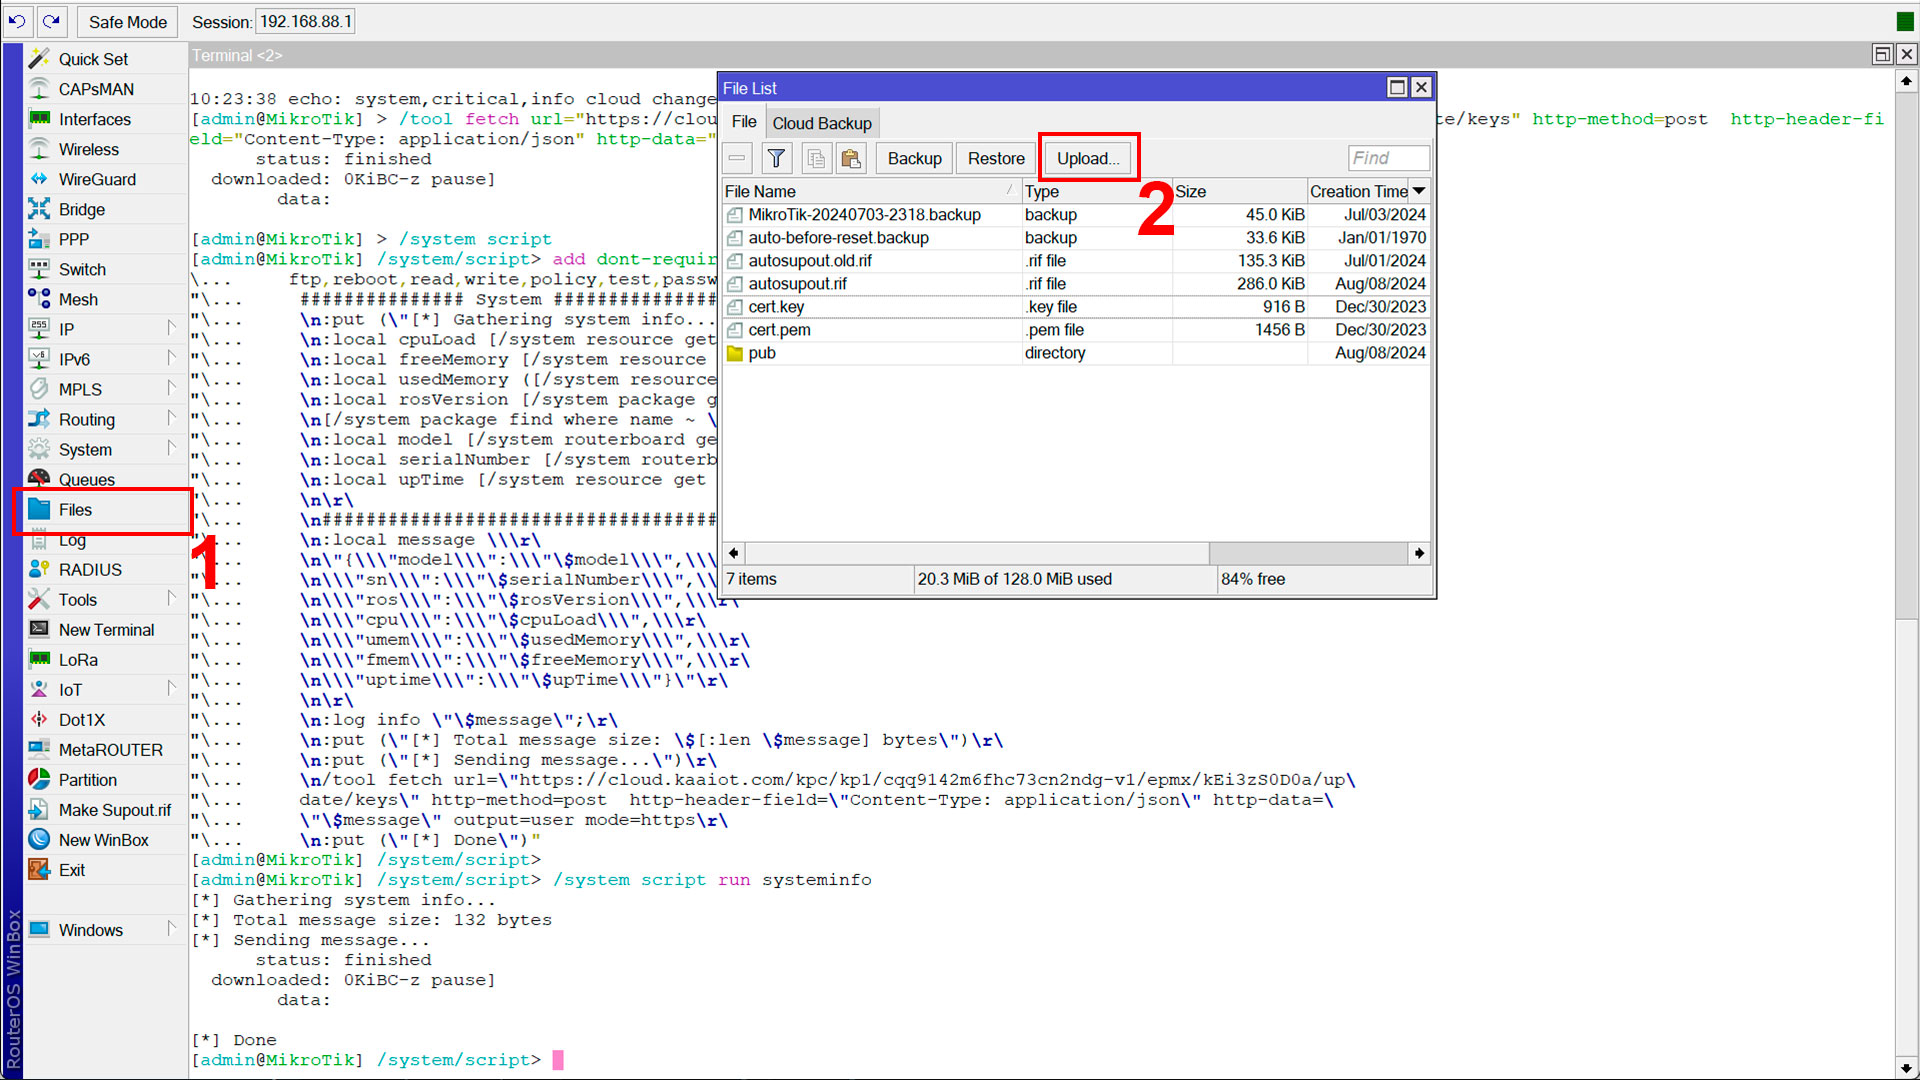
Step 6: Go to the MikroTik admin panel and find the “Files” tab. Click on the “Upload” button.
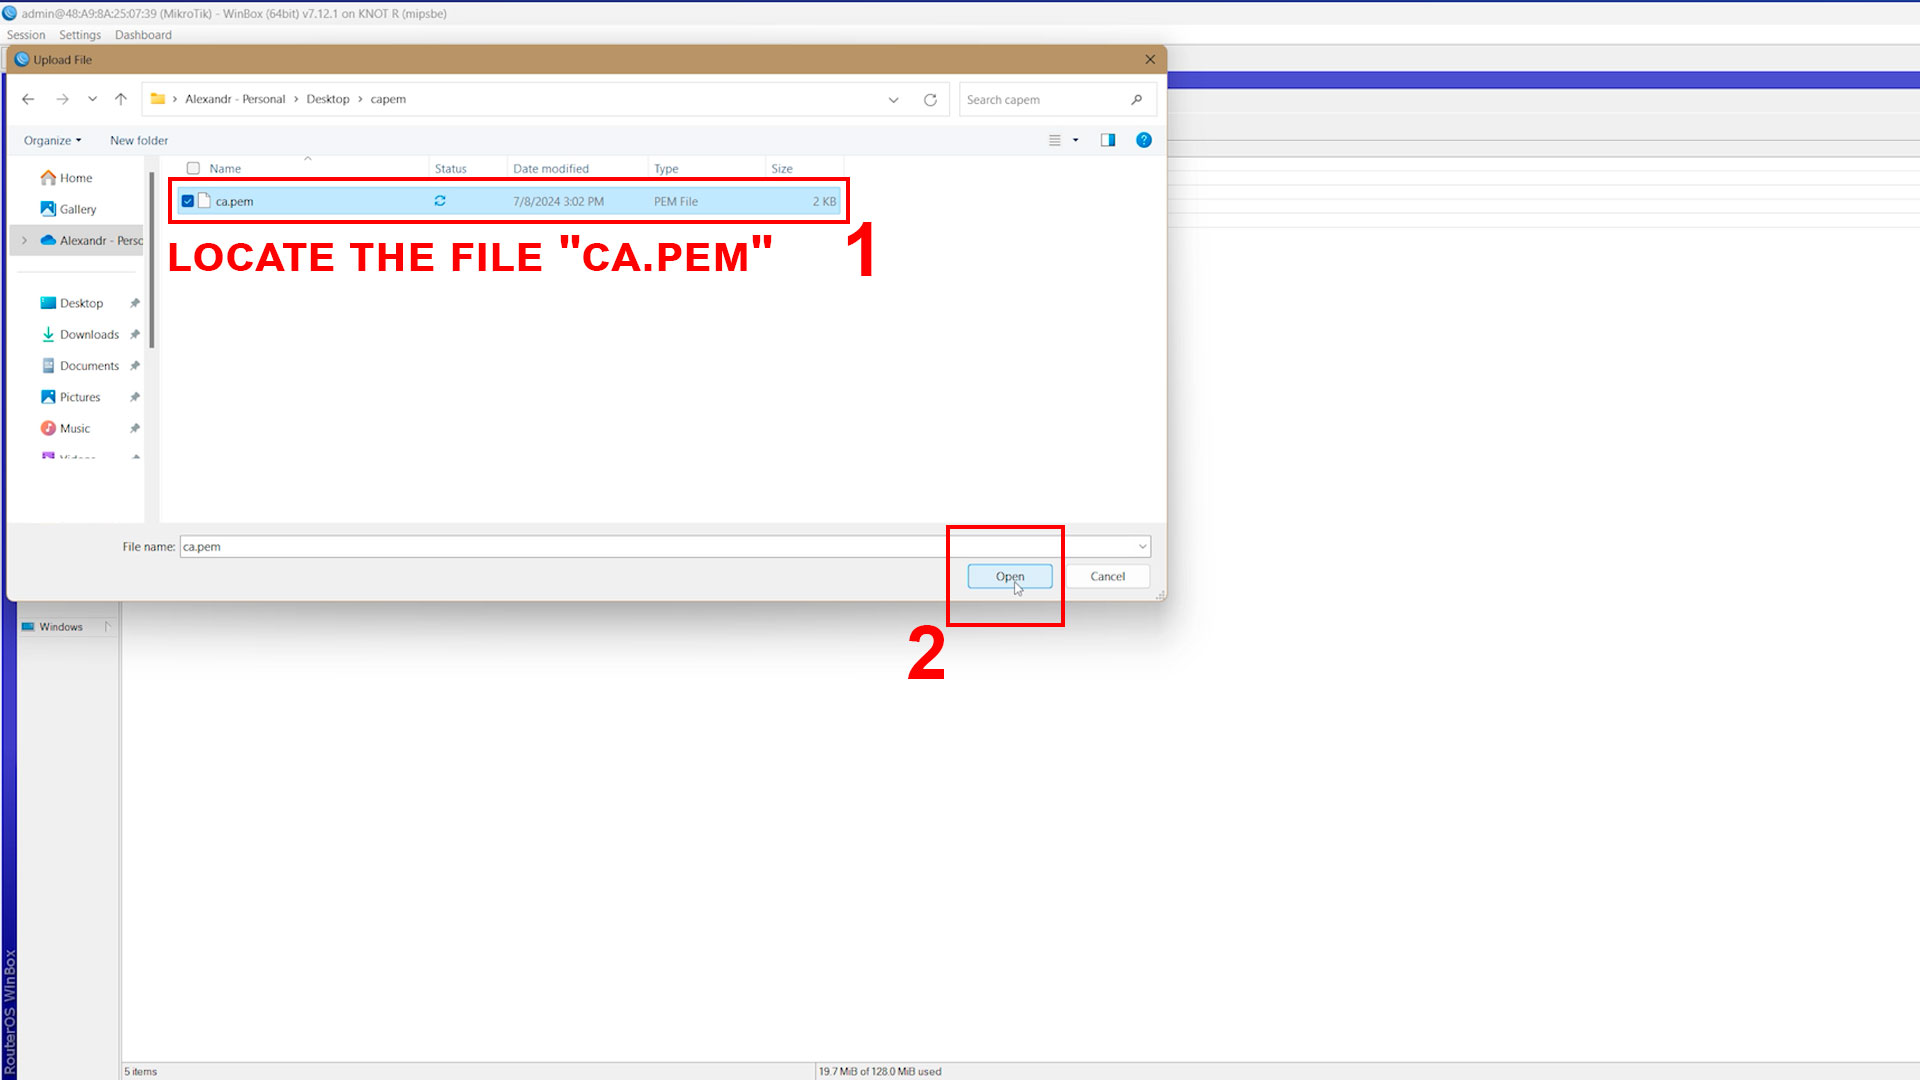
Step 7: You will be taken to your computer's standard explorer. In it, you need to find and select the previously saved “ca.pem” certificate. When you find it, click the “Open” button.
Great, we have successfully downloaded the certificate from Kaa to our router's files.
Step 8: After that, run the command to use MQTT to publish data. To do this, run the following command in the Mikro Tik terminal:
/certificate/import file-name=ca.pem passphrase=""
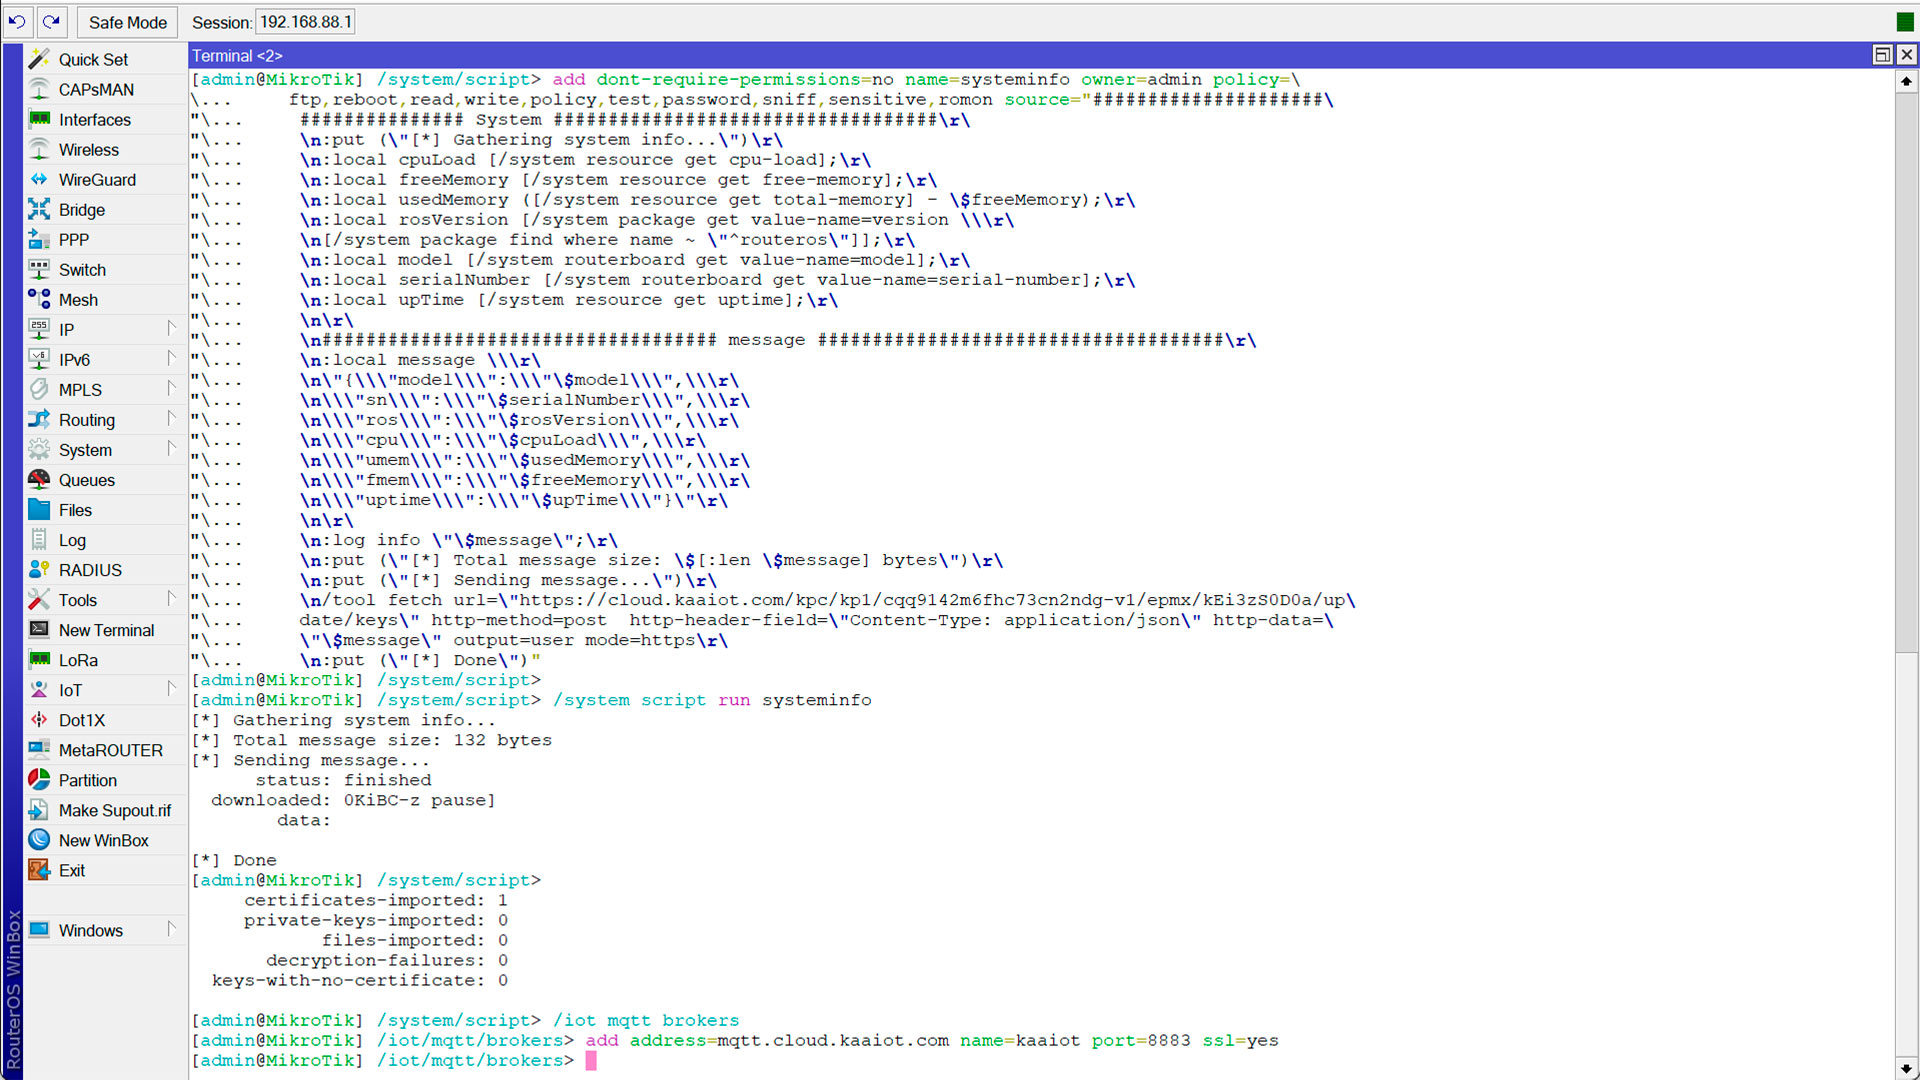
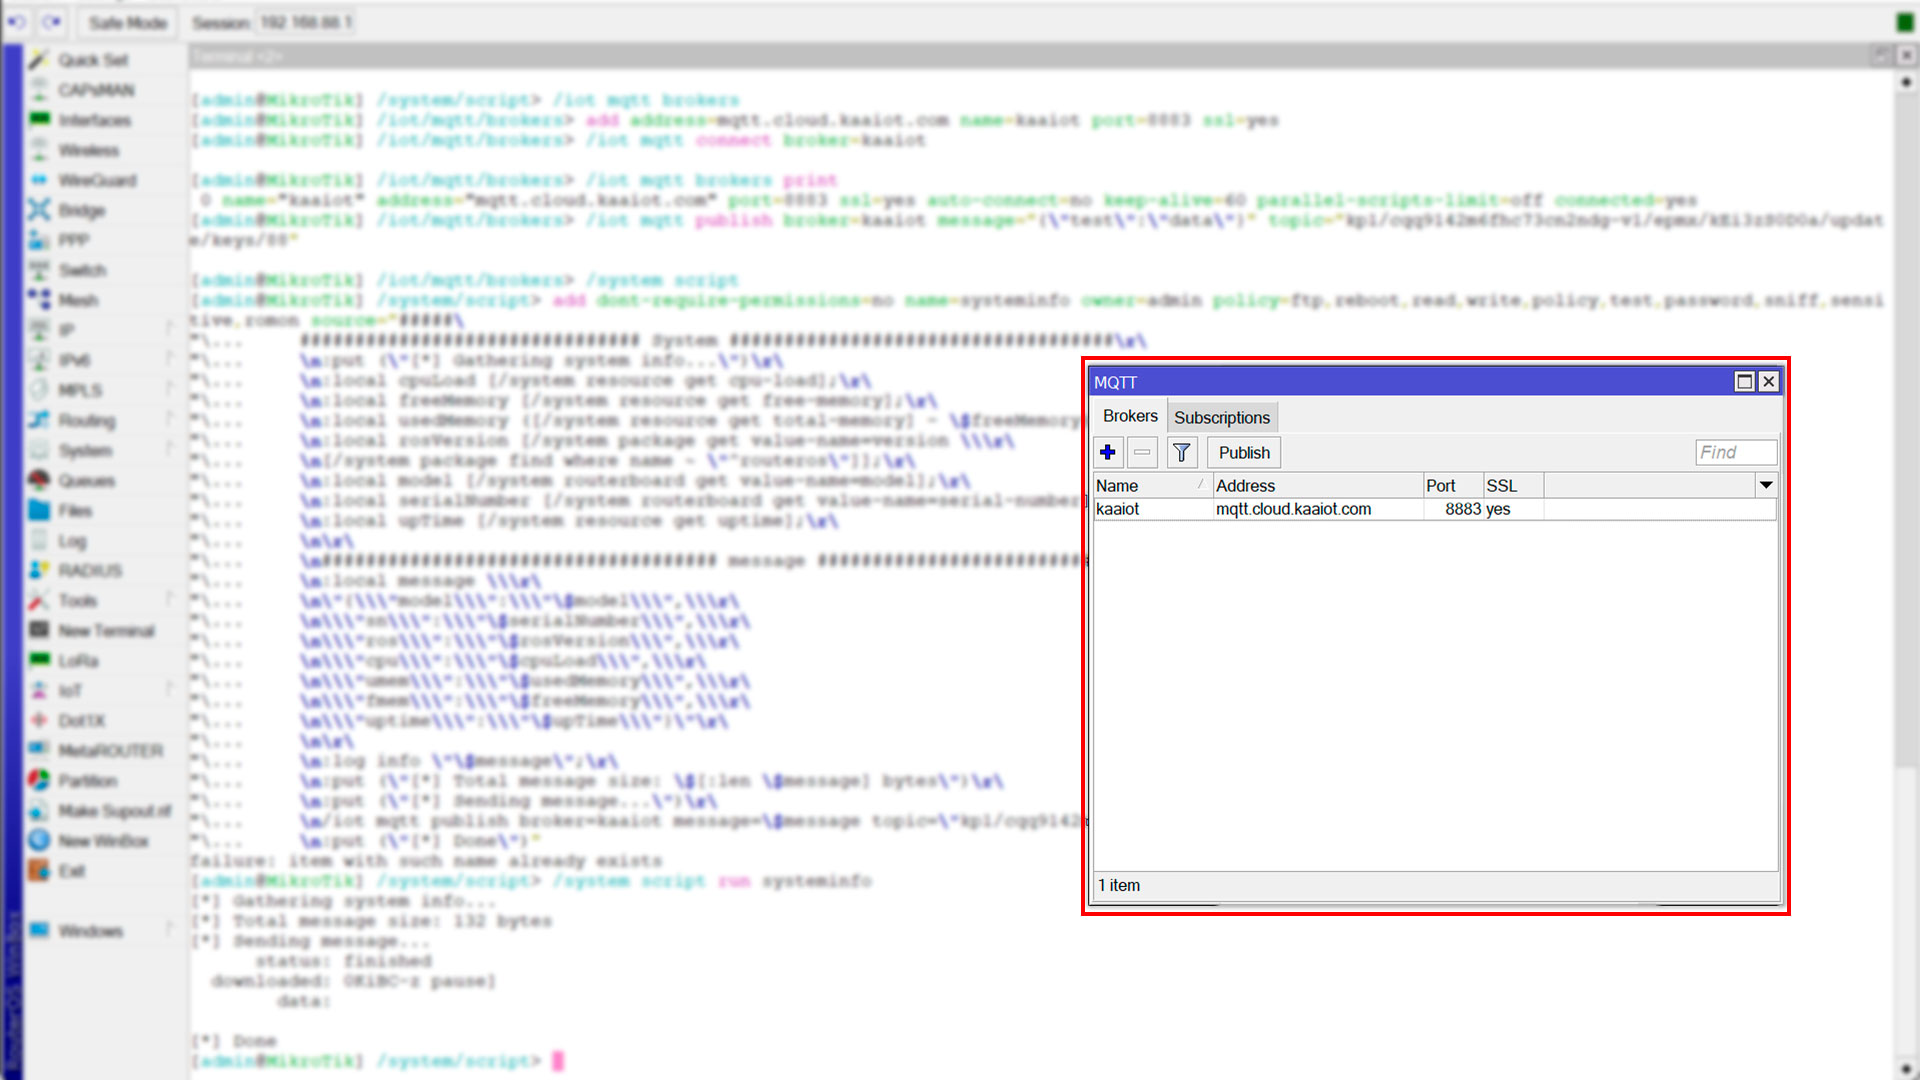
Step 9: The next step is to execute the command that adds a new MQTT broker. Just copy the command and execute it in the terminal:
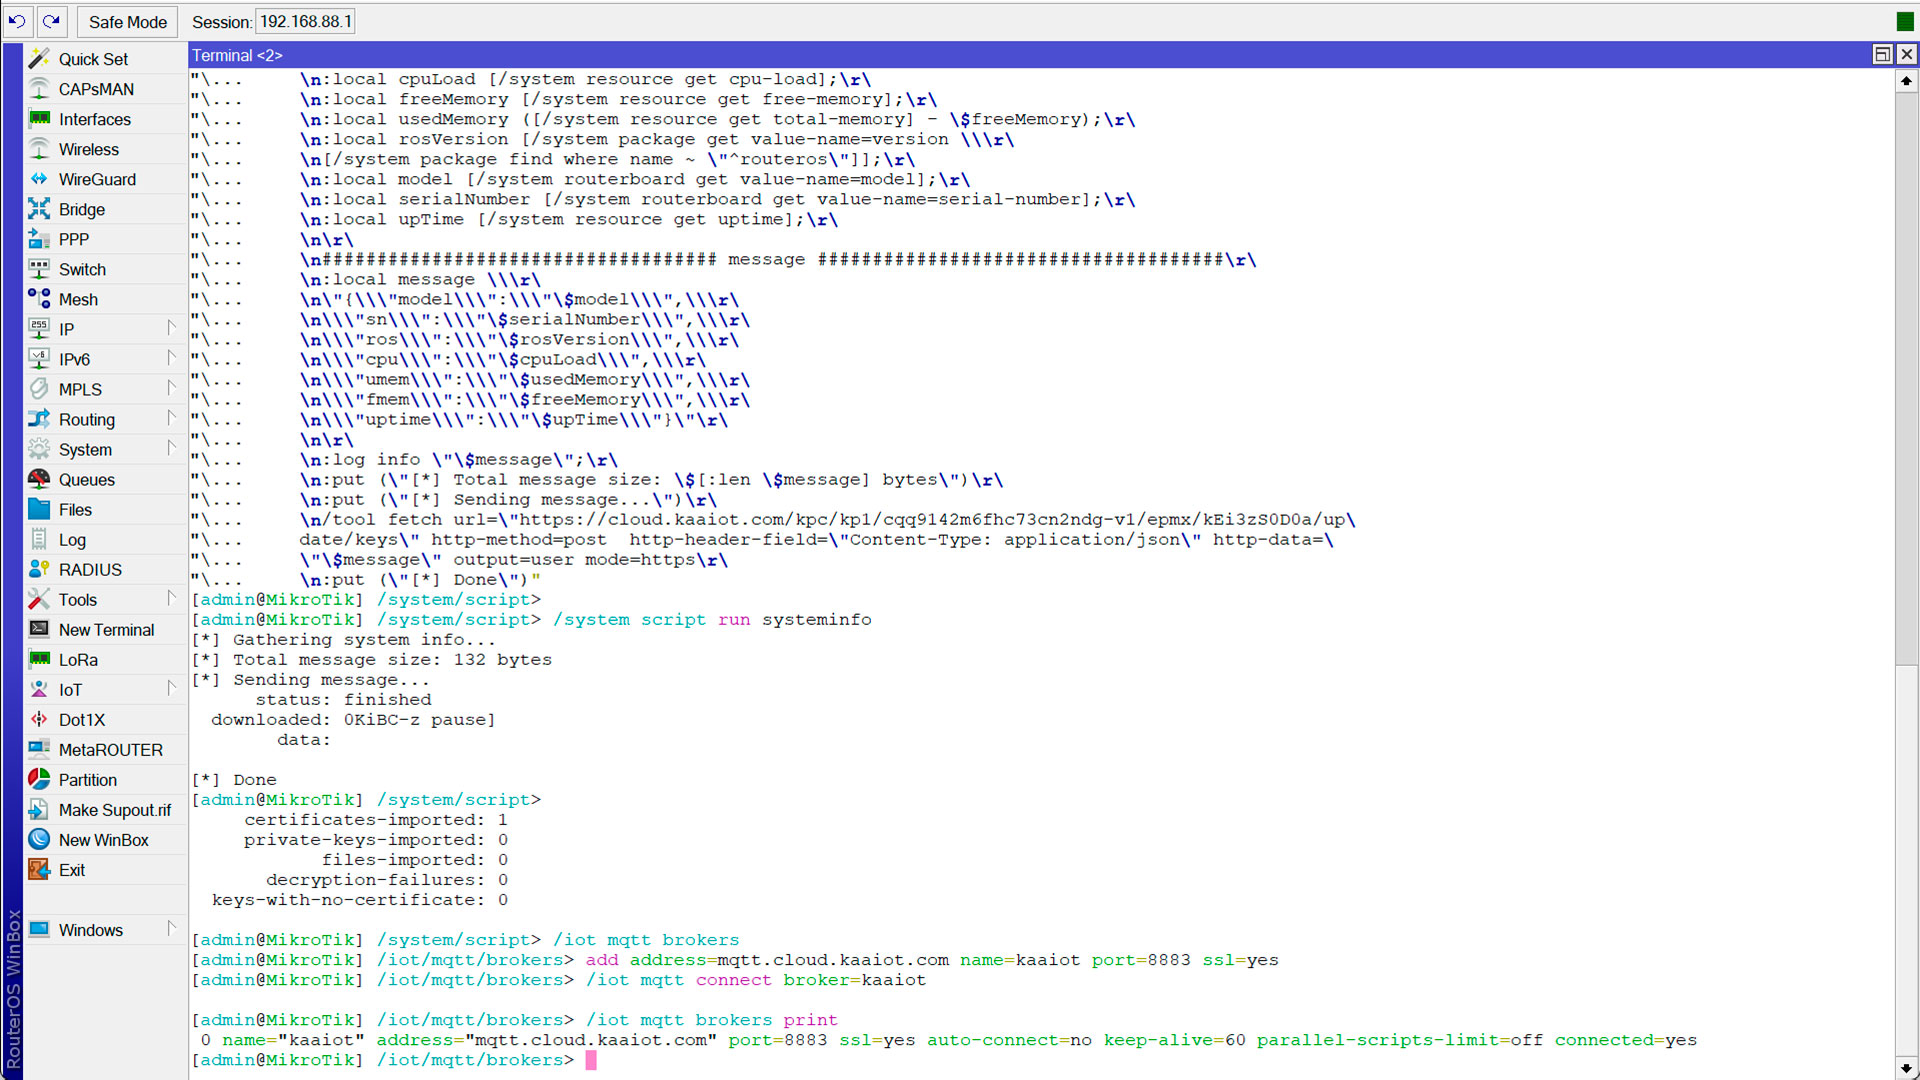
/iot mqtt brokers
add address=mqtt.cloud.kaaiot.com name=kaaiot port=8883 ssl=yes
Step 10: After that, execute the following two commands in turn:
1) /iot mqtt connect broker=kaaiot
2) /iot mqtt brokers print
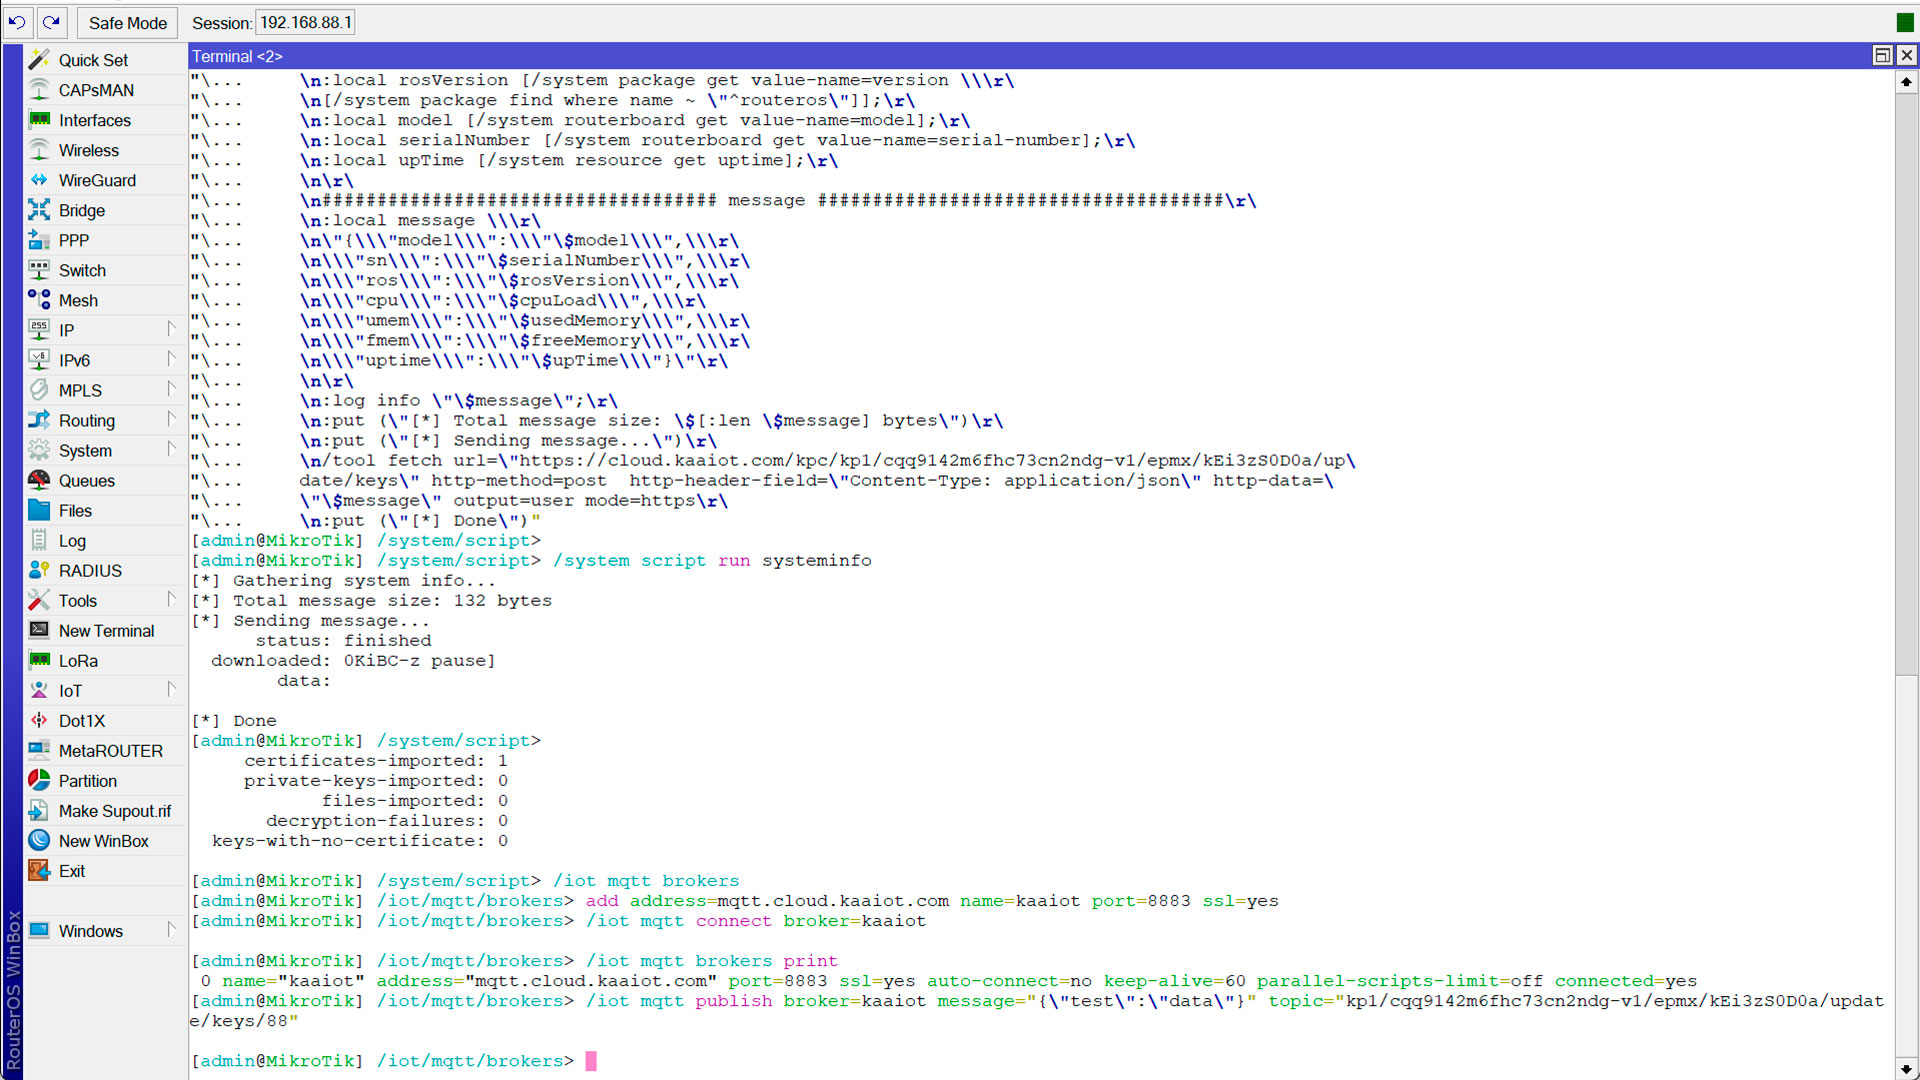
Step 11: The next command we need to execute is responsible for sending a basic JSON message. Copy this command and execute it in the MikroTik terminal:
/iot mqtt publish broker=kaaiot message="{\"test\":\"data\"}" topic="kp1//epmx//update/keys/88"
In this code, we also need to substitute the <token> and <app-version> values in the placeholder.

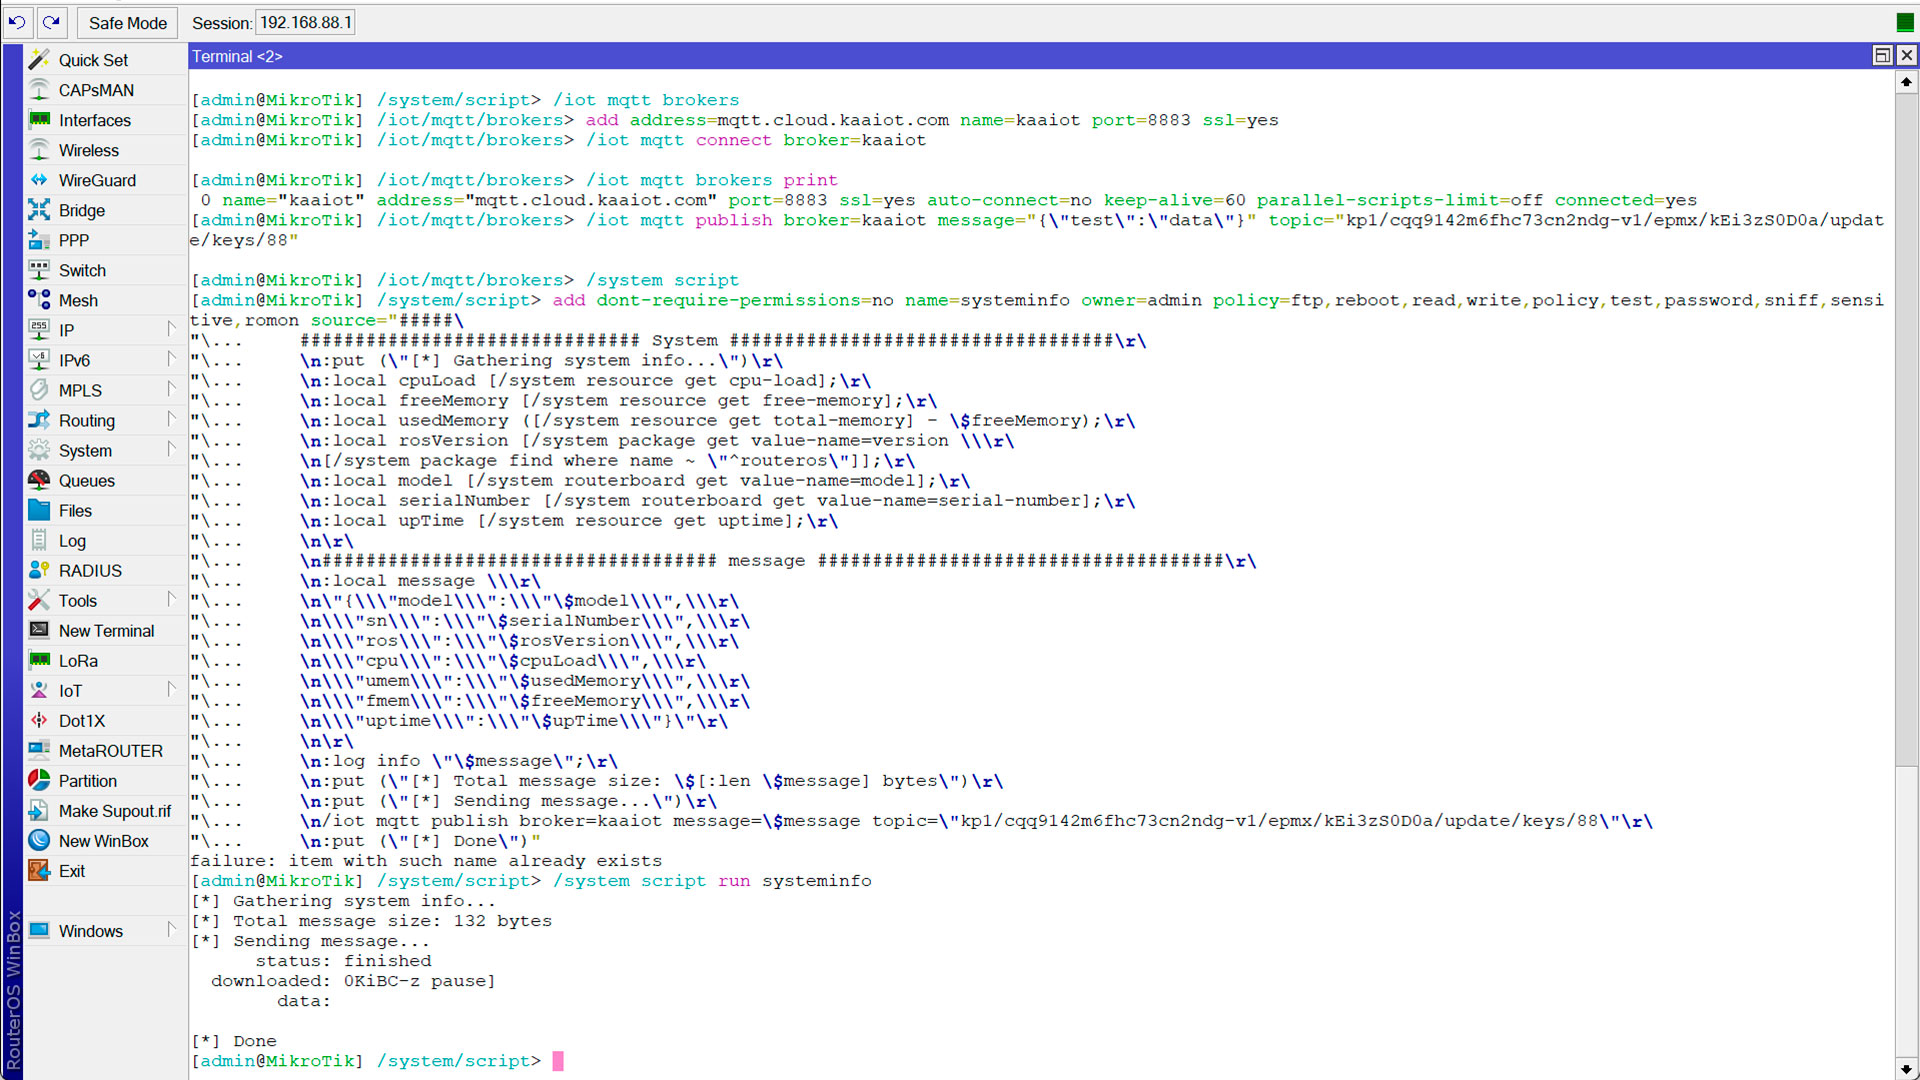
Step 12: Repeat the step and run the following script. In this code, we also need to substitute the values of <token> and <app-version> in the placeholder.
/system script
add dont-require-permissions=no name=systeminfo owner=admin policy=ftp,reboot,read,write,policy,test,password,sniff,sensitive,romon source="#####\
    ############################### System ###################################\r\
    \n:put (\"[*] Gathering system info...\")\r\
    \n:local cpuLoad [/system resource get cpu-load];\r\
    \n:local freeMemory [/system resource get free-memory];\r\
    \n:local usedMemory ([/system resource get total-memory] - \$freeMemory);\r\
    \n:local rosVersion [/system package get value-name=version \\\r\
    \n[/system package find where name ~ \"^routeros\"]];\r\
    \n:local model [/system routerboard get value-name=model];\r\
    \n:local serialNumber [/system routerboard get value-name=serial-number];\r\
    \n:local upTime [/system resource get uptime];\r\
    \n\r\
    \n#################################### message #####################################\r\
    \n:local message \\\r\
    \n\"{\\\"model\\\":\\\"\$model\\\",\\\r\
    \n\\\"sn\\\":\\\"\$serialNumber\\\",\\\r\
    \n\\\"ros\\\":\\\"\$rosVersion\\\",\\\r\
    \n\\\"cpu\\\":\\\"\$cpuLoad\\\",\\\r\
    \n\\\"umem\\\":\\\"\$usedMemory\\\",\\\r\
    \n\\\"fmem\\\":\\\"\$freeMemory\\\",\\\r\
    \n\\\"uptime\\\":\\\"\$upTime\\\"}\"\r\
    \n\r\
    \n:log info \"\$message\";\r\
    \n:put (\"[*] Total message size: \$[:len \$message] bytes\")\r\
    \n:put (\"[*] Sending message...\")\r\
    \n/iot mqtt publish broker=kaaiot message=\$message topic=\"kp1//epmx//update/keys/88\"\r\
    \n:put (\"[*] Done\")"
Step 13: Complete this part of the setup by running the last part of the code:
/system script run systeminfo
Data visualization using Kaa IoT dashboards
This section is designed to help you configure the display of data received from the router on the Kaa IoT platform.
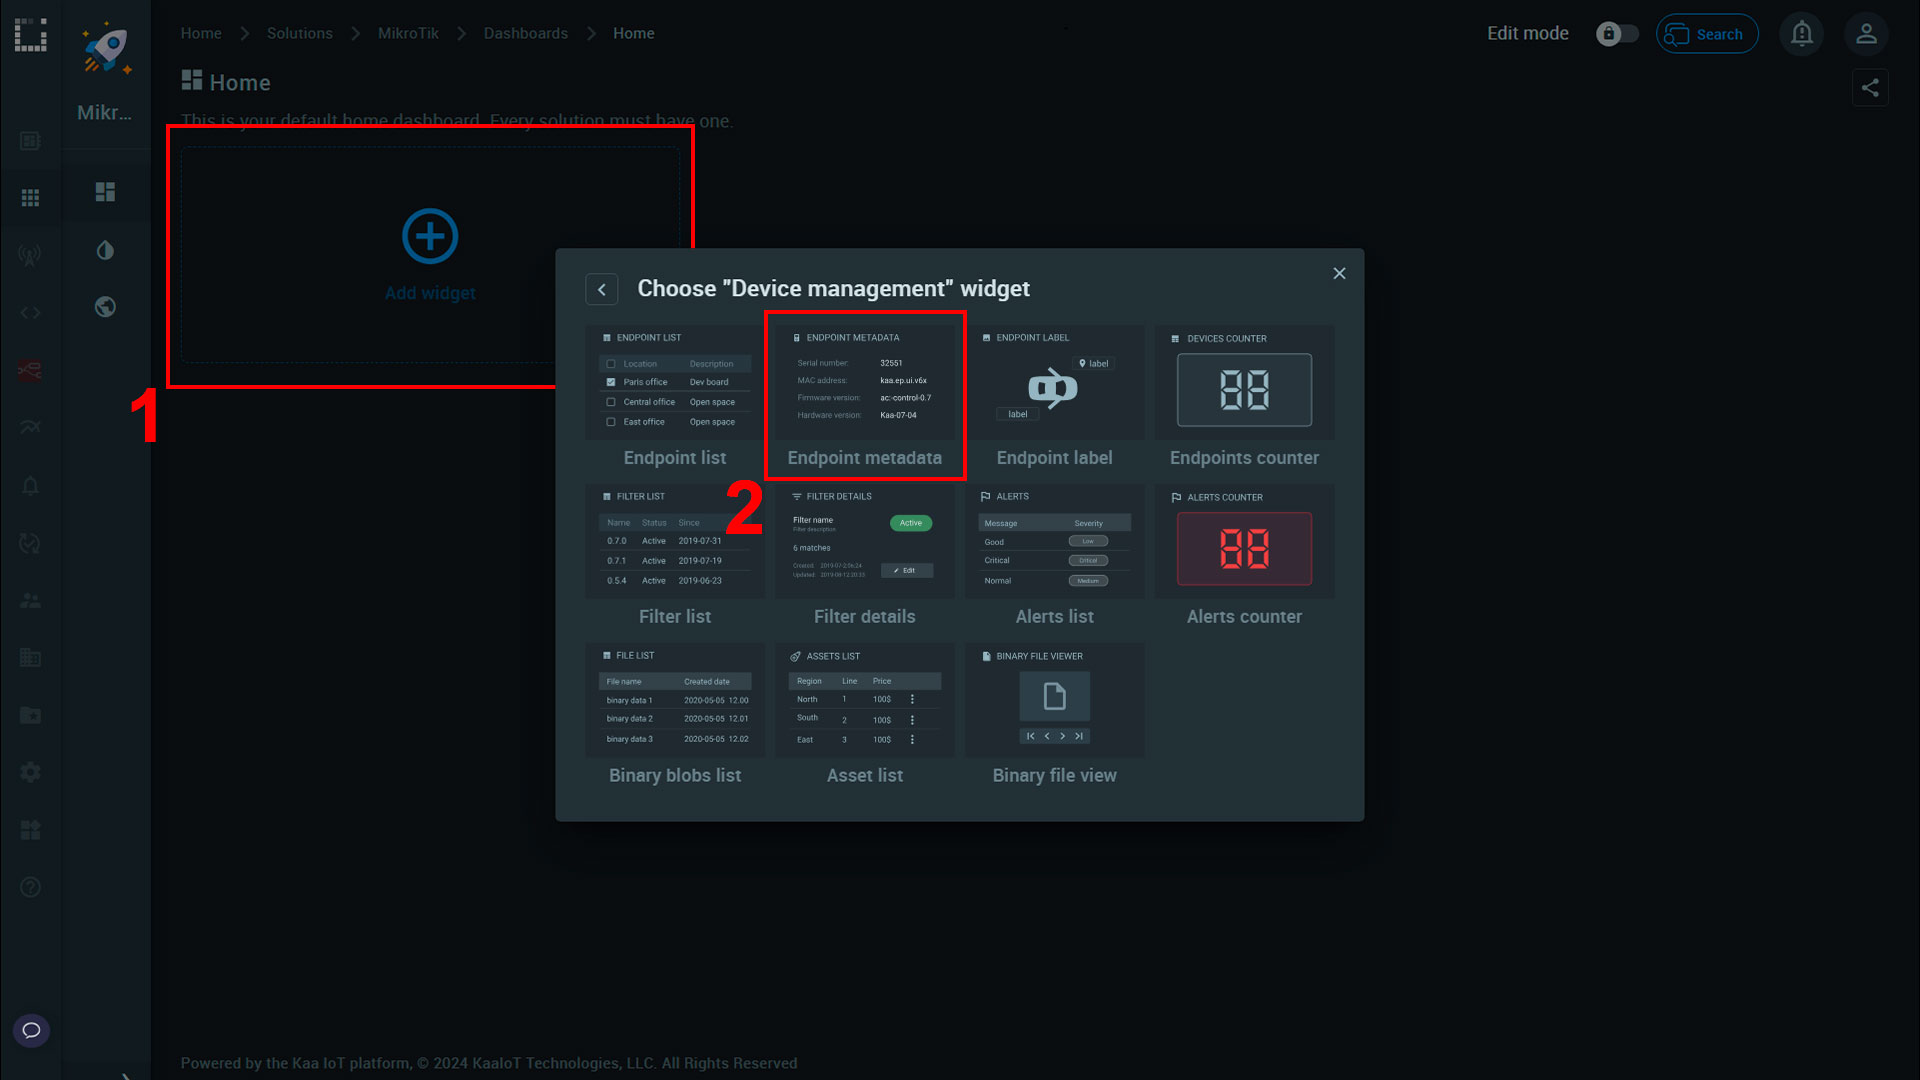
Step 1: Go to Kaa Cloud > Home > Solutions > Your Solution > Dashboards. After that, create the “Endpoint metadata” widget in this dashboard.
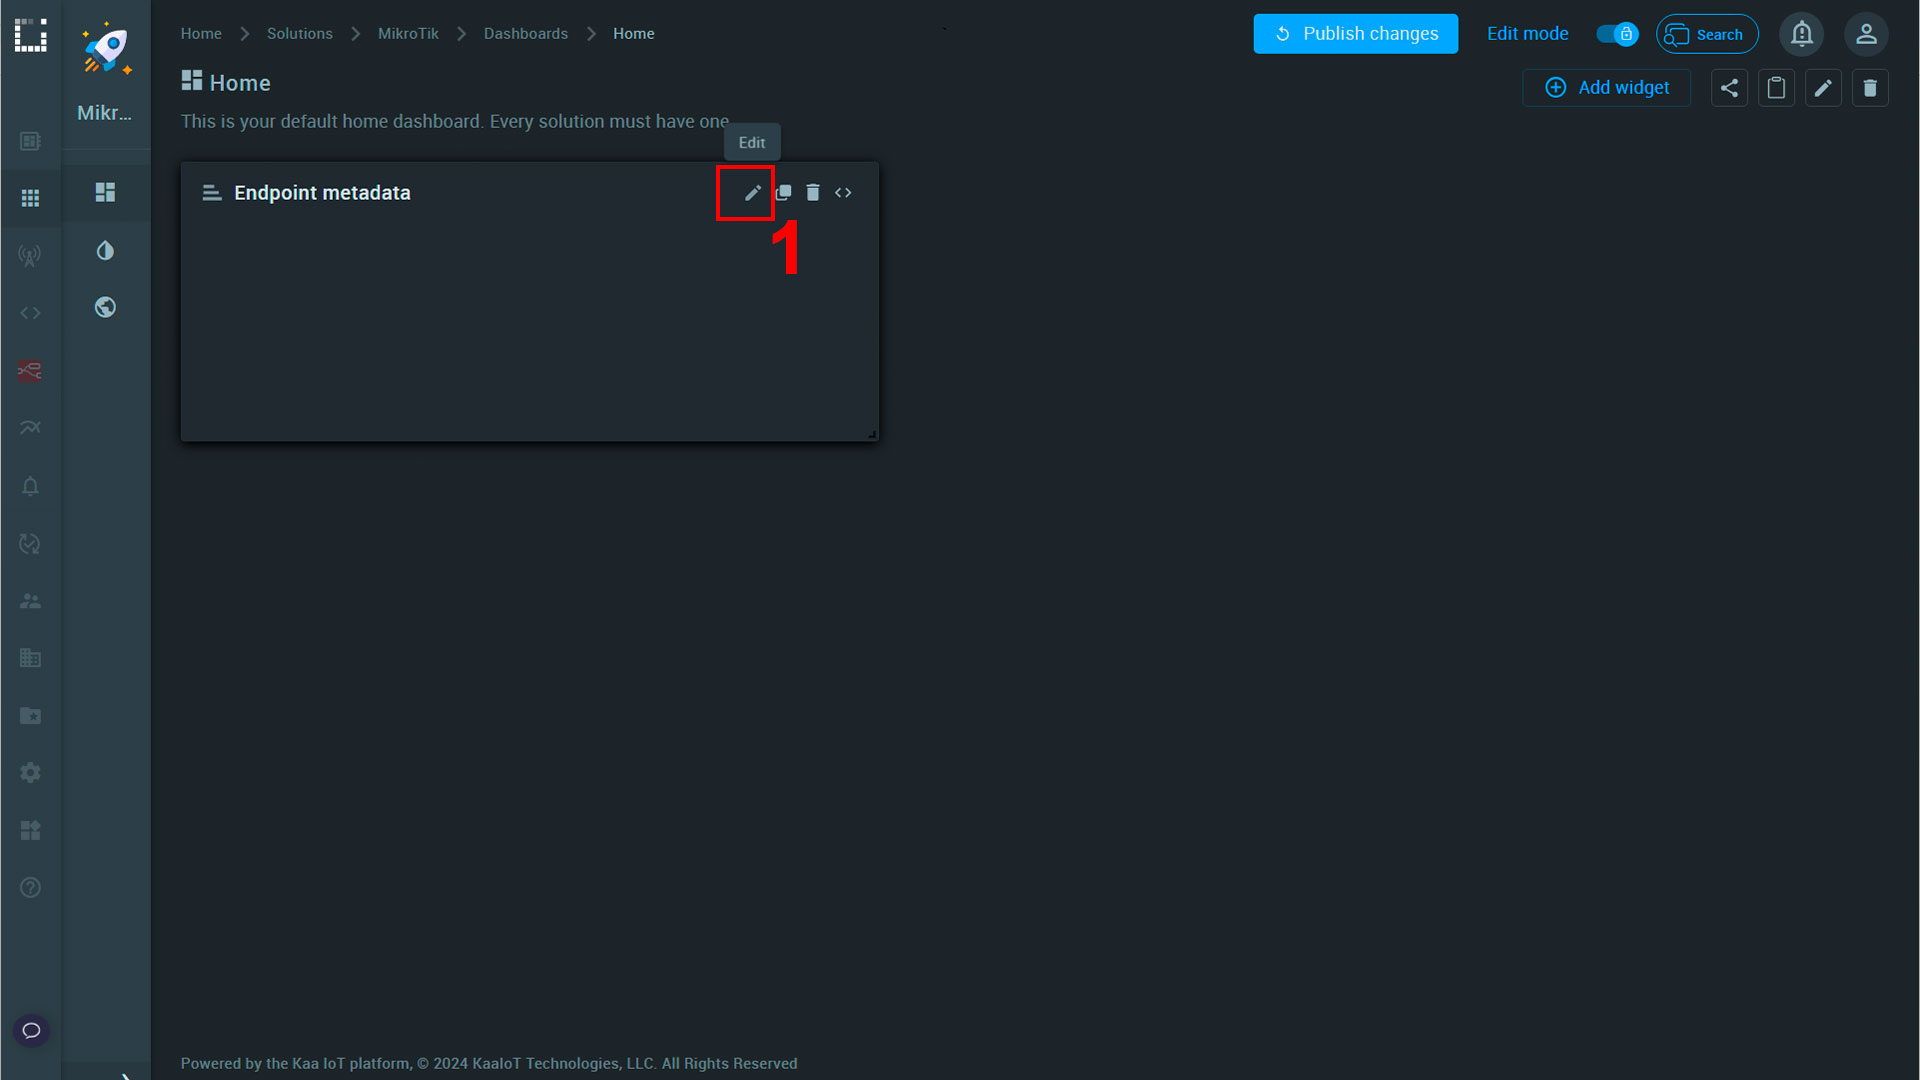
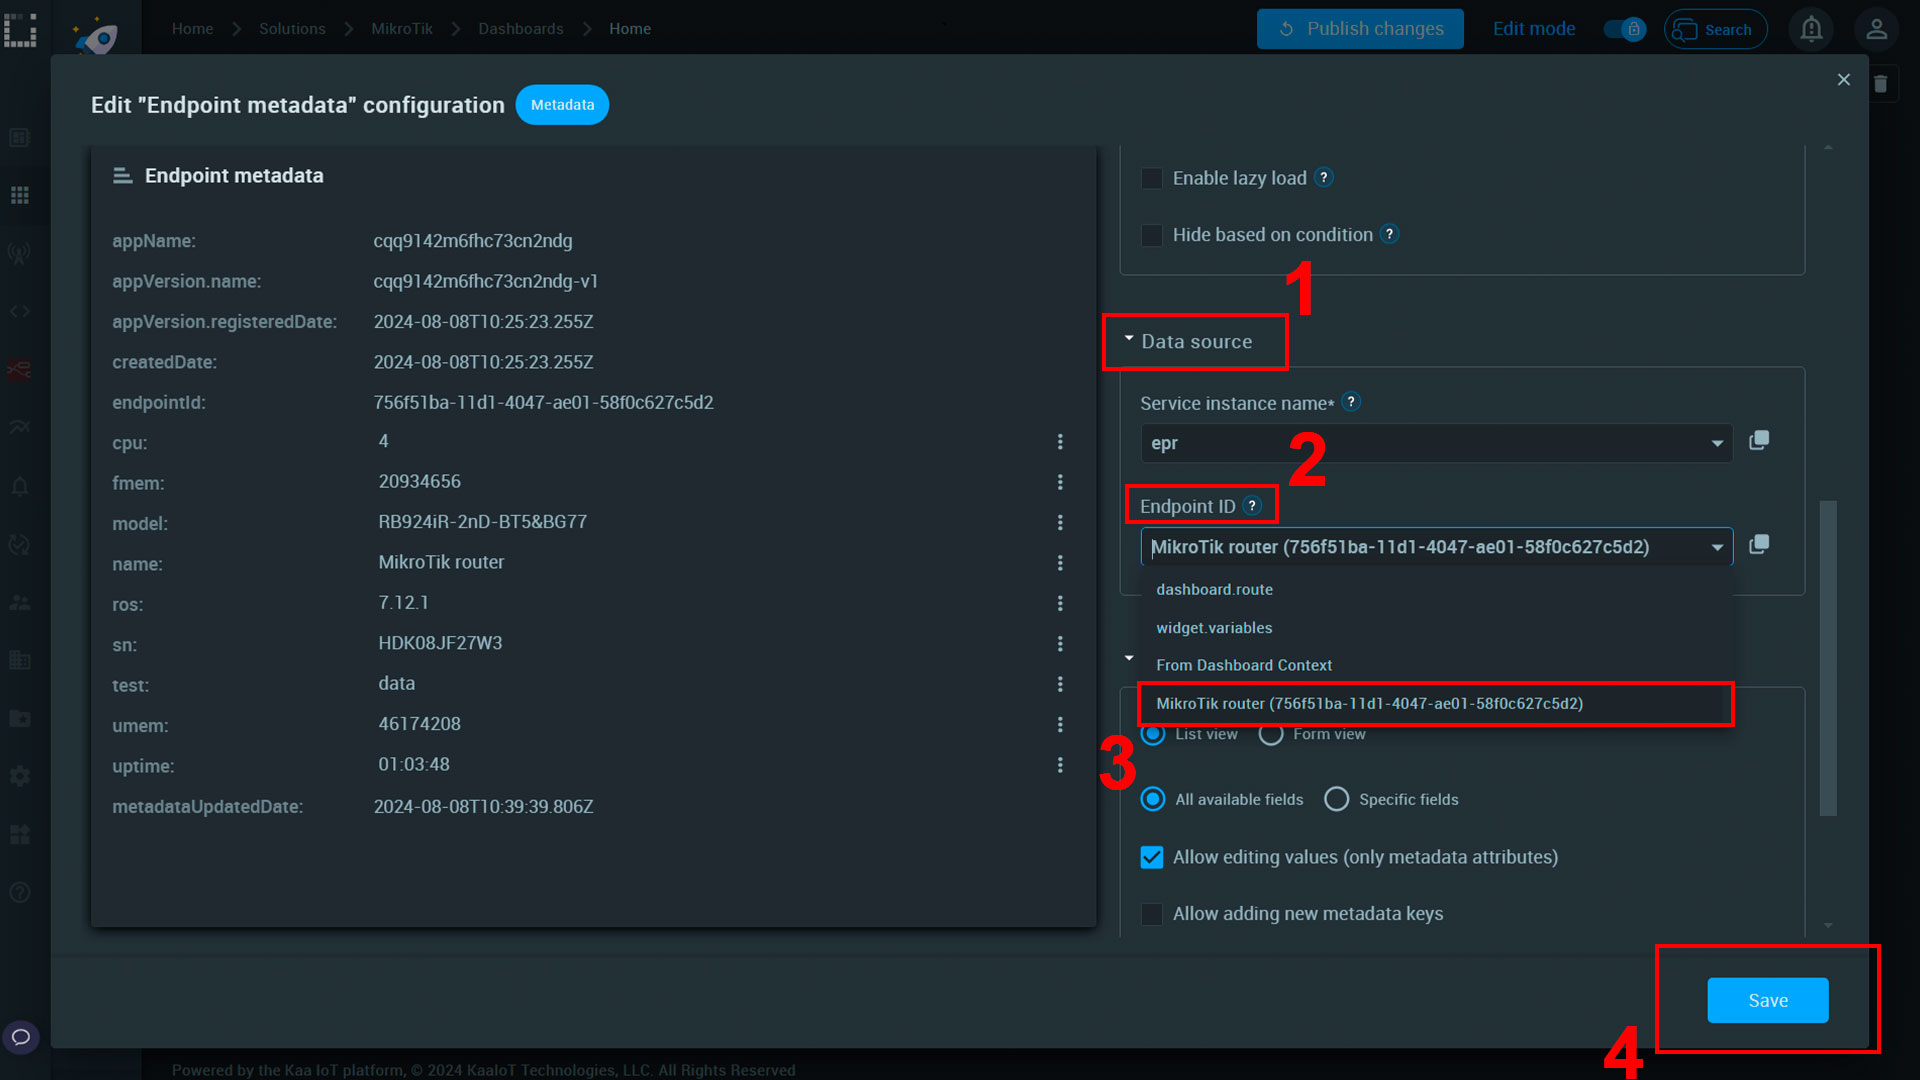
Step 2: Go to the settings of this widget and find the “Data source” section, select your router in the drop-down menu, and click the “Save” button.
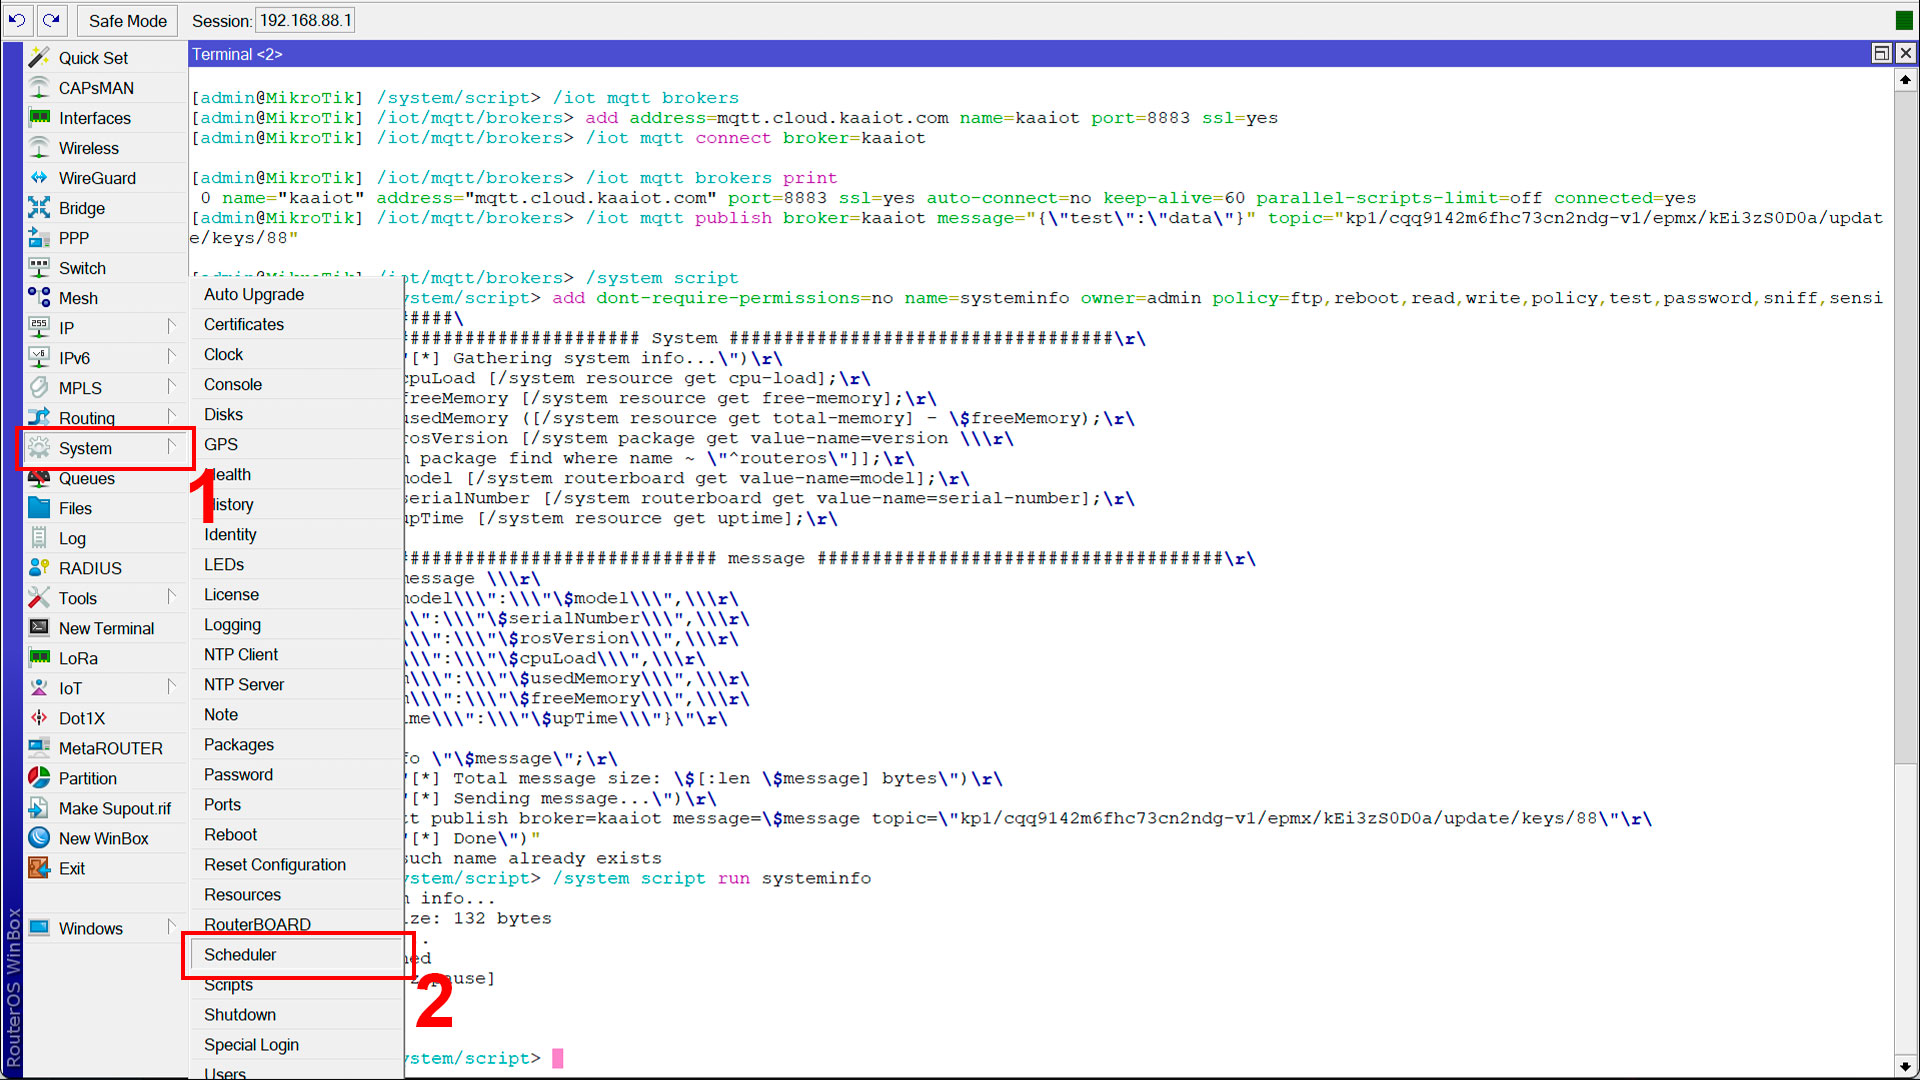
Step 3: Go back to the router's administrative panel, find the System tab, and select Scheduler. Create a new schedule using the command:
/system script run systeminfo
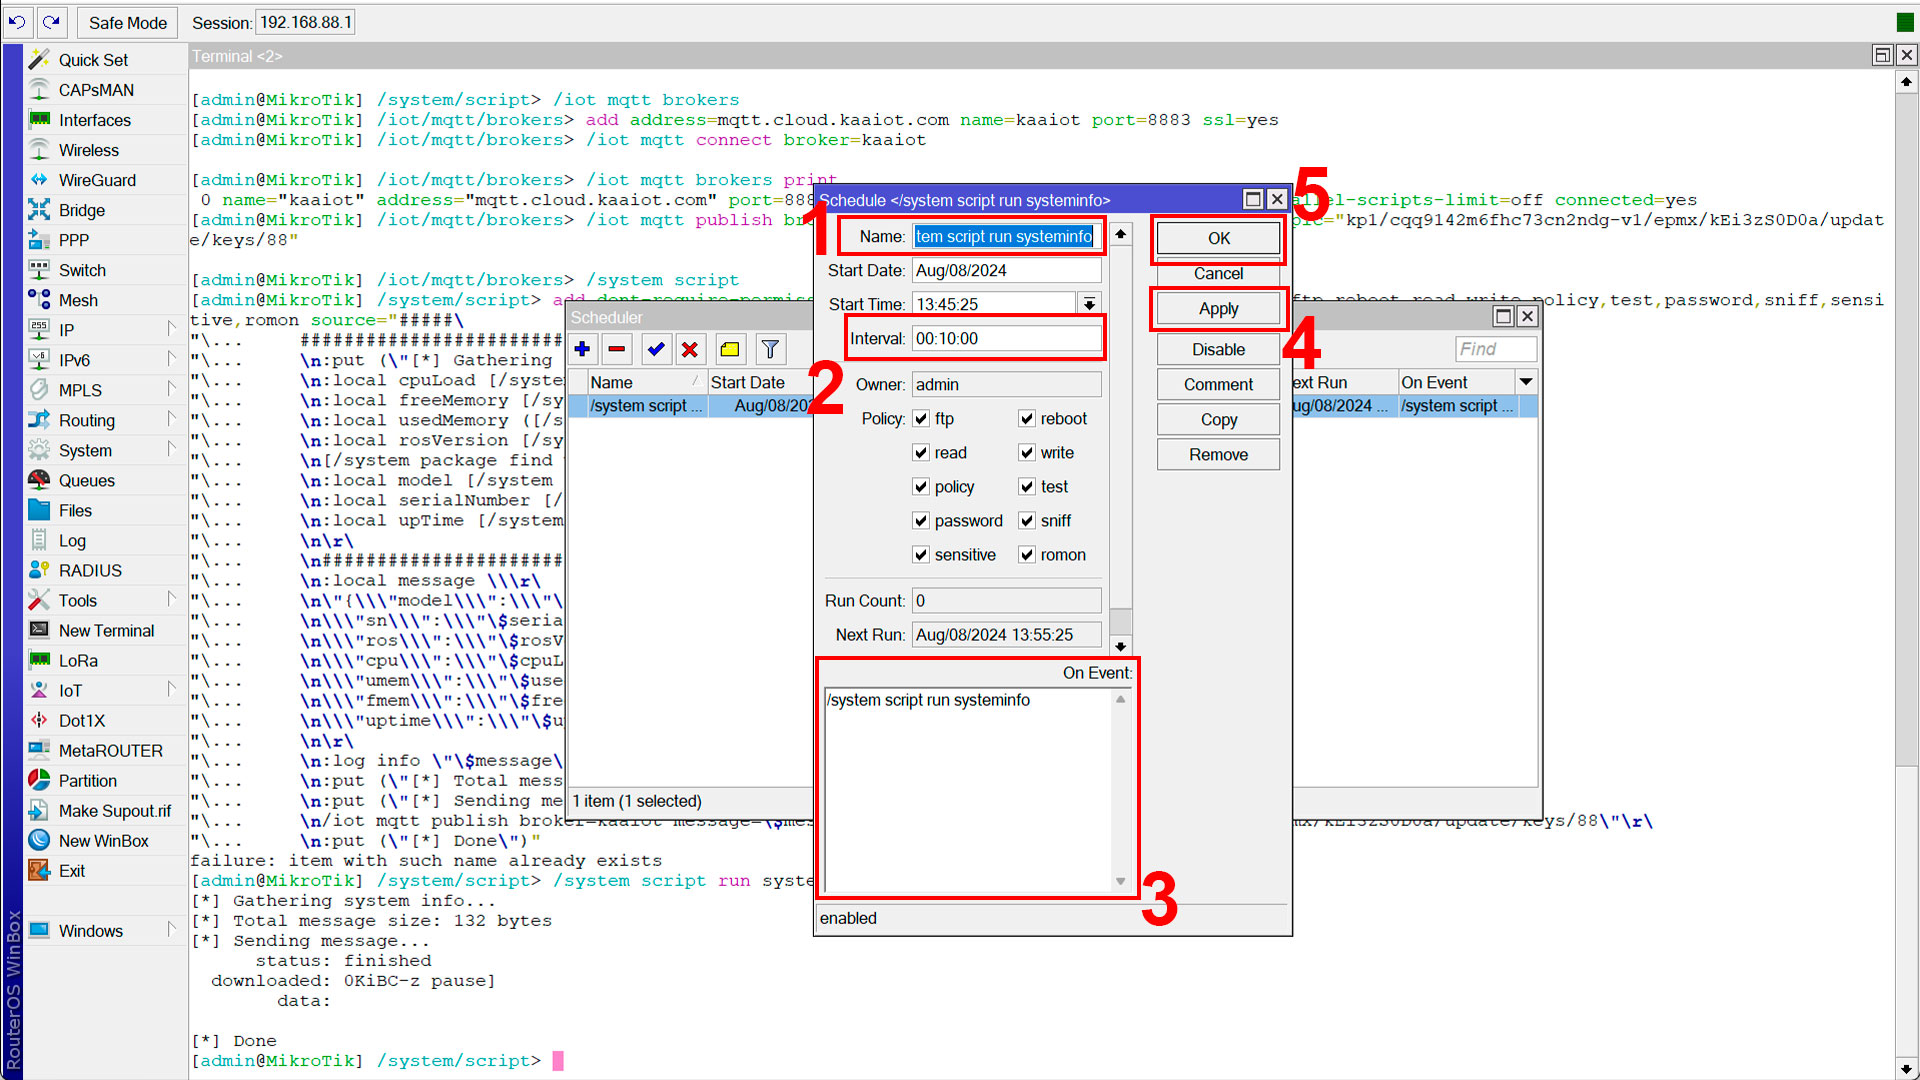
Step 4: In the scheduler settings, specify the following settings:
Name: To avoid problems in the future, we named it “/system script run systeminfo”
Interval: To avoid overloading the equipment, we have specified 10 seconds. If you need maximum speed and the most recent data, you can specify a shorter interval.
On Event: In the text box called “On Event” you need to specify exactly the command you want to repeat, in our case it is “/system script run systeminfo”
After that, click on the “Apply” and “OK” buttons.
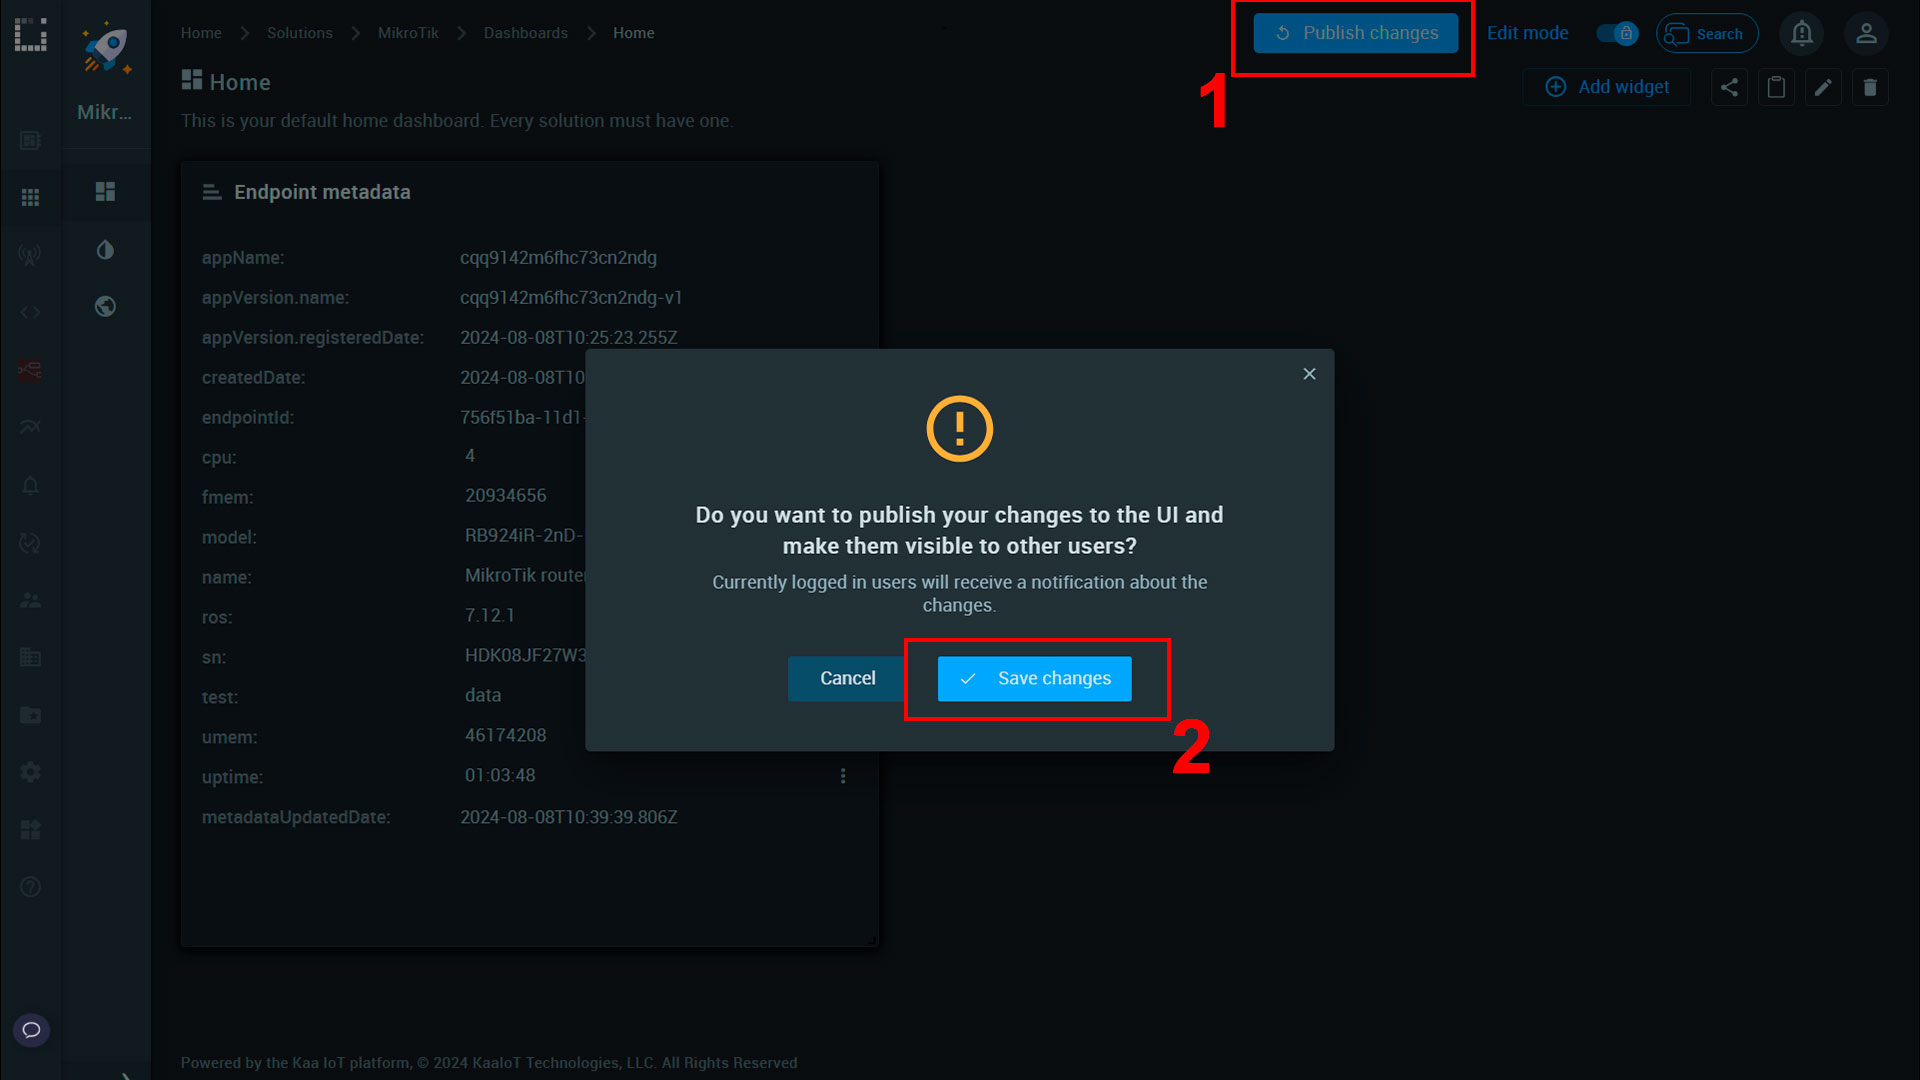
Step 5: Now you need to navigate back to the Kaa Cloud platform tab and save any changes you've made. To do this, you just need to click the button in the upper right corner called “Publish changes”.
Congratulations! You have successfully connected your MikroTik router to Kaa Cloud. Now you can create your own smart space with us!
For those interested in exploring the Kaa Cloud, stay tuned for more tutorials and updates. You may find more information in our documentation and on our blog for now.
Related Stories
In this guide, we will connect the TEKTELIC VIVID LORAWAN® SMART ROOM & OCCUPANCY SENSOR...
Explore the features of the TEKTELIC COMFORT LoRaWAN Smart Room sensor in this tutorial...
TEKTELIC BREEZE and Kaa integration provides actionable insights...
Kaa Cloud enables file uploads directly from your IoT devices...