How to connect Raspberry Pi
In this tutorial, we will look at how to connect a Raspberry Pi to the Kaa platform. You will learn how to create a digital twin of your device, connect it, submit some telemetry, and view it in the Kaa web interface.
Overview
Our Raspberry Pi will represent an endpoint in the Kaa platform and report temperature, humidity, and air pressure. Also, we will interact with the Kaa UI to create a digital twin of the Raspberry Pi and view telemetry data.
Prerequisites
- You have a Raspberry Pi board.
- You have a Kaa Cloud account.
- You have a BME280 sensor (optional).
Playbook
Connect your device
Go to the “Device Management” dashboard in your account
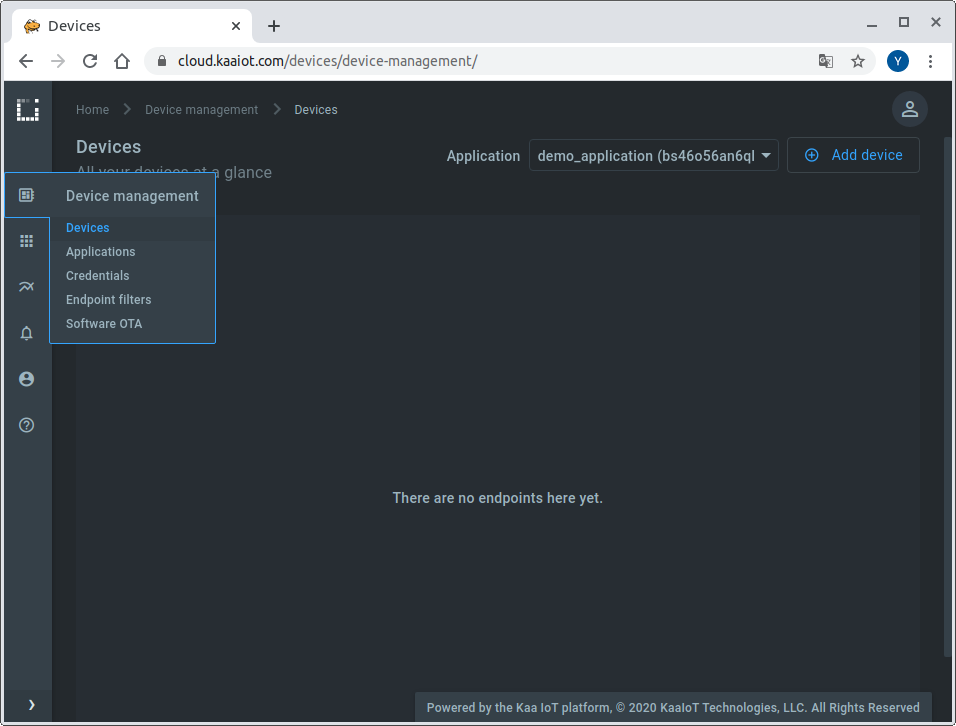
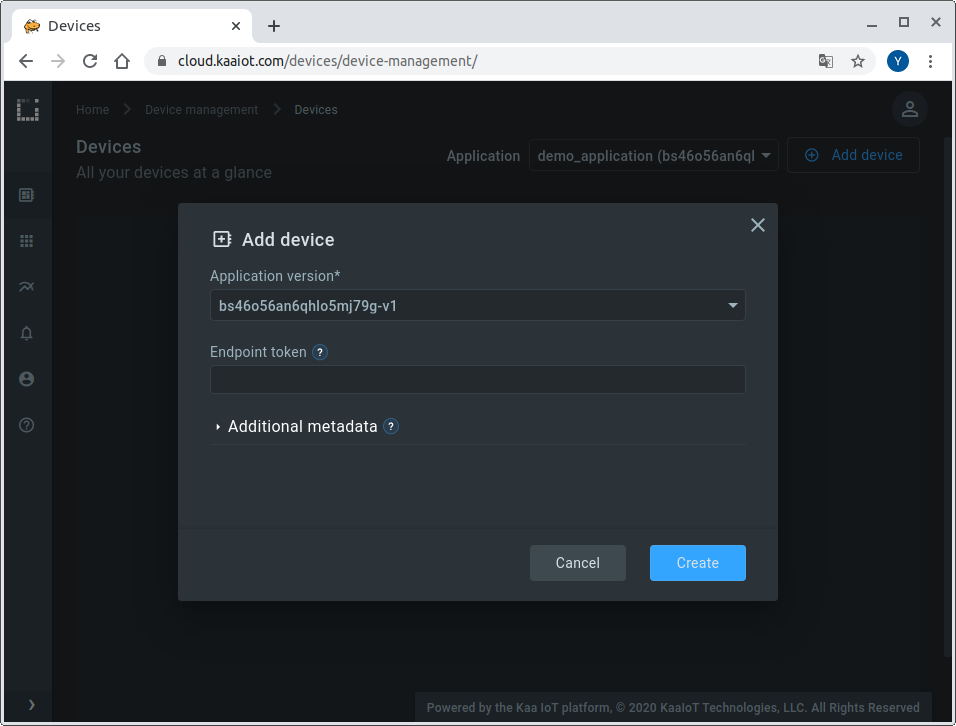
and add a new device specifying a token that we will use later to identify a Raspberry Pi in the Kaa Cloud.
Also, go to the added device page from the “Device Management” dashboard and copy the application version name.
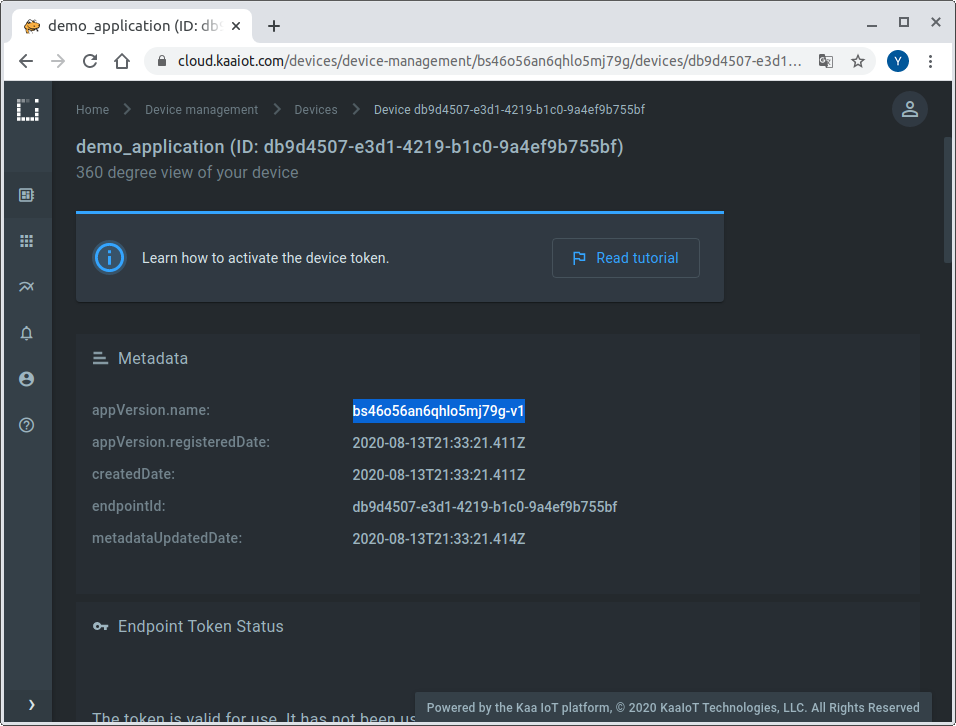
We will need both the application version and token to connect a Raspberry Pi to the Kaa Cloud.
Now that we have a device’s digital twin created in Kaa together with its token and application version, let’s work with the Raspberry Pi.
Connect the BME280 sensor to the Raspberry Pi by referring to the following table:
| MODULE PCB | DESC | GPIO HEADER PINS |
|---|---|---|
| VCC | 3.3V | P1-01 |
| GND | Ground | P1-06 |
| SCL | I2C SCL | P1-05 |
| SDA | I2C SDA | P1-03 |
Here’s the diagram of a breadboard setup.
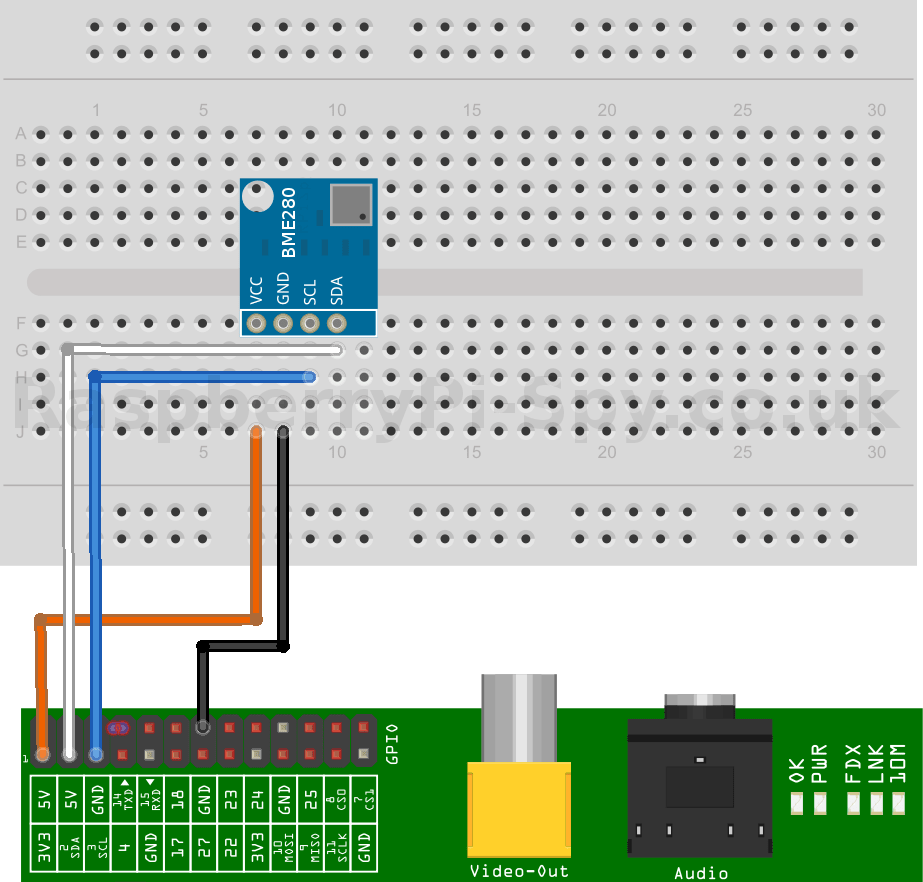
If you don’t have the BME280 sensor, then skip the above step and move on.
Connect the Raspberry Pi to the WiFi.
Once the Raspberry Pi is connected to the WiFi, install the BME Python library:
$ pip install bme280
Sending Data Over MQTT
Install Eclipse Paho MQTT Python client library:
$ pip install paho-mqtt
Create somewhere on the Raspberry Pi filesystem a file called “client.py” and open it.
If you have BME280 use this Python code:
import json
import random
import signal
import string
import time
import bme280

import paho.mqtt.client as mqtt

KPC_HOST = "mqtt.cloud.kaaiot.com"  # Kaa Cloud plain MQTT host
KPC_PORT = 1883  # Kaa Cloud plain MQTT port

ENDPOINT_TOKEN = ""       # Paste endpoint token
APPLICATION_VERSION = ""  # Paste application version


class KaaClient:

    def __init__(self, client):
        self.client = client
        self.metadata_update_topic = f'kp1/{APPLICATION_VERSION}/epmx/{ENDPOINT_TOKEN}/update/keys'
        self.data_collection_topic = f'kp1/{APPLICATION_VERSION}/dcx/{ENDPOINT_TOKEN}/json'

    def connect_to_server(self):
        print(f'Connecting to Kaa server at {KPC_HOST}:{KPC_PORT} using application version {APPLICATION_VERSION} and endpoint token {ENDPOINT_TOKEN}')
        self.client.connect(KPC_HOST, KPC_PORT, 60)
        print('Successfully connected')

    def disconnect_from_server(self):
        print(f'Disconnecting from Kaa server at {KPC_HOST}:{KPC_PORT}...')
        self.client.loop_stop()
        self.client.disconnect()
        print('Successfully disconnected')

    def compose_metadata(self):
        return json.dumps([
            {
                "model": "BME/BMP 280",
                "fwVersion": "v0.0.1",
                "customer": "Andrew",
                "latitude": 40.71427,
                "longitude": -74.00597,
            }
        ])

    def compose_data_sample(self):
        # BME/BMP 280
        temperature, pressure, humidity = bme280.readBME280All()

        return json.dumps([
            {
                "timestamp": int(round(time.time() * 1000)),
                "temperature": round(temperature,1),
                "humidity": int(humidity),
                "pressure": round(pressure,2)
            }
        ])


def on_message(client, userdata, message):
    print(f'<-- Received message on topic "{message.topic}":\n{str(message.payload.decode("utf-8"))}')


def main():
    # Initiate server connection
    client = mqtt.Client(client_id=''.join(random.choice(string.ascii_uppercase + string.digits) for _ in range(6)))

    kaa_client = KaaClient(client)
    kaa_client.connect_to_server()
    client.on_message = on_message

    # Start the loop
    client.loop_start()

    # Send data samples in loop
    listener = SignalListener()

    payload = kaa_client.compose_metadata()
    result = kaa_client.client.publish(topic=kaa_client.metadata_update_topic, payload=payload)
    print(f'--> Sent message on topic "{kaa_client.metadata_update_topic}":\n{payload}')

    while listener.keepRunning:
        payload = kaa_client.compose_data_sample()
        result = kaa_client.client.publish(topic=kaa_client.data_collection_topic, payload=payload)
        if result.rc != 0:
            print('Server connection lost, attempting to reconnect')
            kaa_client.connect_to_server()
        else:
            print(f'--> Sent message on topic "{kaa_client.data_collection_topic}":\n{payload}')
        time.sleep(3)

    kaa_client.disconnect_from_server()


class SignalListener:
    keepRunning = True

    def __init__(self):
        signal.signal(signal.SIGINT, self.stop)
        signal.signal(signal.SIGTERM, self.stop)

    def stop(self, signum, frame):
        print('Shutting down...')
        self.keepRunning = False


if __name__ == '__main__':
    main()
If not use this Python code:
import json
import random
import signal
import string
import time

import paho.mqtt.client as mqtt

KPC_HOST = "mqtt.cloud.kaaiot.com"  # Kaa Cloud plain MQTT host
KPC_PORT = 1883  # Kaa Cloud plain MQTT port

ENDPOINT_TOKEN = ""       # Paste endpoint token
APPLICATION_VERSION = ""  # Paste application version


class KaaClient:

    def __init__(self, client):
        self.client = client
        self.metadata_update_topic = f'kp1/{APPLICATION_VERSION}/epmx/{ENDPOINT_TOKEN}/update/keys'
        self.data_collection_topic = f'kp1/{APPLICATION_VERSION}/dcx/{ENDPOINT_TOKEN}/json'

    def connect_to_server(self):
        print(f'Connecting to Kaa server at {KPC_HOST}:{KPC_PORT} using application version {APPLICATION_VERSION} and endpoint token {ENDPOINT_TOKEN}')
        self.client.connect(KPC_HOST, KPC_PORT, 60)
        print('Successfully connected')

    def disconnect_from_server(self):
        print(f'Disconnecting from Kaa server at {KPC_HOST}:{KPC_PORT}...')
        self.client.loop_stop()
        self.client.disconnect()
        print('Successfully disconnected')

    def compose_metadata(self):
        return json.dumps([
            {
                "model": "BME/BMP 280",
                "fwVersion": "v0.0.1",
                "customer": "Andrew",
                "latitude": 40.71427,
                "longitude": -74.00597,
            }
        ])

    def compose_data_sample(self):
        return json.dumps([
            {
              "timestamp": int(round(time.time() * 1000)),
              "temperature": random.randint(18, 23),
              "humidity": random.randint(40, 60),
              "pressure": random.randint(980, 1000)
            }
        ])


def on_message(client, userdata, message):
    print(f'<-- Received message on topic "{message.topic}":\n{str(message.payload.decode("utf-8"))}')


def main():
    # Initiate server connection
    client = mqtt.Client(client_id=''.join(random.choice(string.ascii_uppercase + string.digits) for _ in range(6)))

    kaa_client = KaaClient(client)
    kaa_client.connect_to_server()
    client.on_message = on_message

    # Start the loop
    client.loop_start()

    # Send data samples in loop
    listener = SignalListener()

    payload = kaa_client.compose_metadata()
    result = kaa_client.client.publish(topic=kaa_client.metadata_update_topic, payload=payload)
    print(f'--> Sent message on topic "{kaa_client.metadata_update_topic}":\n{payload}')

    while listener.keepRunning:
        payload = kaa_client.compose_data_sample()
        result = kaa_client.client.publish(topic=kaa_client.data_collection_topic, payload=payload)
        if result.rc != 0:
            print('Server connection lost, attempting to reconnect')
            kaa_client.connect_to_server()
        else:
            print(f'--> Sent message on topic "{kaa_client.data_collection_topic}":\n{payload}')
        time.sleep(3)

    kaa_client.disconnect_from_server()


class SignalListener:
    keepRunning = True

    def __init__(self):
        signal.signal(signal.SIGINT, self.stop)
        signal.signal(signal.SIGTERM, self.stop)

    def stop(self, signum, frame):
        print('Shutting down...')
        self.keepRunning = False


if __name__ == '__main__':
    main()
Copy the corresponding code then paste it into the “client.py” file.
Edit endpoint token and application version in your newly created “client.py” file.
ENDPOINT_TOKEN = "your_token"             # Paste endpoint token
APPLICATION_VERSION = "your_app_version"  # Paste application version
Save and close the “client.py” file and run it:
$ python client.py
Visualize data from the device
1. Enable the time series auto-extraction from data samples for the previously created Kaa application. For that, go to “Device management” / “Applications” / your application / epts.

Enable the auto-extraction.
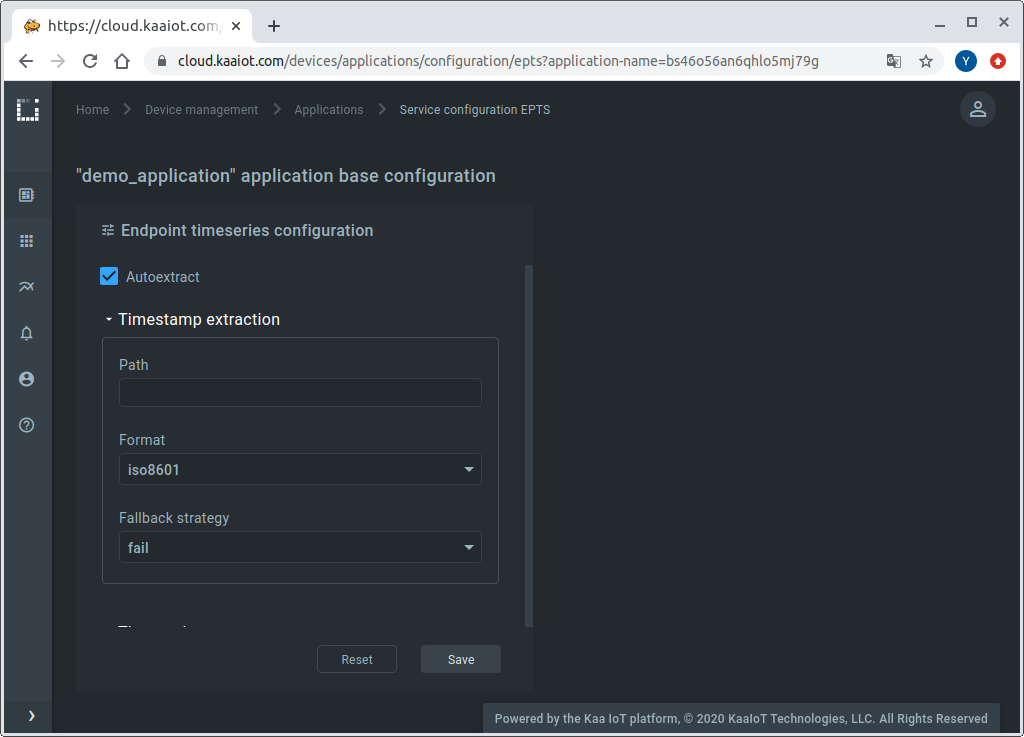
With this function enabled, Kaa will automatically create a time series for each numeric field it encounters at the root of data samples your endpoints submit. You will then be able to view these time series in Kaa UI, no extra configuration is required.
2. Go to the device details page of the recently created endpoint (by clicking on the corresponding row in the device table on the “Devices” dashboard). See the data from your Raspberry Pi on the “Device telemetry” widget.
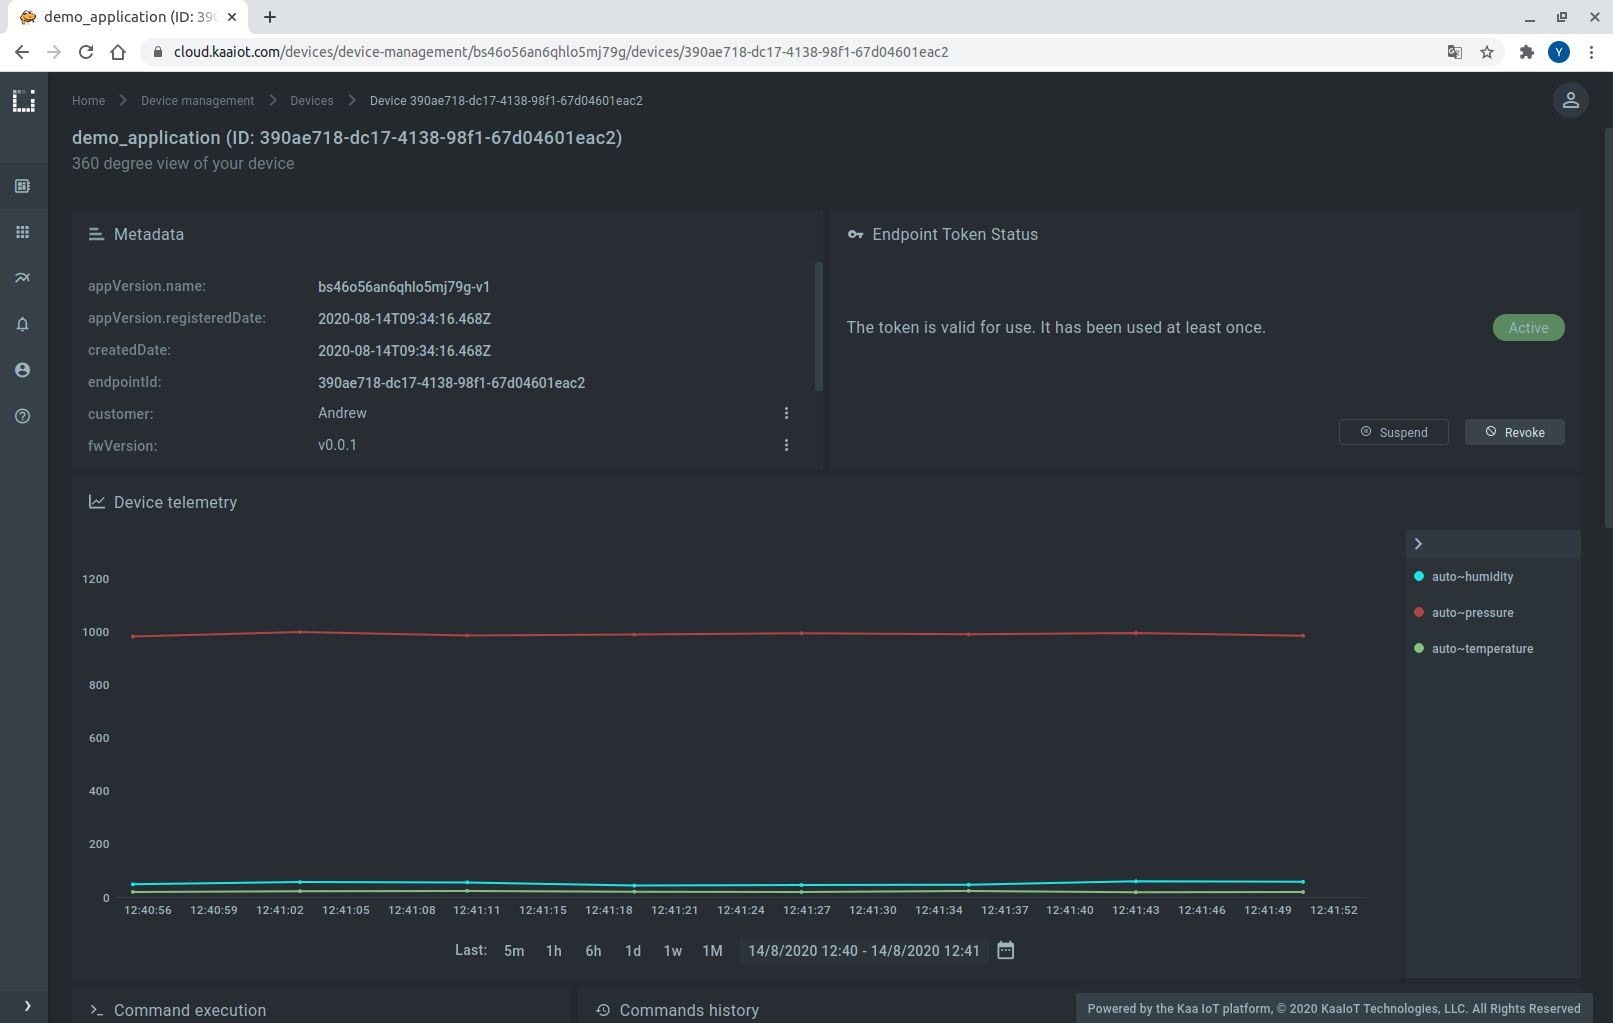
Congratulations, you have connected and visualized data from your Raspberry Pi!
Resources
- All tutorial resources are located on GitHub.


