Alerts
Continuous monitoring and immediate response are key components of the Internet of Things. KaaIoT offers a robust alert system to help you achieve this. The platform enables proactive management and quick response to various conditions.
In this page, we will go over the main alert concepts, and steps to set up alerts in the Kaa IoT platform, including how to choose monitoring settings and configure additional actions. It will walk you through the steps to set up email alerts in the Kaa Cloud, which allows you to monitor critical events and take appropriate actions.
Where can IoT alerts be applied?
- Industrial equipment monitoring
- Smart building management
- Environmental monitoring
- Fleet management
Prerequisites
- Active account in the Kaa IoT Cloud.
- Ensure you have a connected device or simulator and have published some data, whether metadata or telemetry values.
Main Concepts
Alert Type
An alert type specifies the category of an alert, such as high temperature, device offline, or battery low.
It is usually defined as a constant string, e.g., HIGH_TEMPERATURE, DEVICE_OFFLINE, etc.
Acknowledgement
Alert Acknowledgement refers to the process of marking an alert as acknowledged or handled after it has been triggered and brought to the attention of a user or operator.
It confirms that an alert has been noticed and addressed by the responsible party.
Initially, an alert is in an unacknowledged state.
Severity Level
Severity Level refers to the classification of alerts or events based on their importance or urgency.
Possible values are: Info, Low, Medium, High, Critical.
State
Alert State refers to the current status of an alert within its lifecycle.
Possible values are: Active, Resolved.
- An alert initially has an Active state, meaning it is currently ongoing or not yet resolved. If an alert is in the Active state, it indicates that the condition that triggered it is still true.
- The Resolved state indicates that the condition that triggered the alert is no longer present, e.g., the temperature is back to normal.
Once an alert has been resolved, it cannot return to the Active state. Instead, a new alert is created with the Active state.
Entity Type
Alert Entity Type refers to the kind of entity that the alert is associated with or, in other words, raised on.
Currently, two possible entity types are supported: Endpoint and Tenant.
- Examples of alerts associated with an Endpoint include high temperature, low battery, etc.
- Examples of alerts associated with a Tenant include traffic quota reached, rule execution quota reached, etc.
In the future, other entity types will be supported, e.g., assets, users, etc.
Entity ID
The ID of the entity that an alert is associated with, e.g., endpoint ID.
Activate Reason
Activate Reason is a human-readable explanation of the condition or event that caused the alert.
Resolve Reason
Resolve Reason is a human-readable explanation for why the alert was transitioned to the Resolved state.
Handbook
Creating alert
To begin setting up alerts, you need to create Alert Setting where you will specify the trigger, condition, and actions to be taken when the alert is activated or resolved.
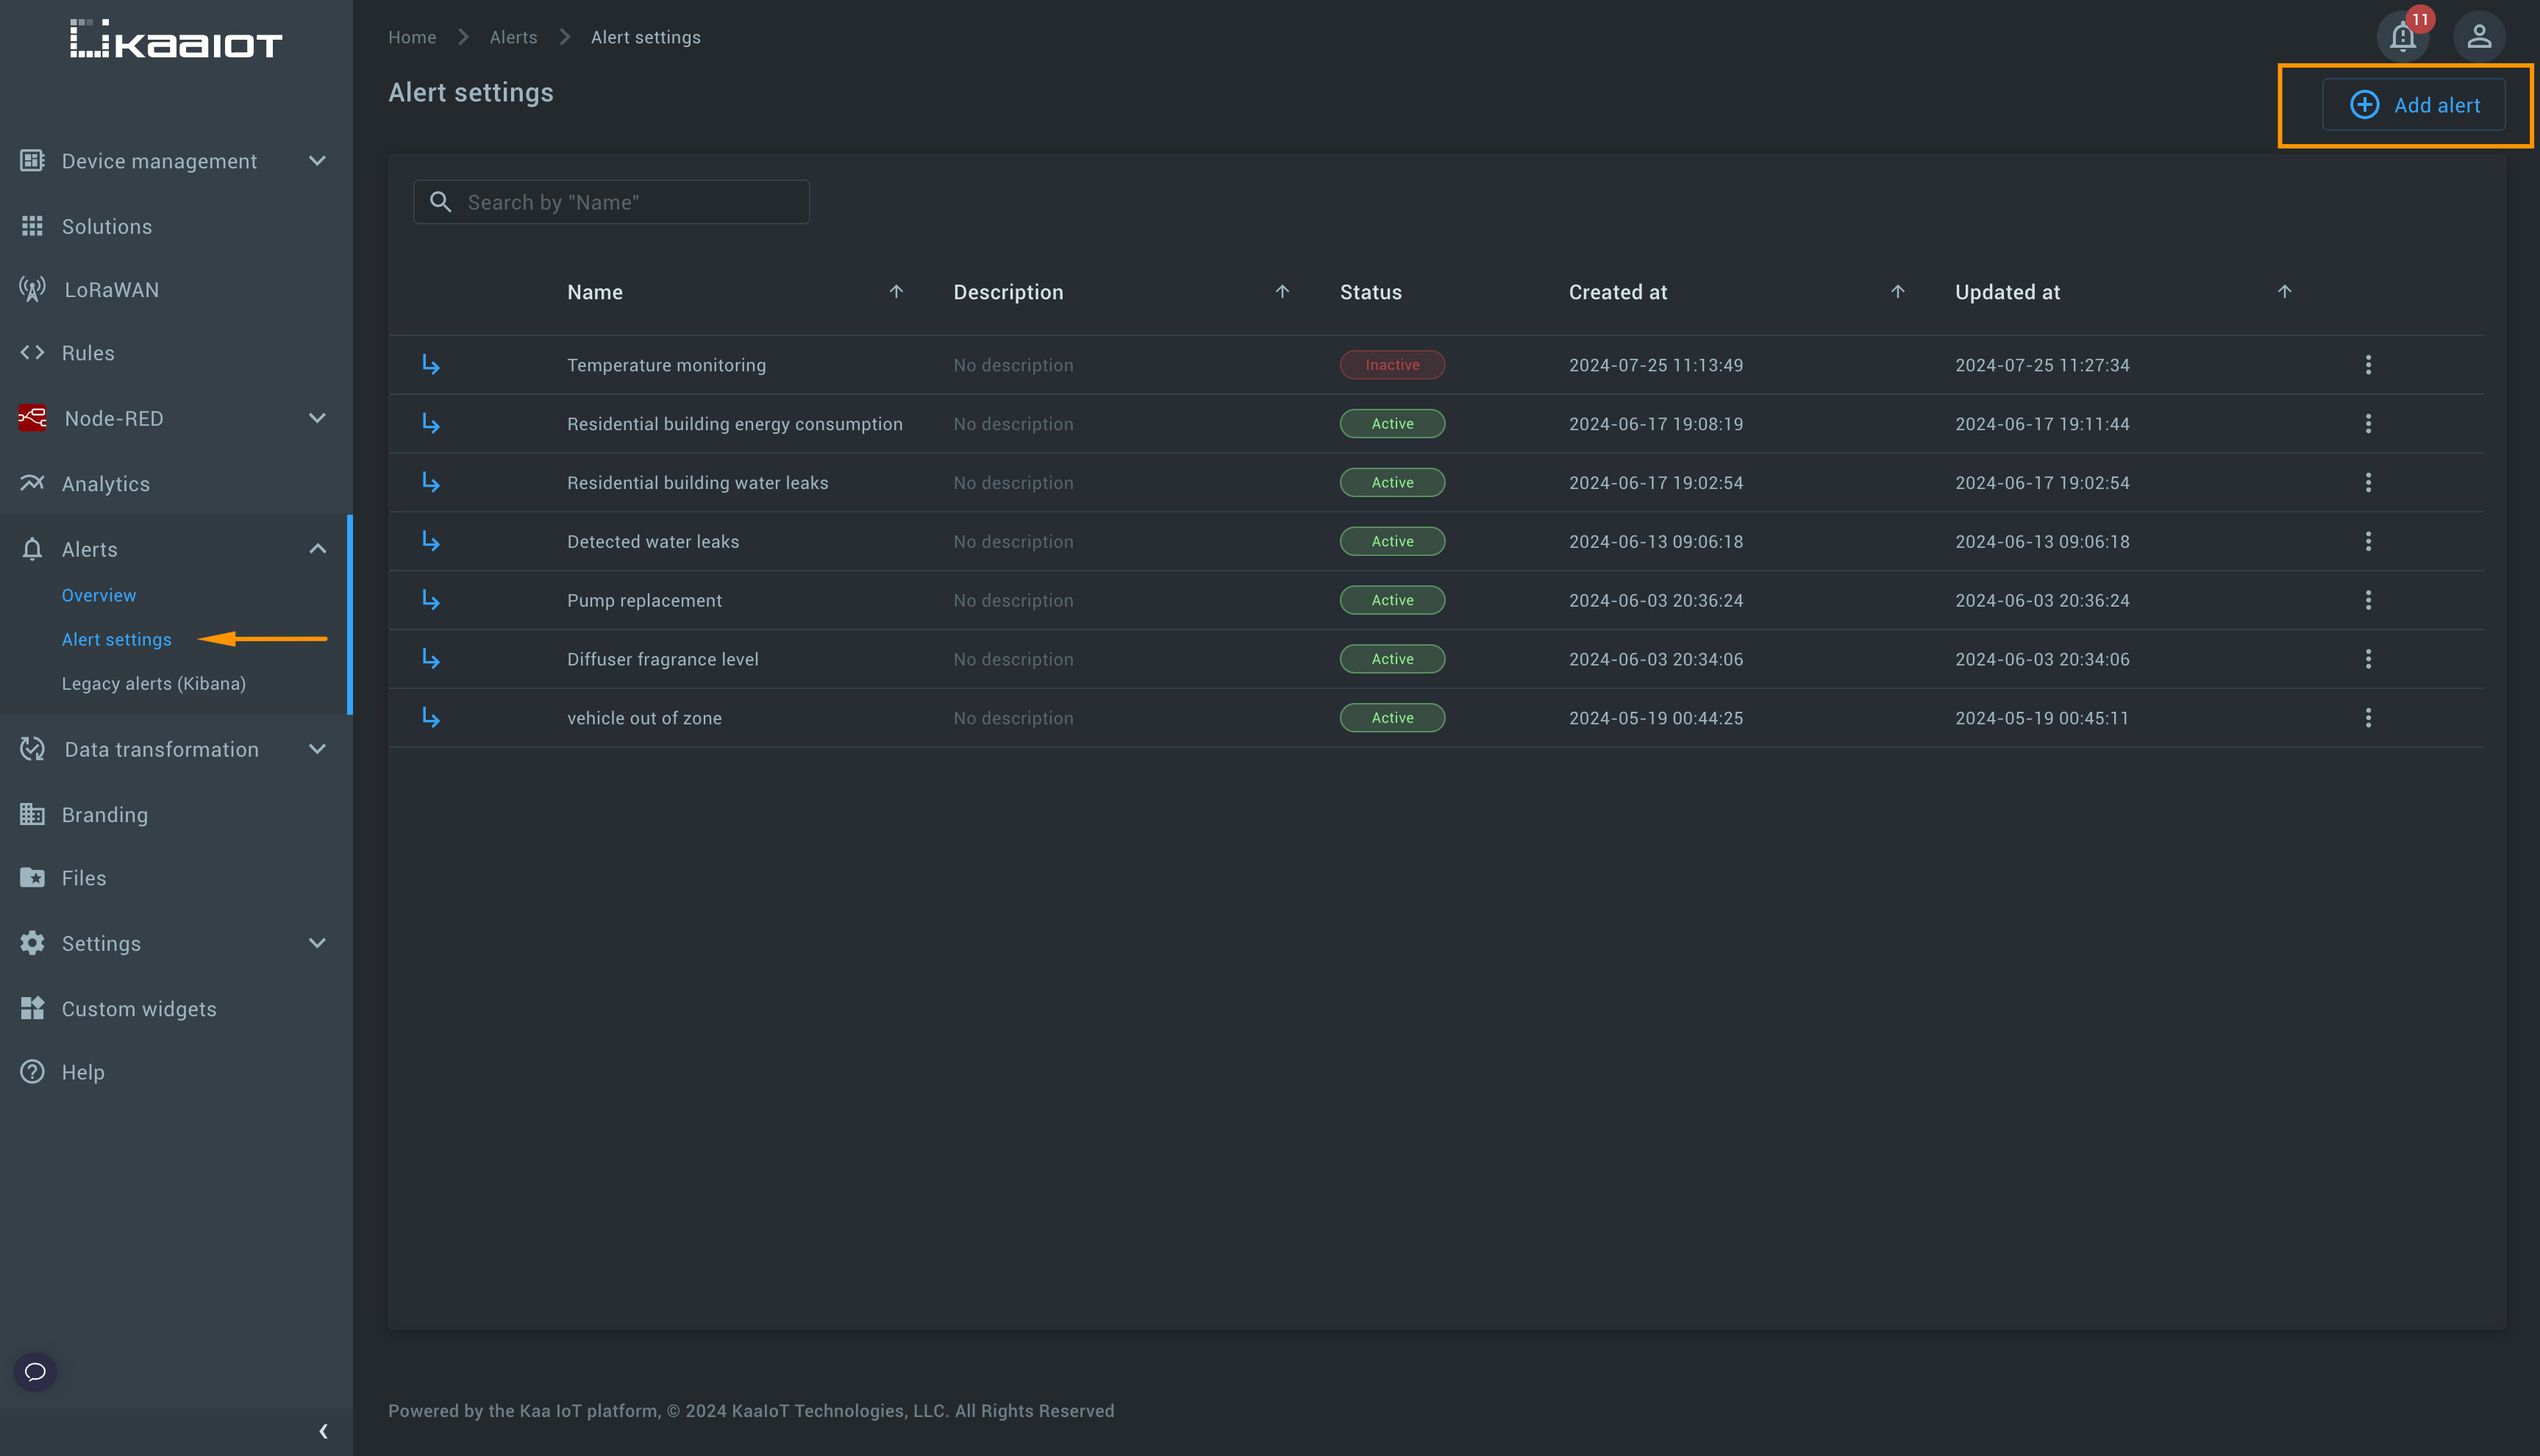
- Open Alerts -> Alert Settings: This page allows you to manage alert settings, where you can create, update, delete, or disable alerts.
- Hit “Add Alert”: Start the process of setting up a new alert.
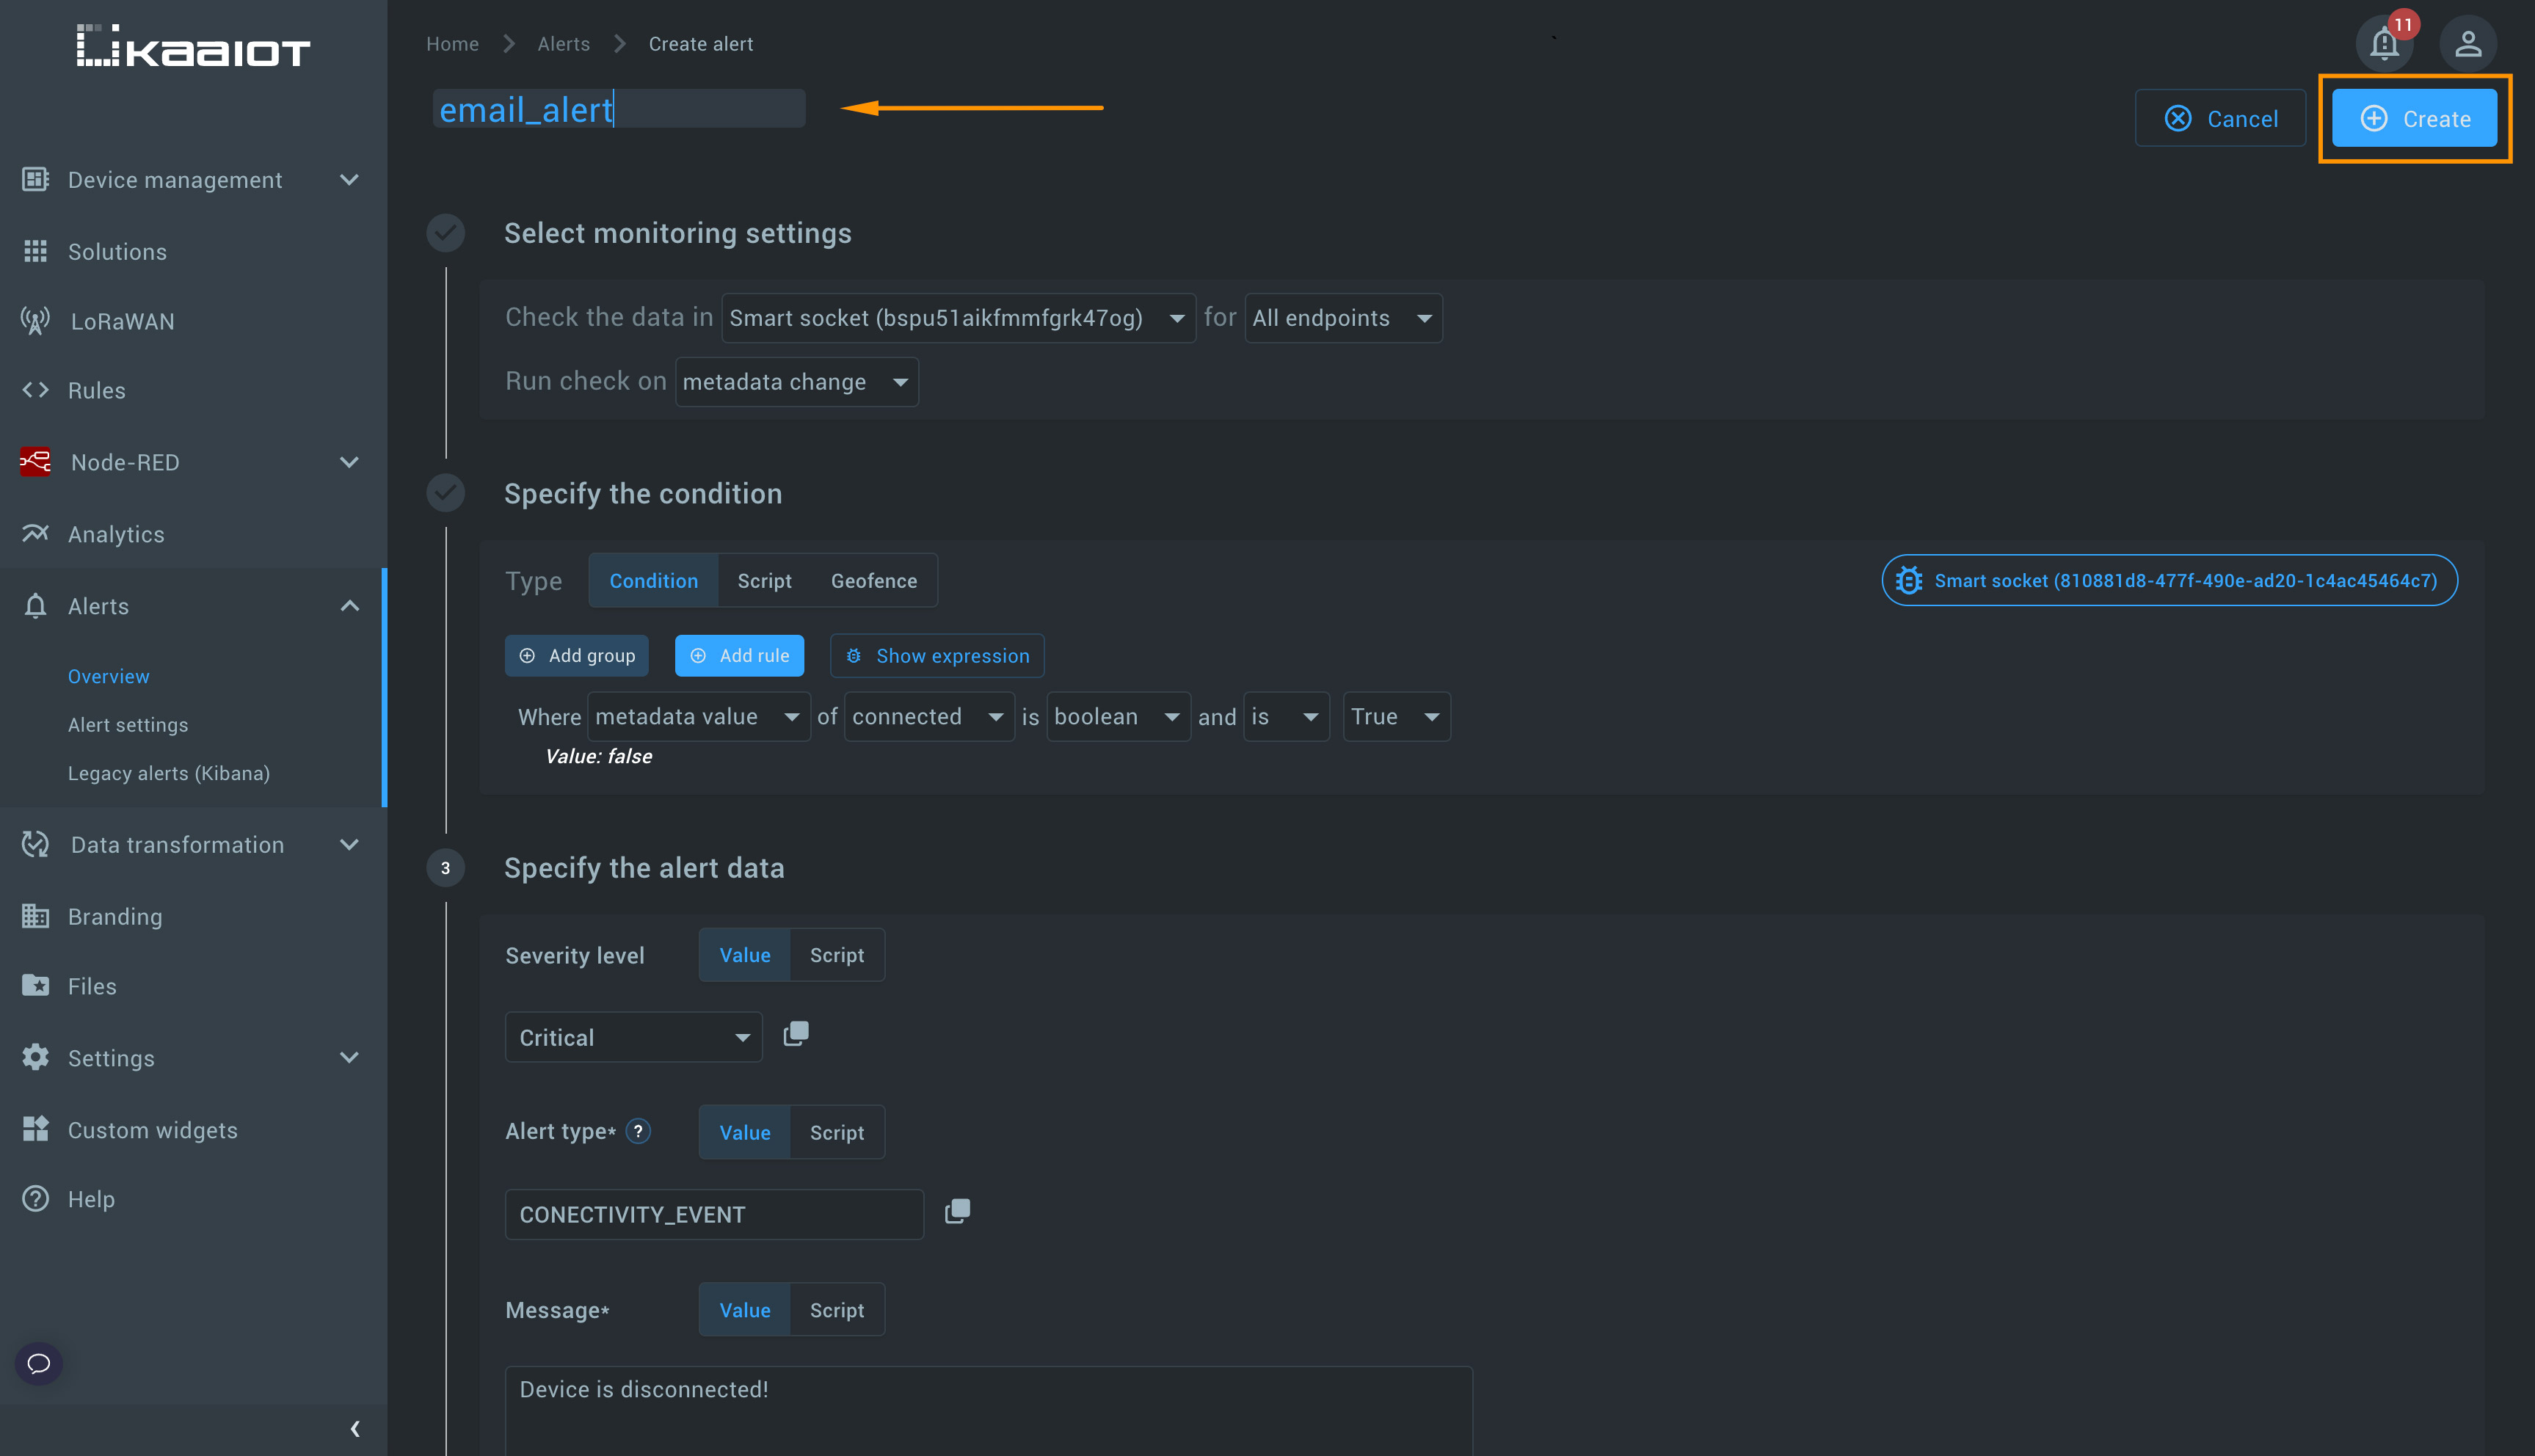
Setting up an alert involves three required steps:
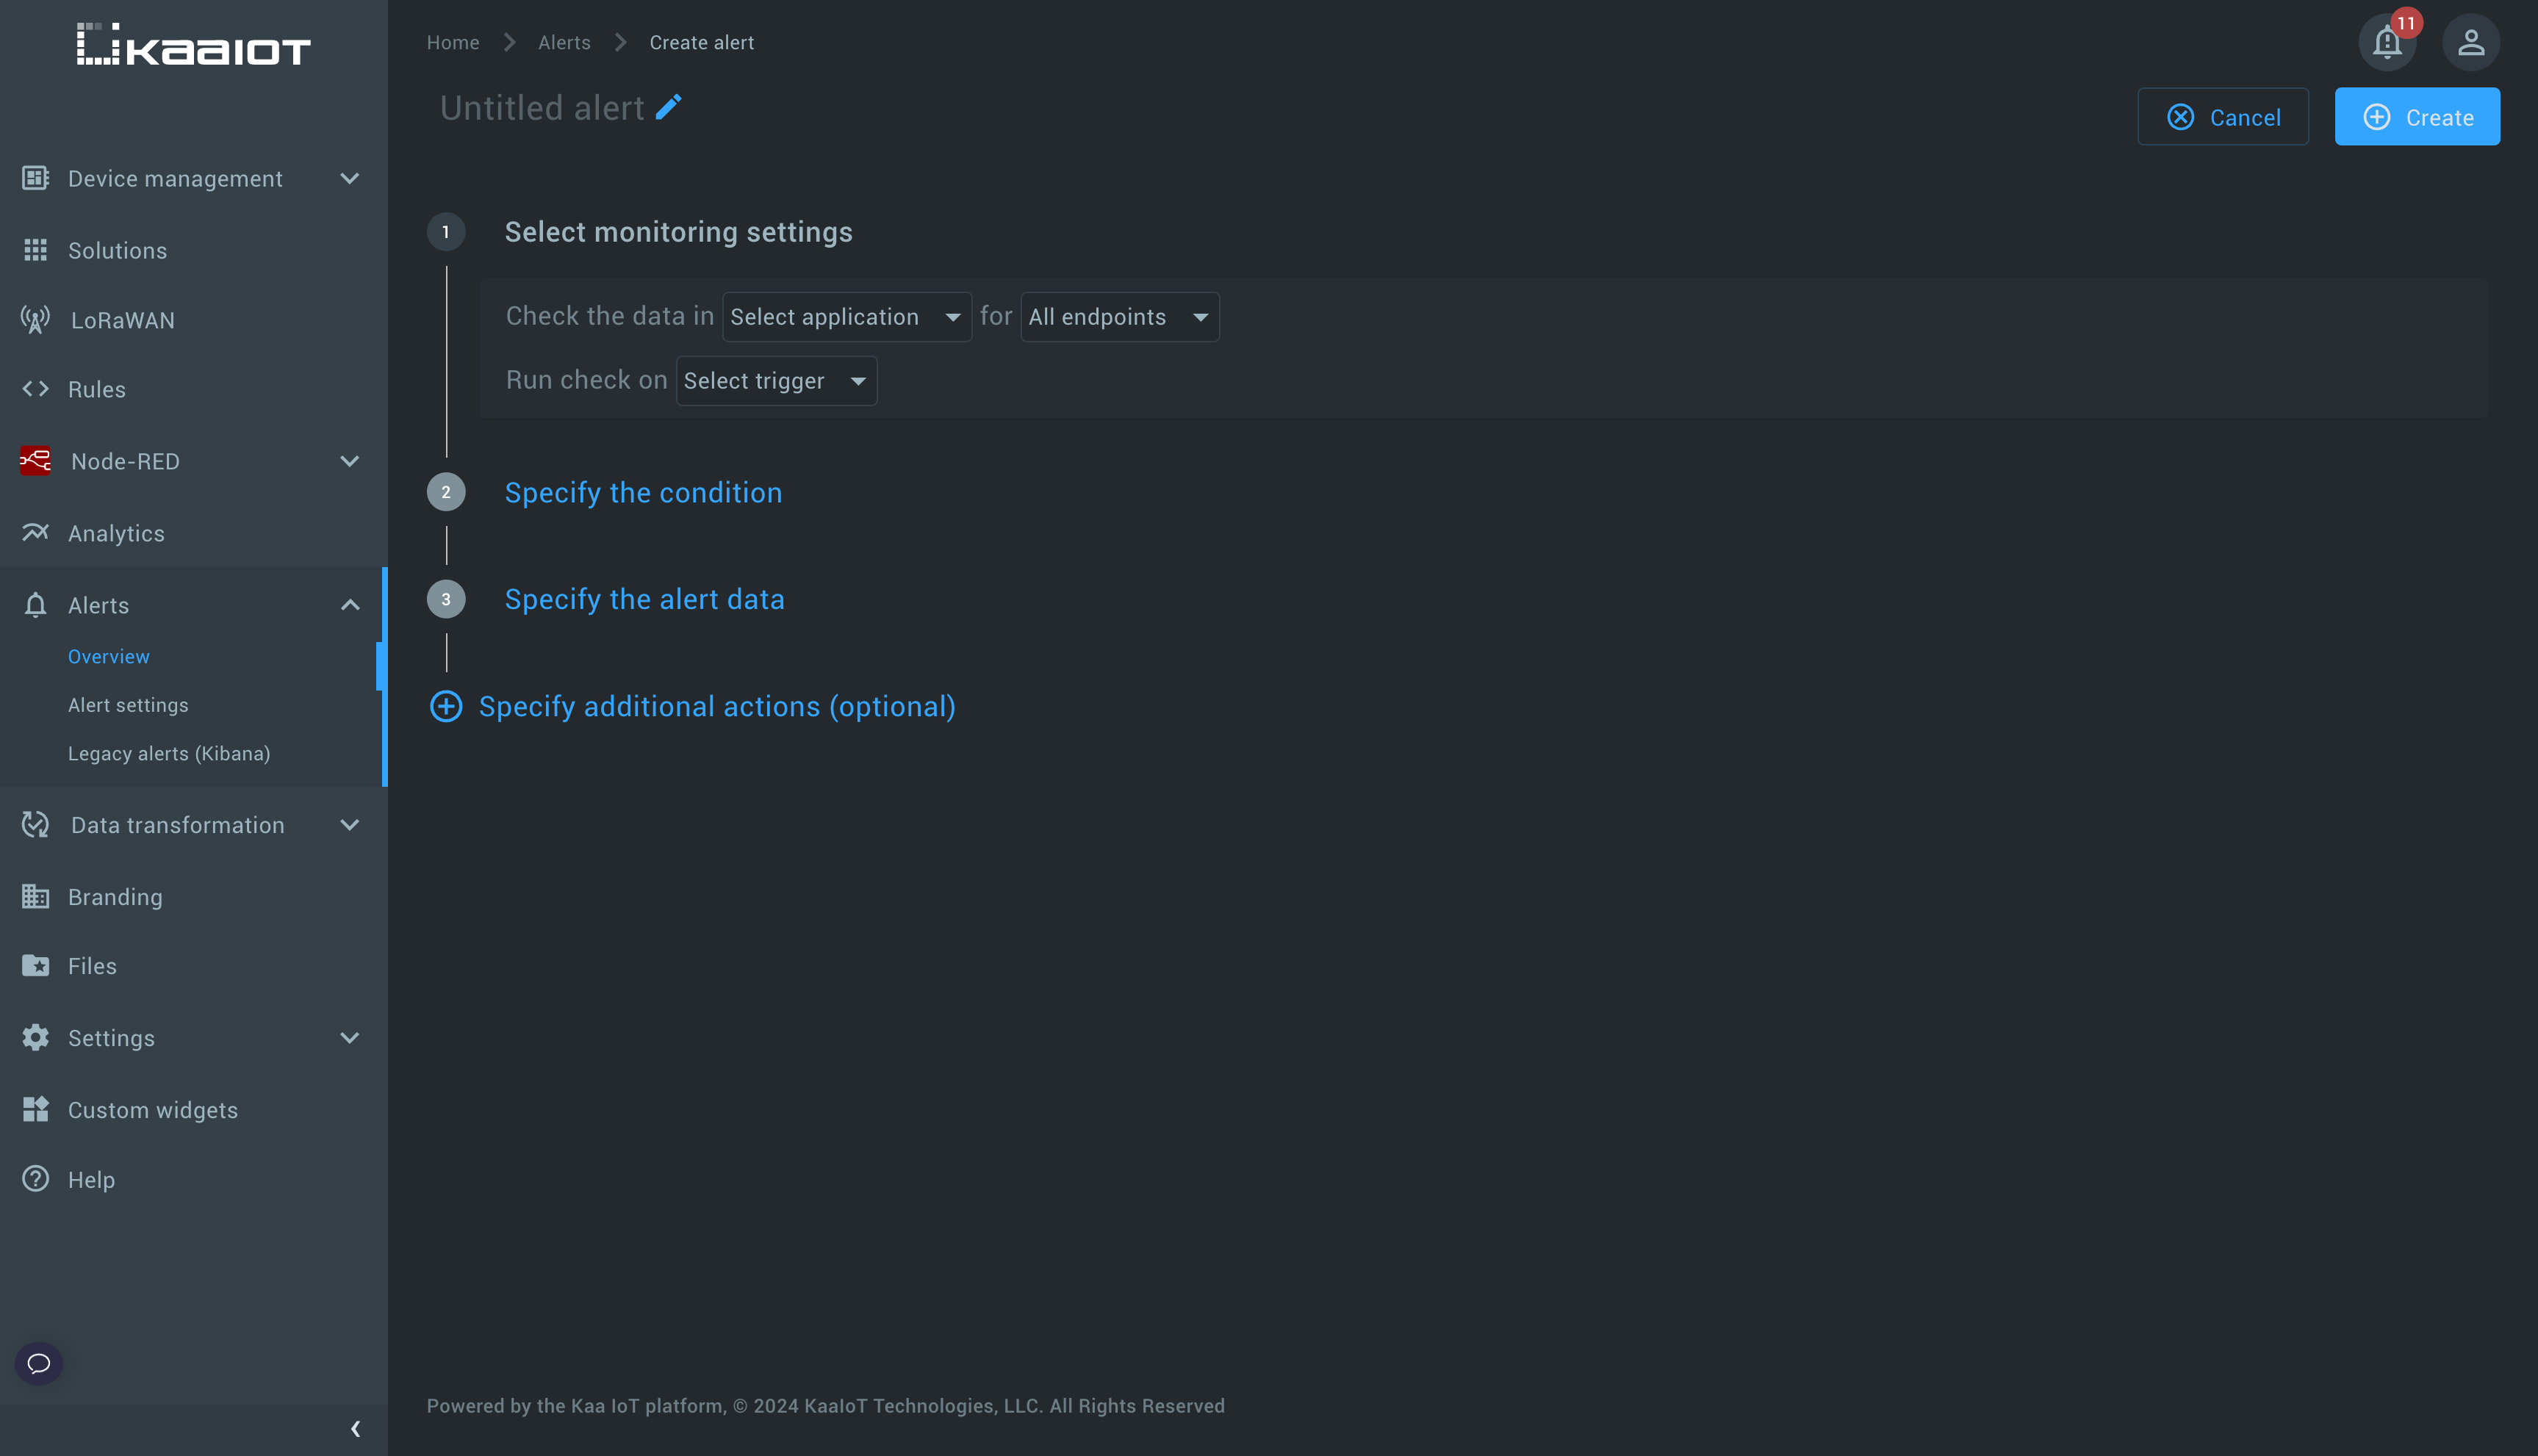
Step 1: Select monitoring settings
This step is where you define the trigger that your alert should react to.
-
Choose the application: Select the application where your devices are created. Optionally, select a specific endpoint if you want to track it. By default, all endpoints in the specified application are tracked.
-
Select the trigger: Decide when the alert should be triggered. There are three options:
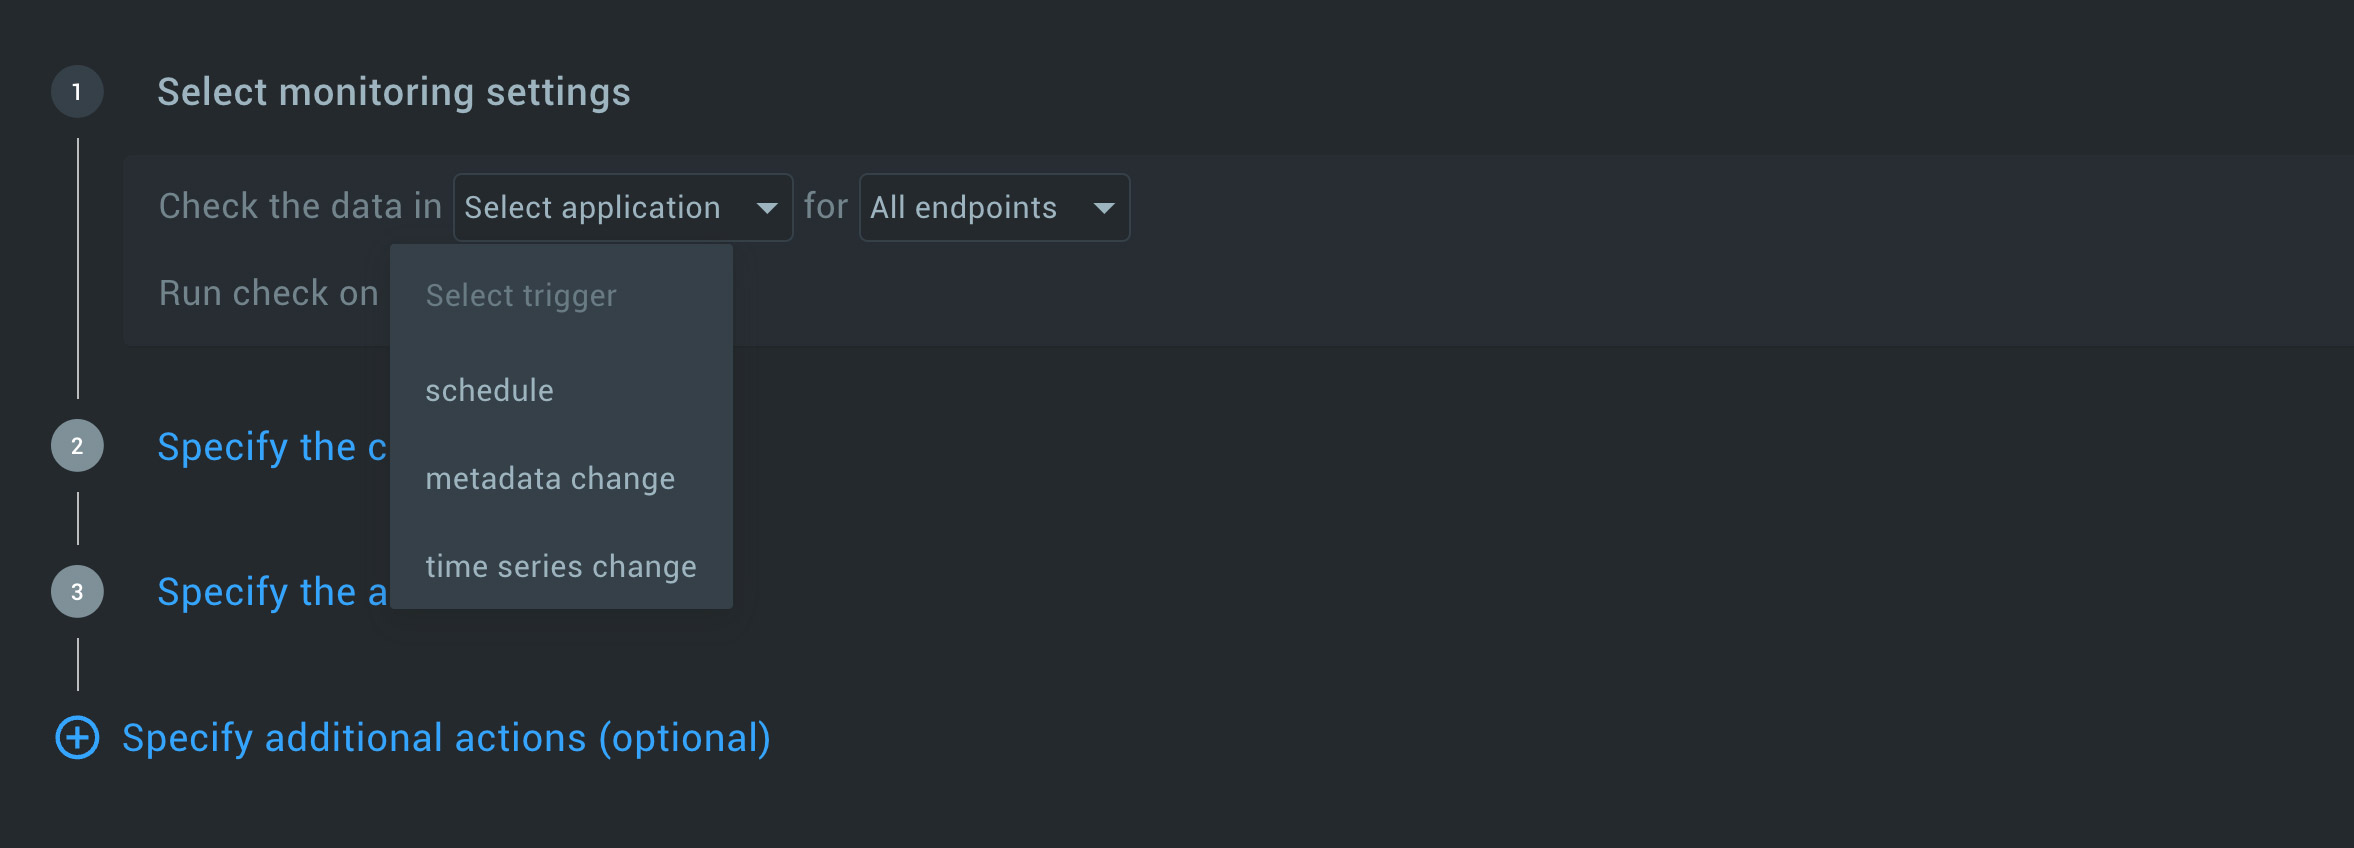
- Schedule: Specify the interval for checks or use a cron expression.
- Metadata change: Trigger the alert whenever metadata changes.
- Time series change: When specific time series names change, the alert is activated.
Step 2: Define alert condition
Here, you define the conditions under which the alert will be activated.
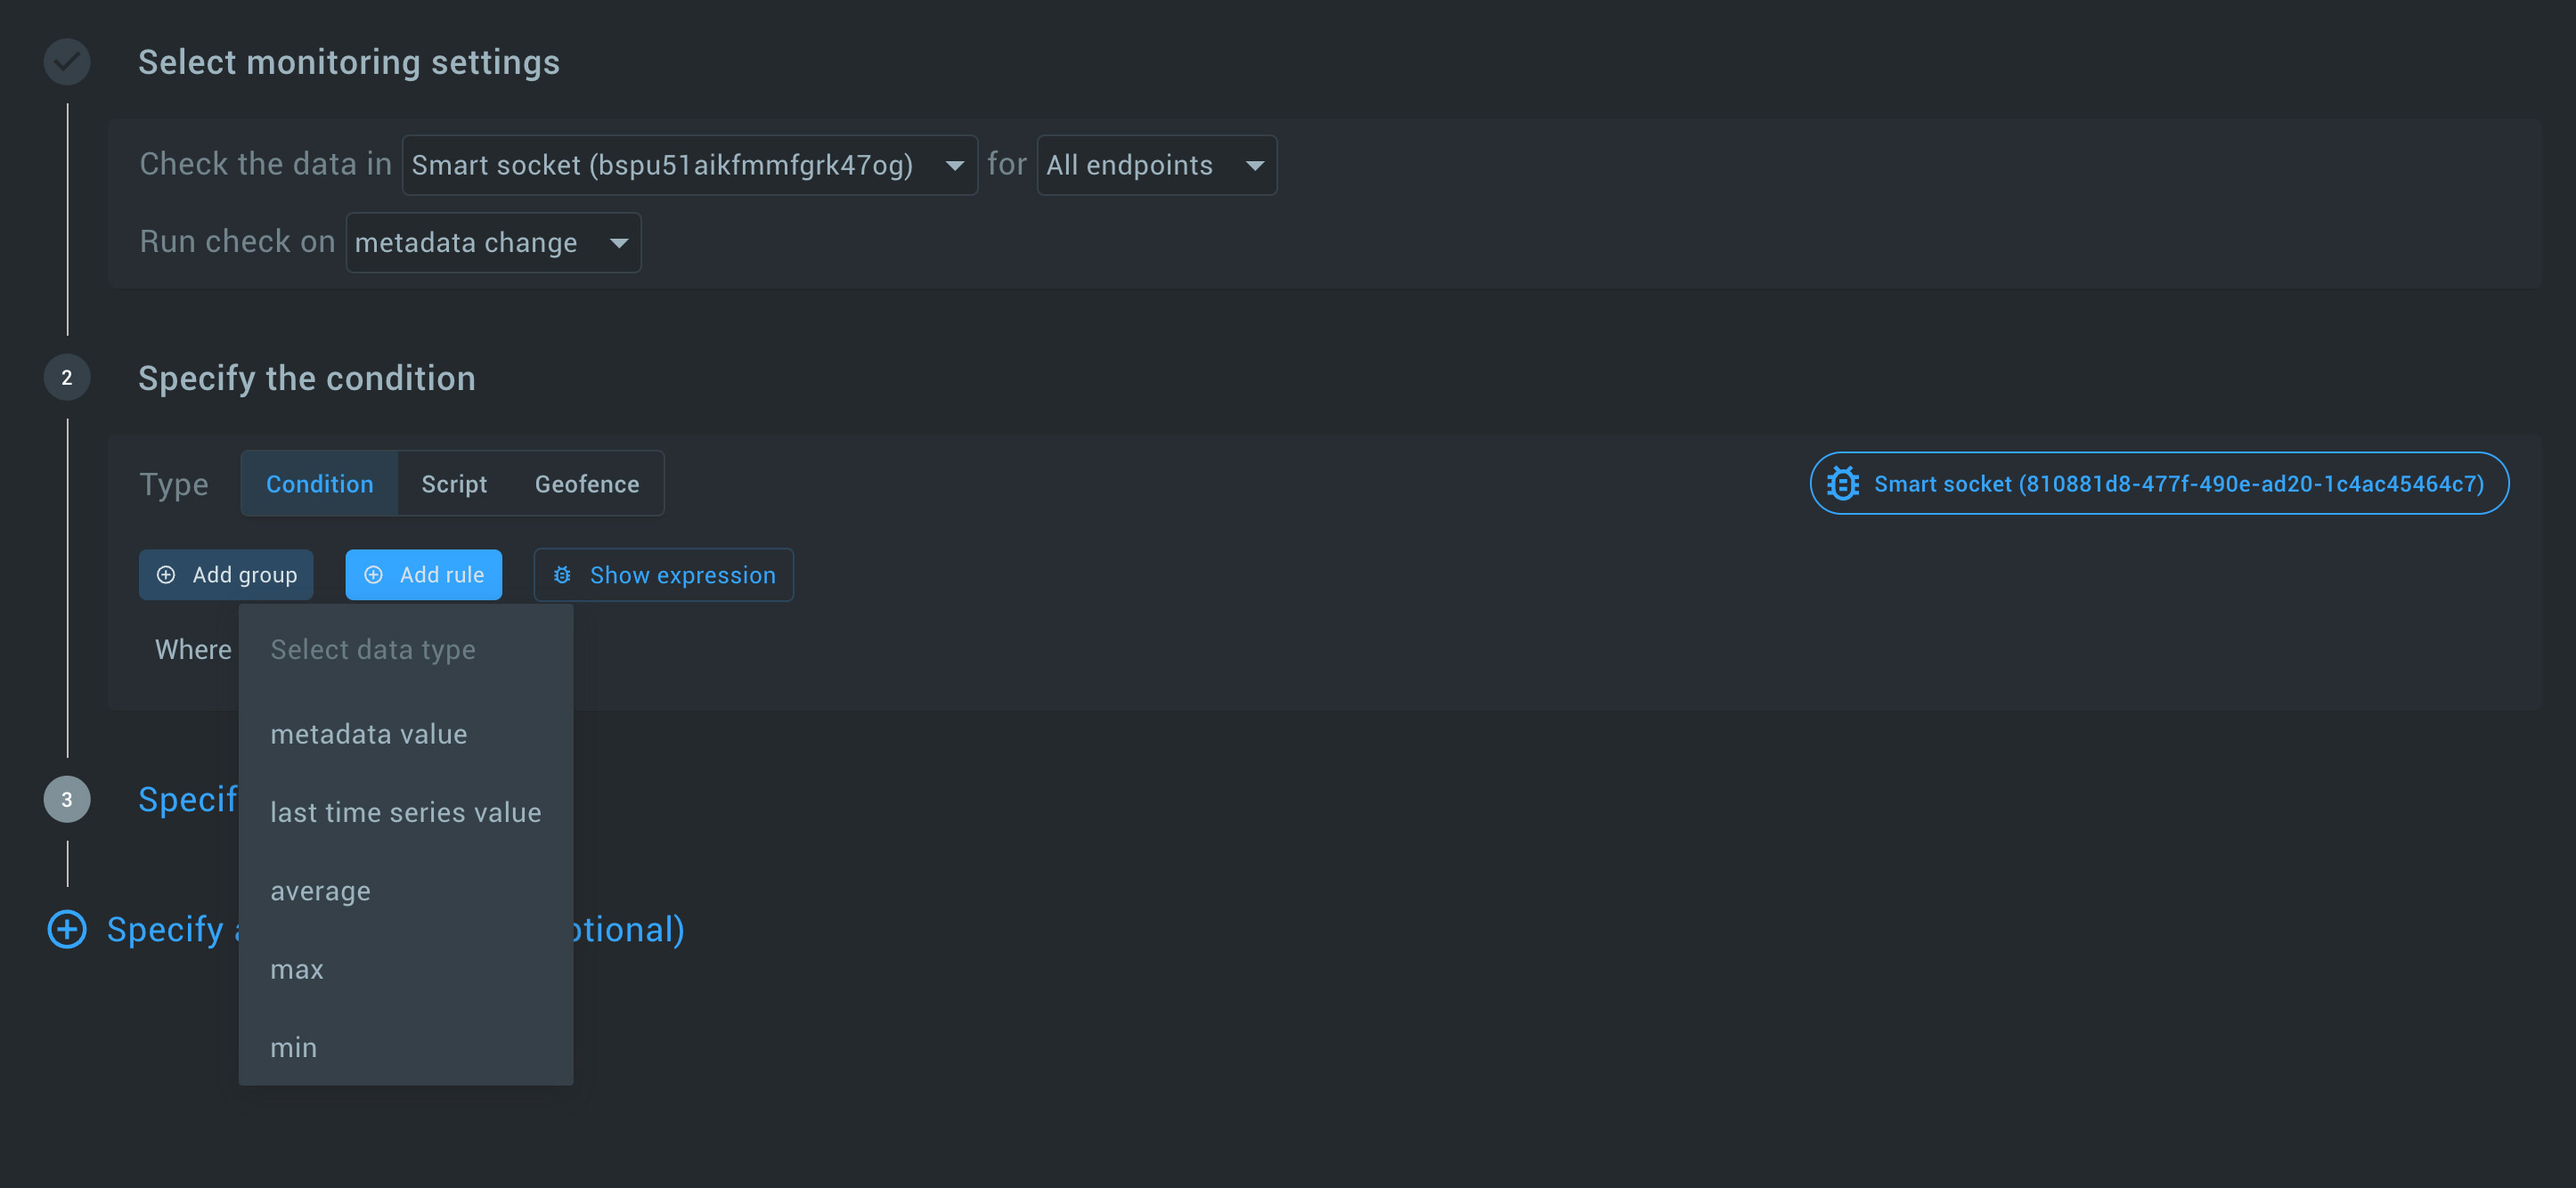
-
Condition builder: Use this visual tool to create conditions based on user-friendly rules. Specify the value source, type, operator, and value to compare.
-
Script-based conditions: For advanced users, you can use JavaScript to define conditions.
-
Geofence conditions: Set up geofencing conditions if applicable.
Read also: Geofence Alerts in Kaa: Advanced Functionality Tutorial.
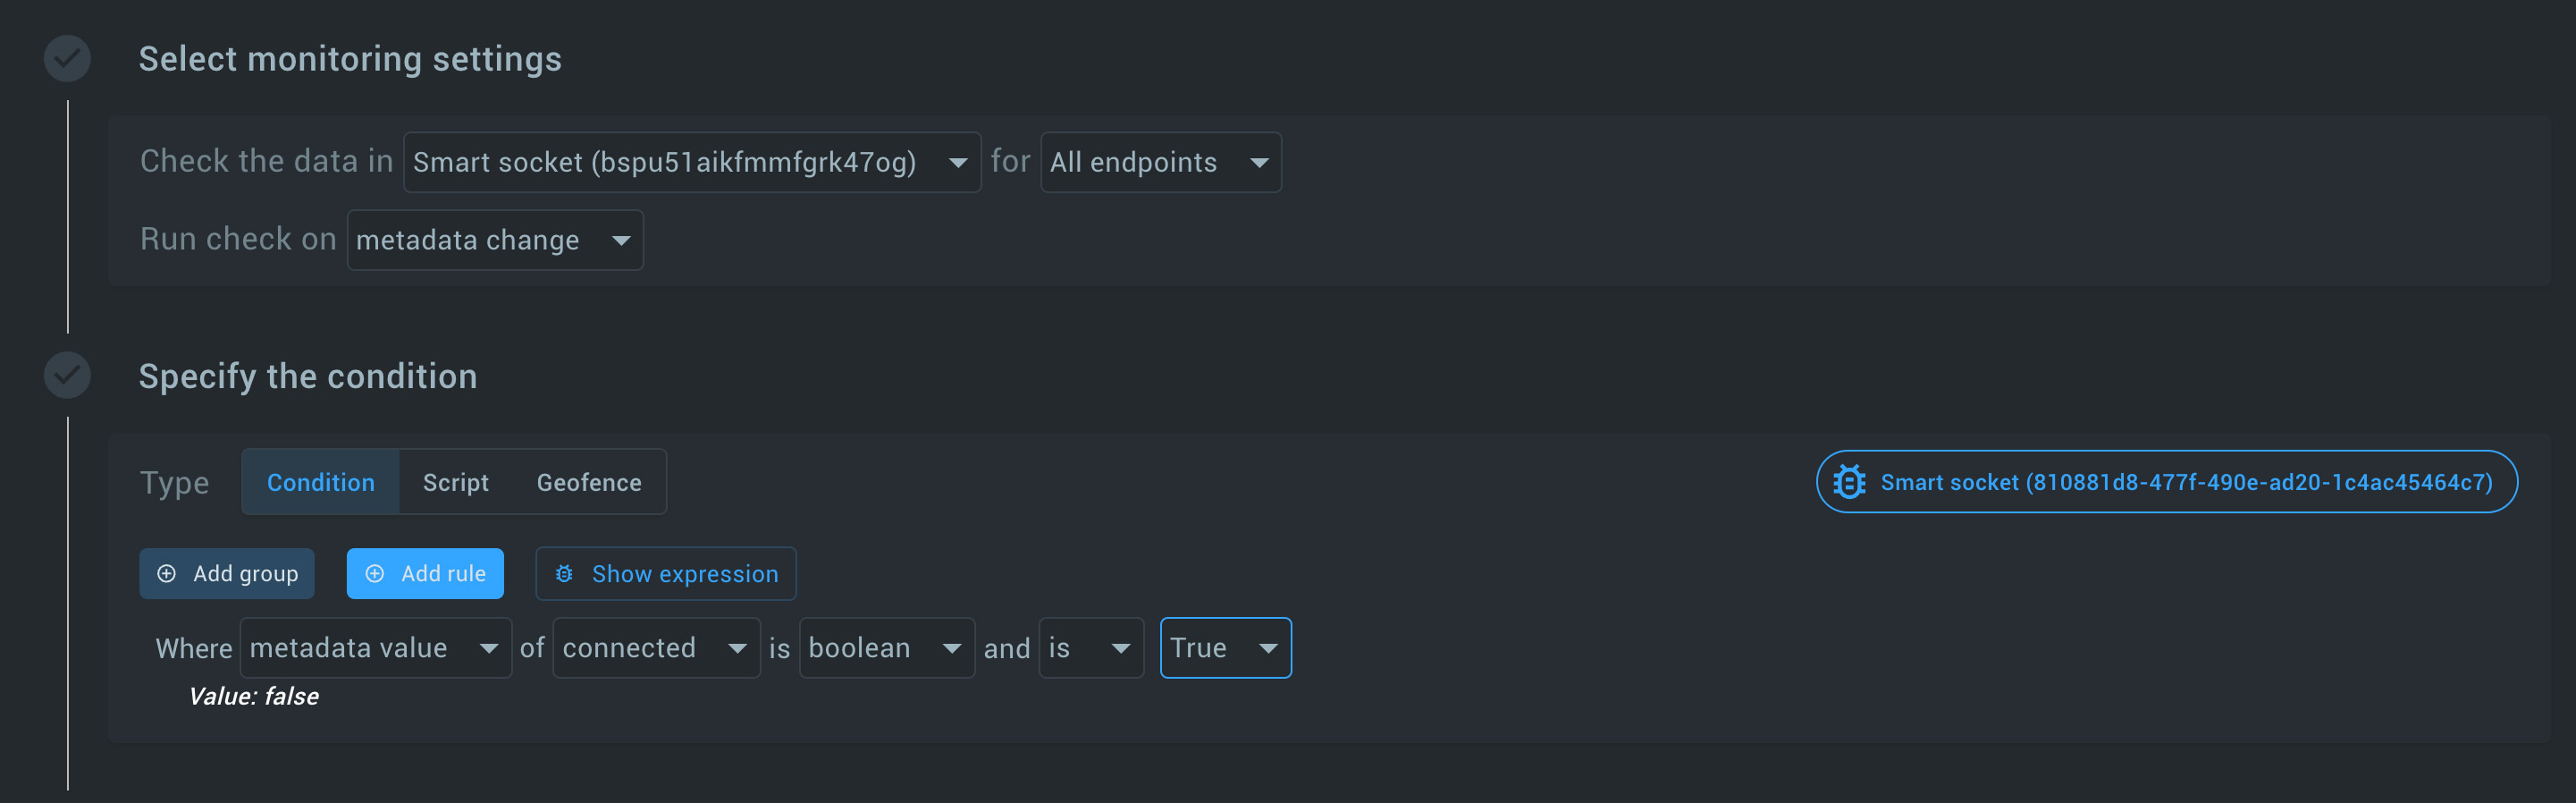
When you select the required fields, you’ll see the current value that your device reports, and the next step is activated.
In this section, you can see the current value, which is now false in our example.
You can change the endpoint by clicking on the chip to see the current value for another endpoint.
You can also click on Show expression to see how the actual script will look, which will be used under the hood.
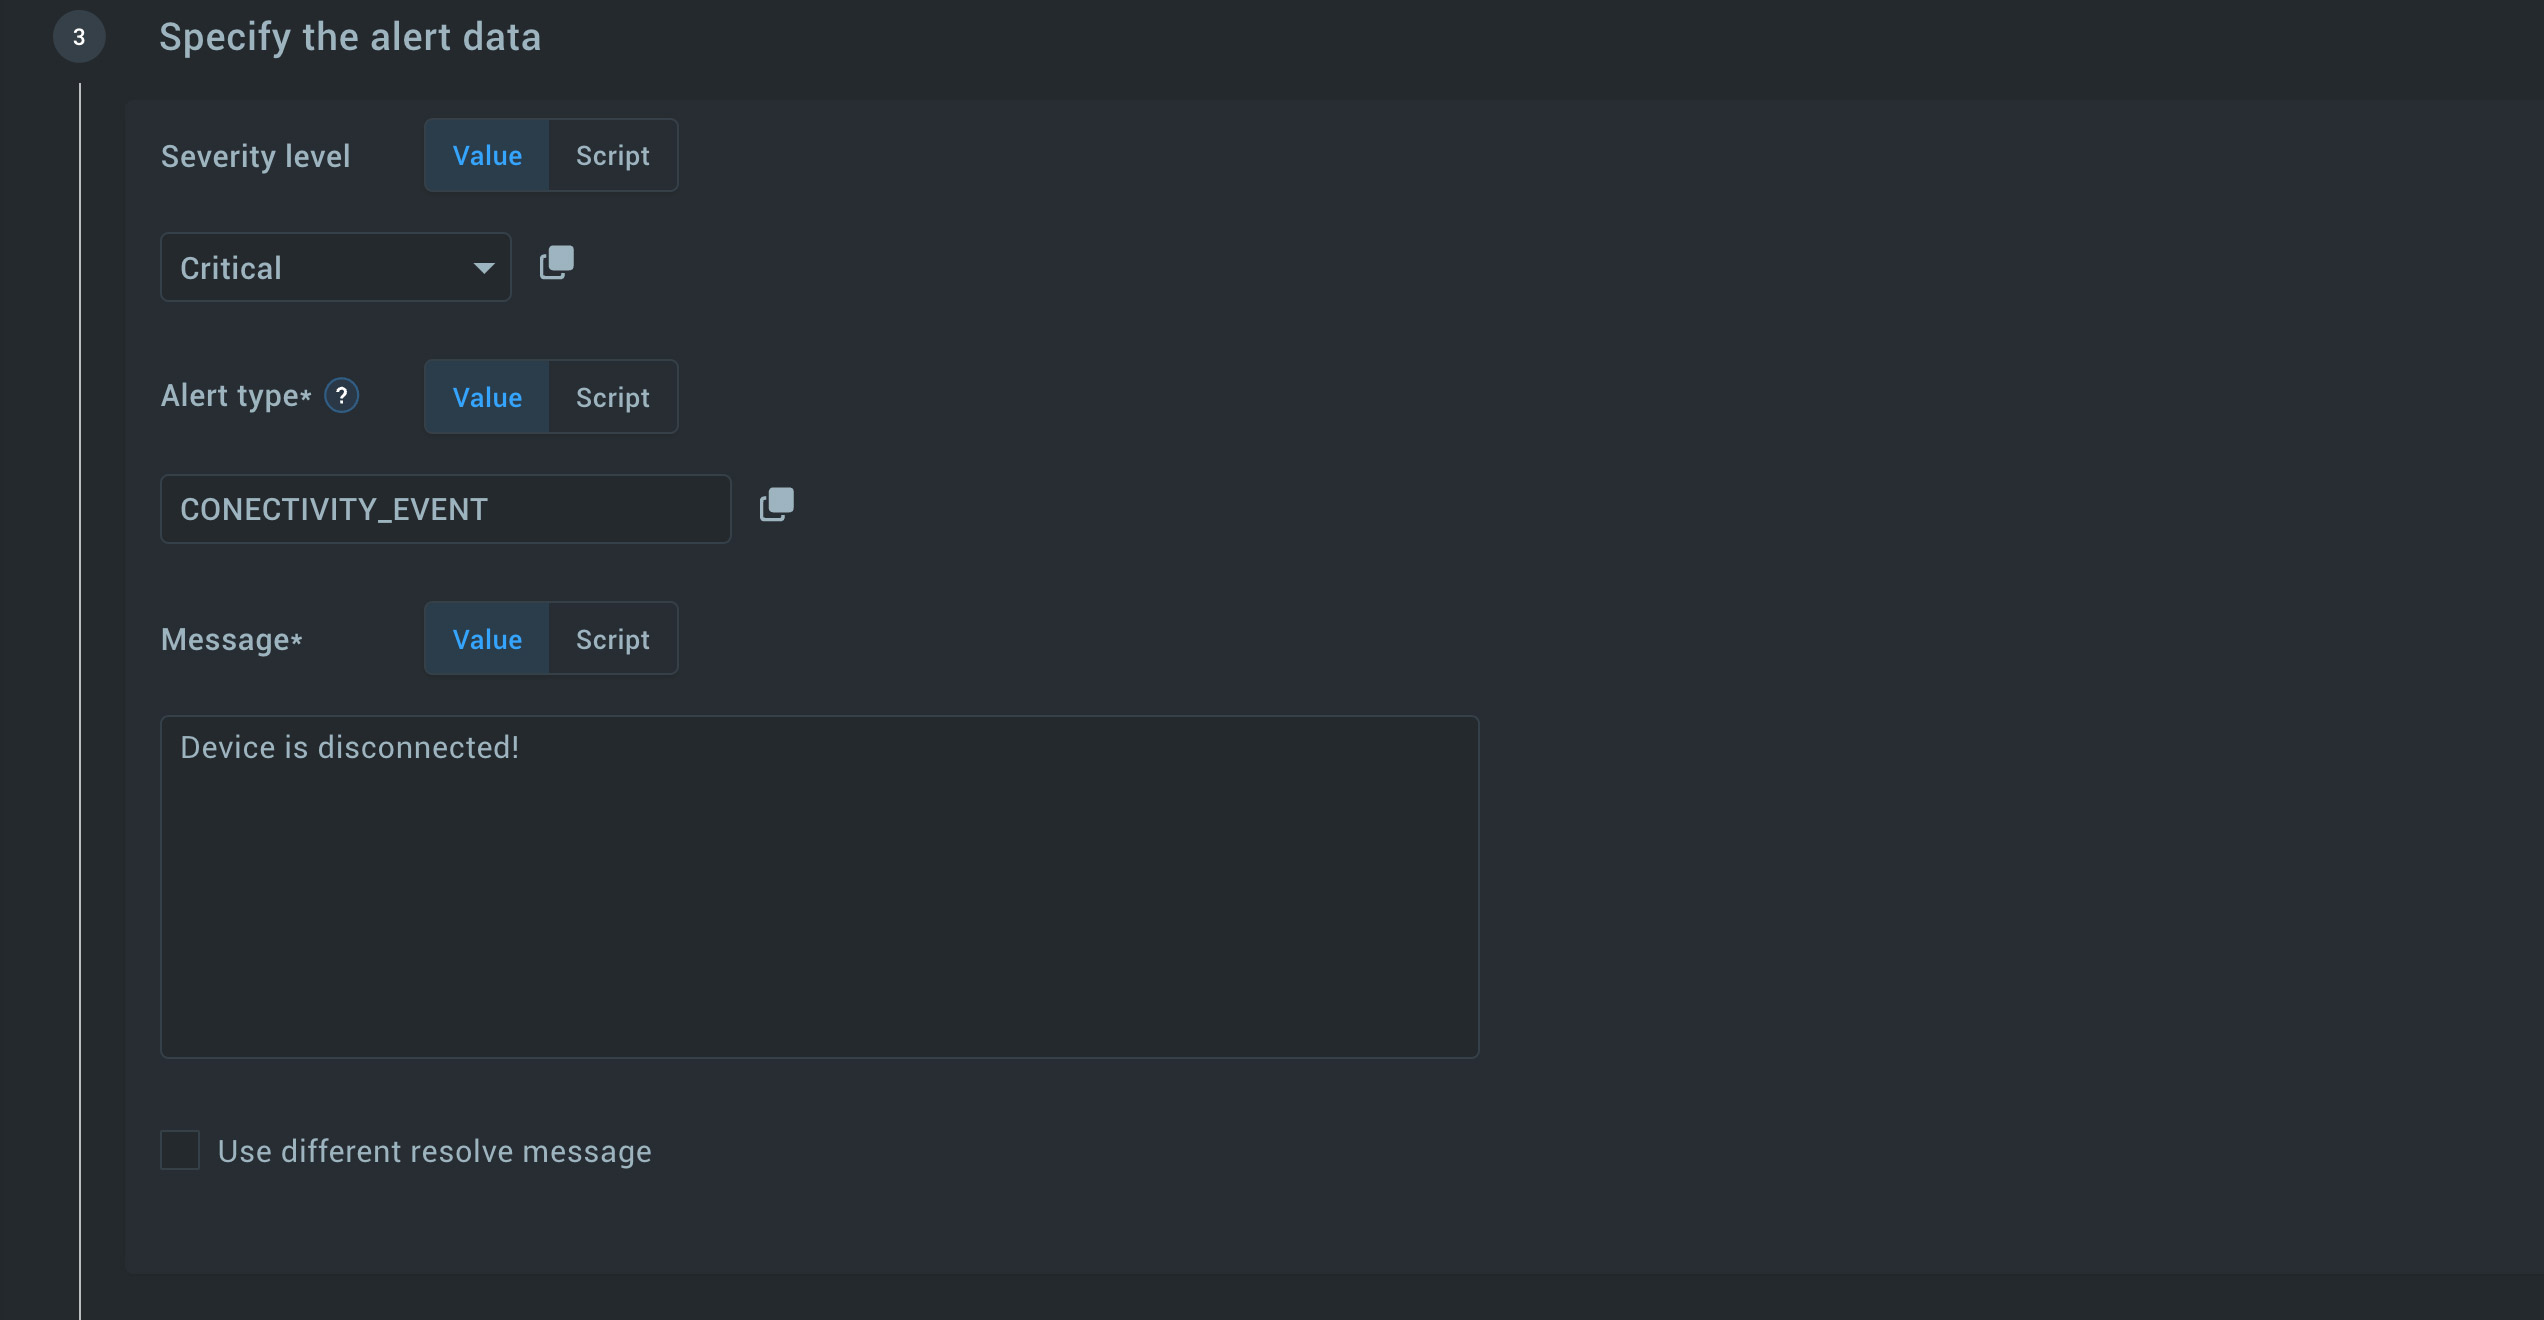
Step 3: Configuring alert data
This step involves defining the severity, type, and message of the alert.
-
Severity: Set the severity level of the alert. It can be one of the predefined values that you can pick or write a script to choose the severity level based on the value. If you aren’t very familiar with JS coding, you can click on Show expression from the previous step and reuse it for the logic here.
-
Type and message: Define the type of alert and compose a message. Scripting is supported for advanced cases, where you can decide on the type of alert or place some dynamic values in the message. As before, the Show expression button can be helpful to quickly bootstrap the script.
Optional: Additional actions
This step provides configurations to send notifications via email, webhook, or Slack when the alert is activated or resolved.
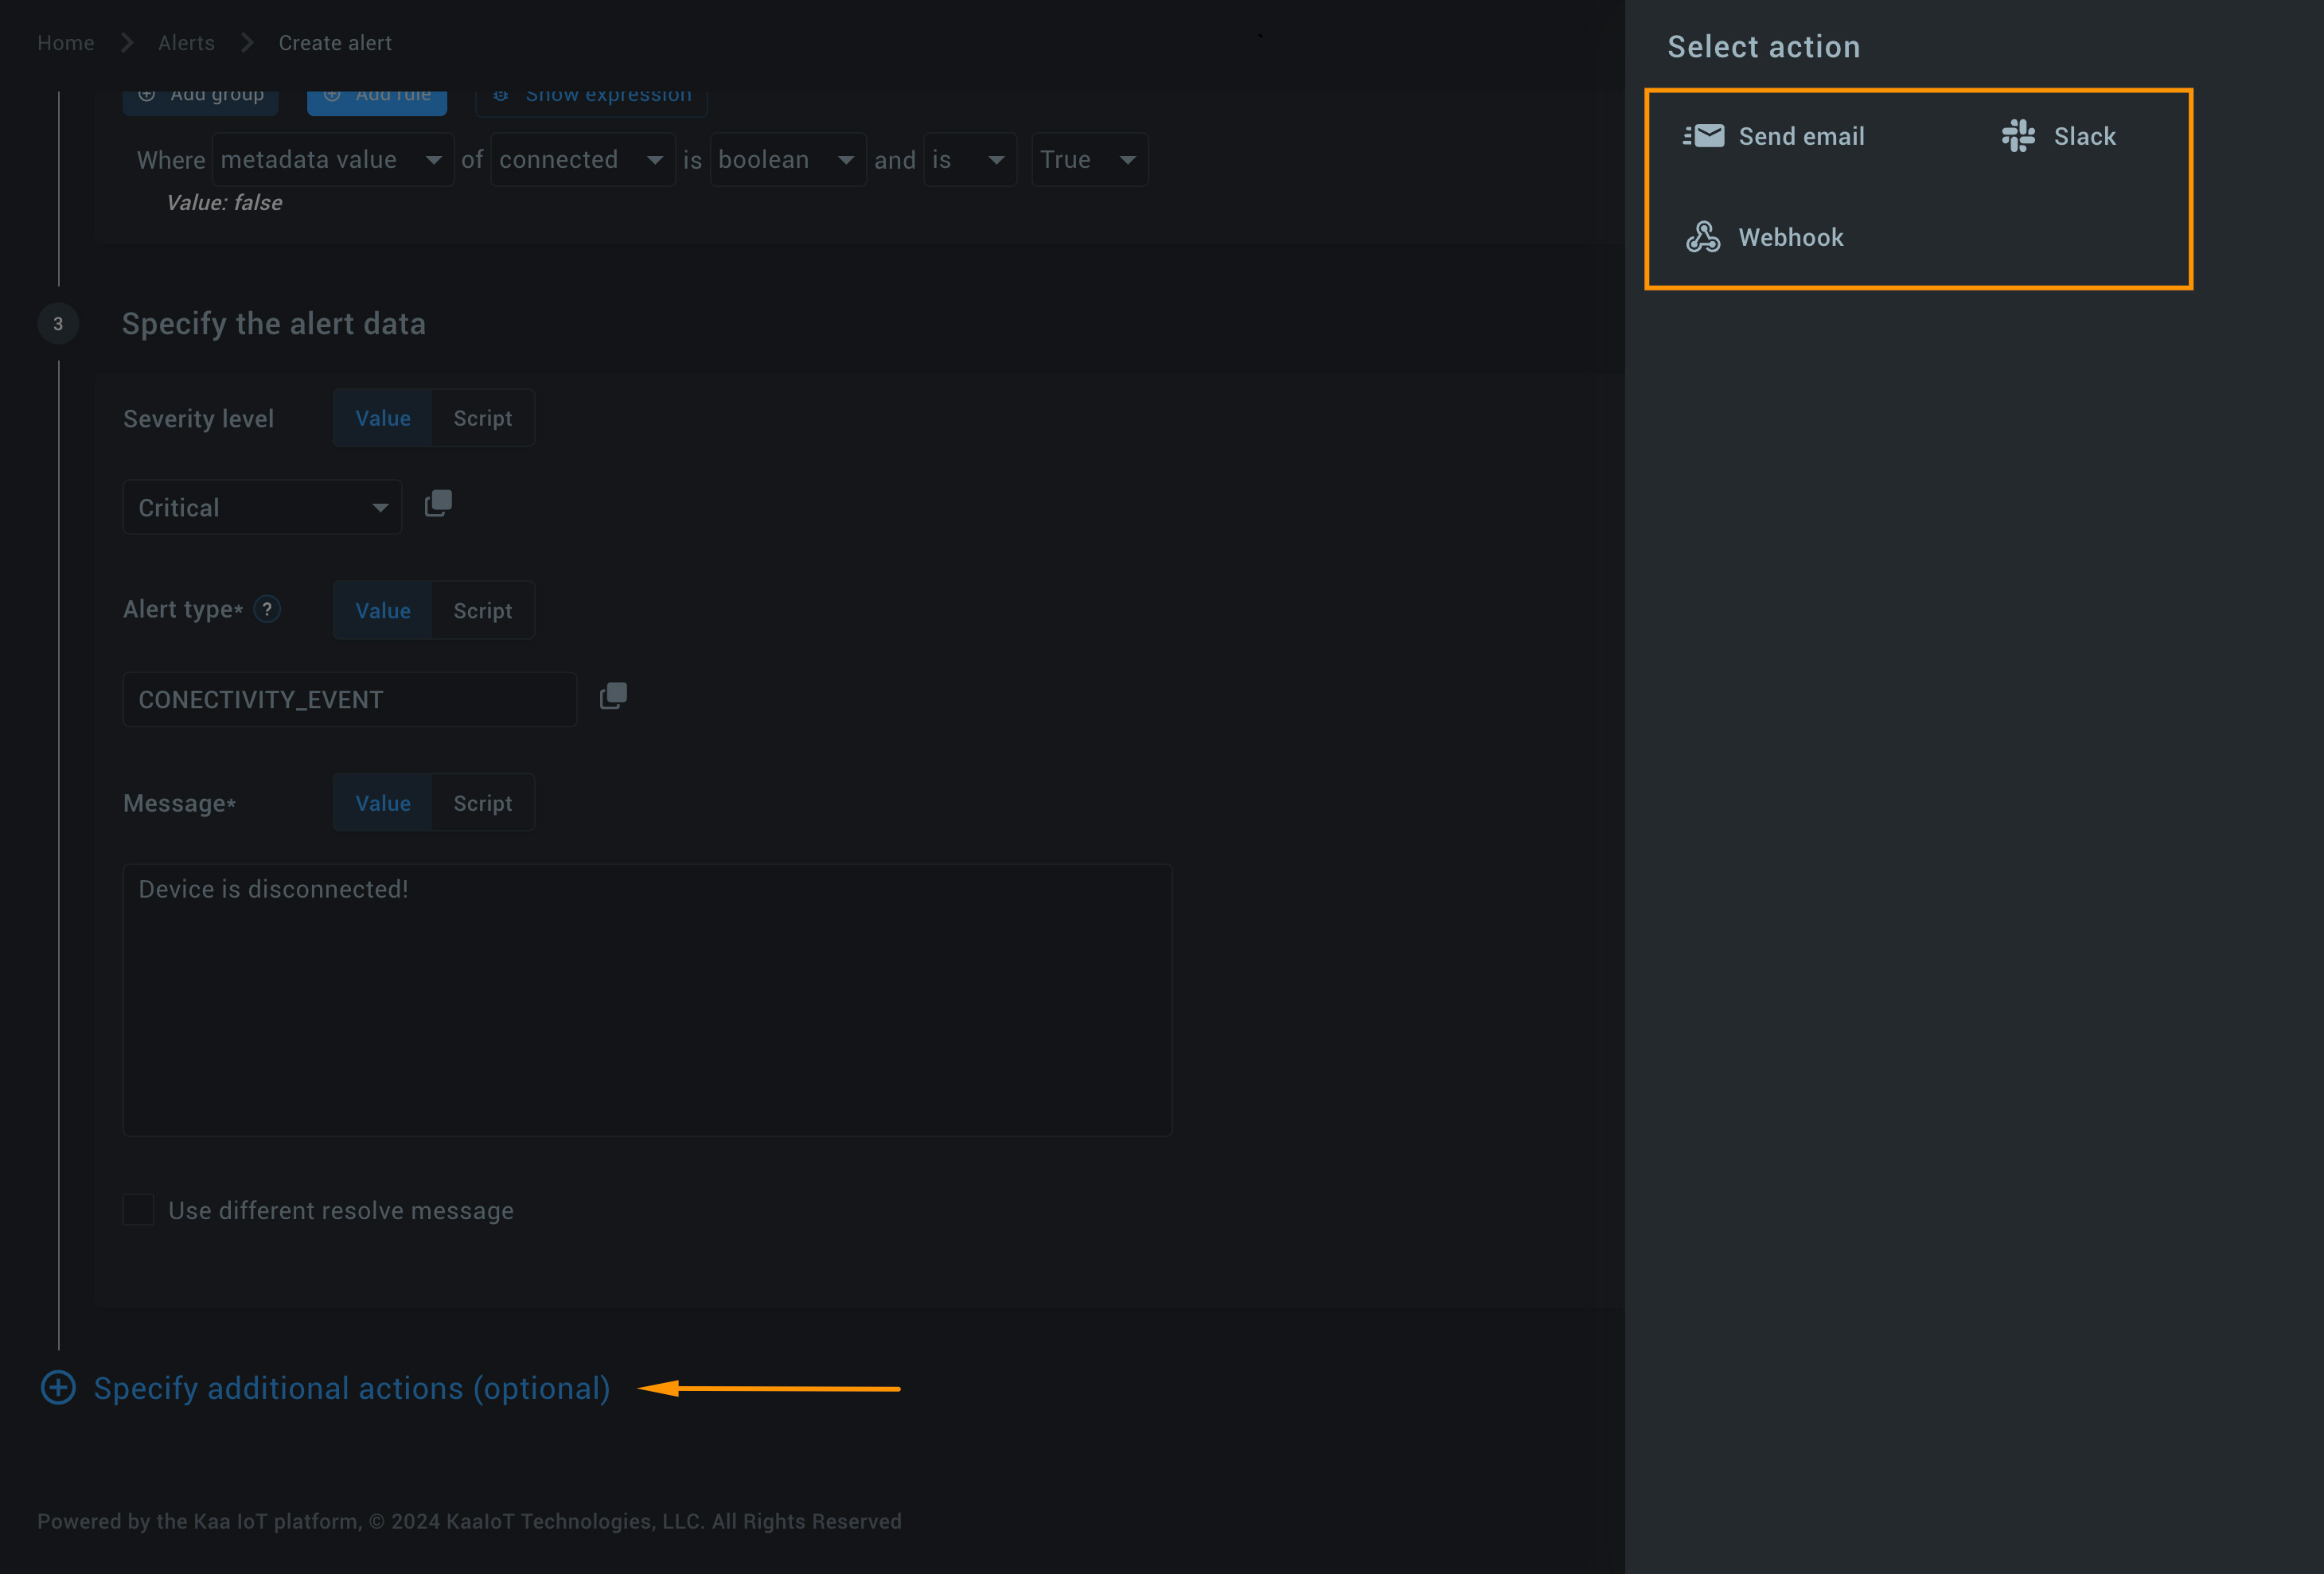
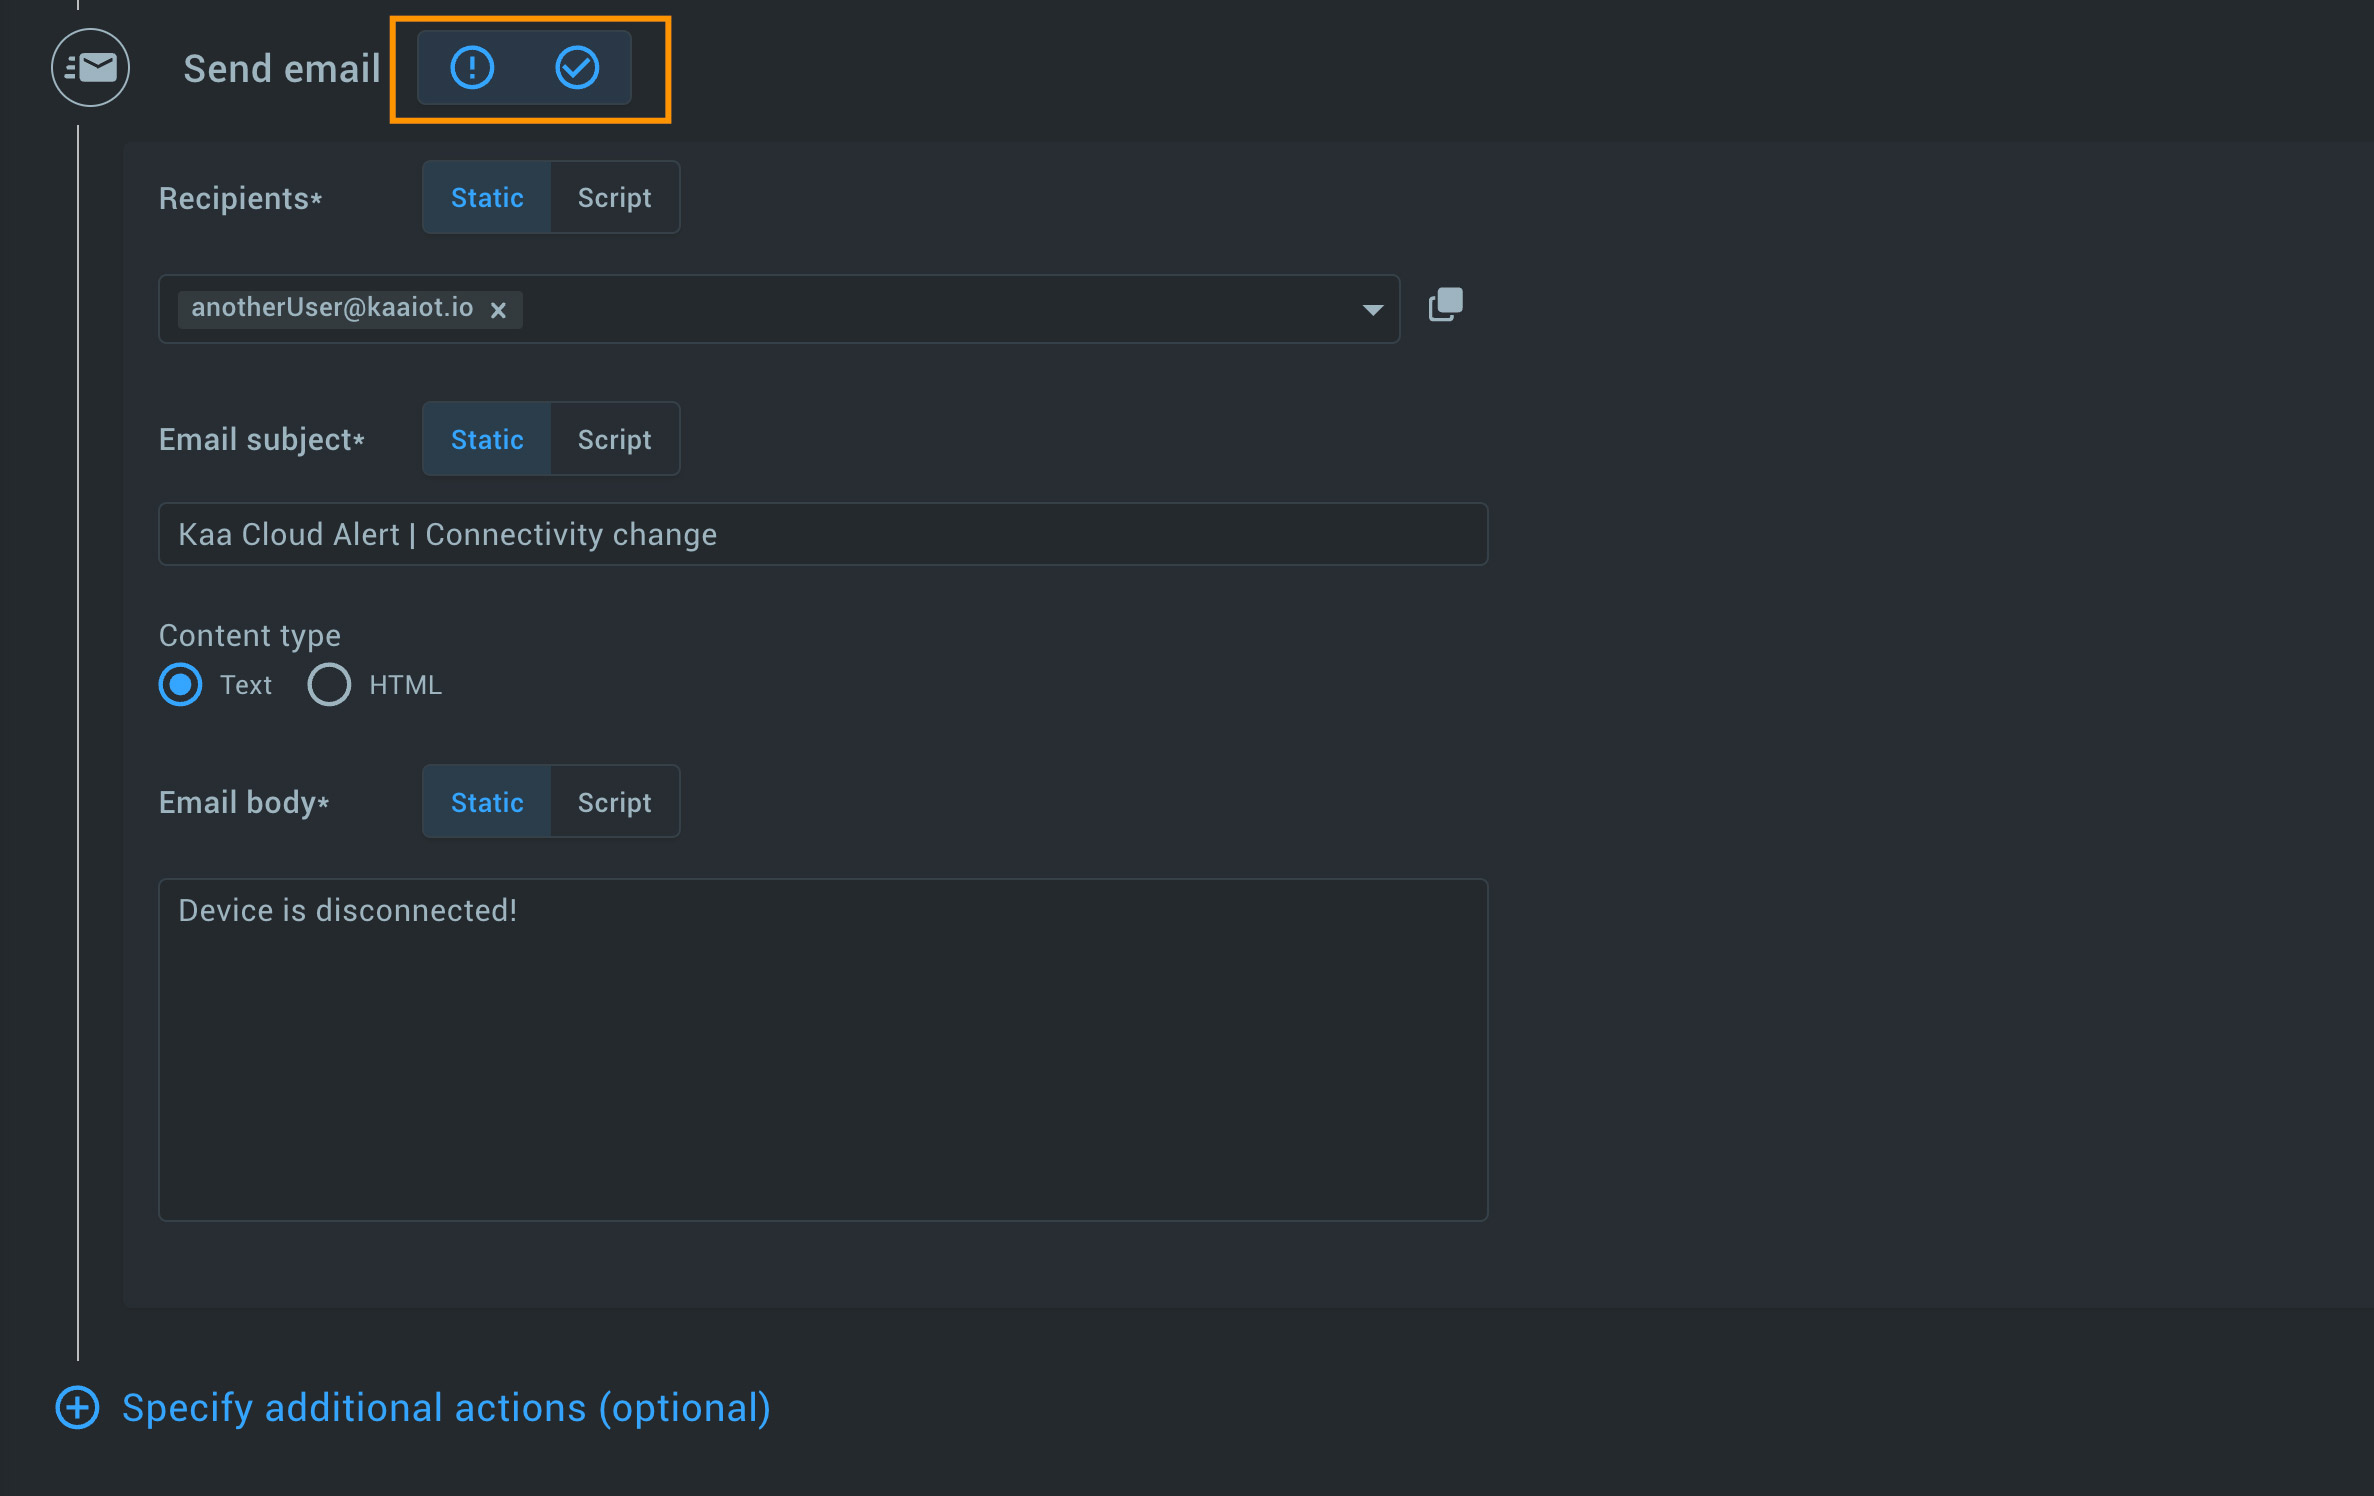
- Email notifications: Specify when to send emails (on activation or resolution), recipients, subject, content type (text/HTML), and provide templates for messages.
The selected area on the screenshot below shows that you can choose when to send email, when alert is activated or resolved, or both. By default, it will send on both.
-
Webhook notifications: Set up webhook notifications for alerts.
-
Slack notifications: Configure Slack notifications for real-time alerts.
💡Note: Before creating the alert, the system will prompt you to add the email addresses as registered recipients. They must approve the receiving messages to get email notifications.
Final steps
Now, you are ready to create the alert.
- Name your alert and make sure it’s meaningful.
- Click “Create” to finalize the alert setup.
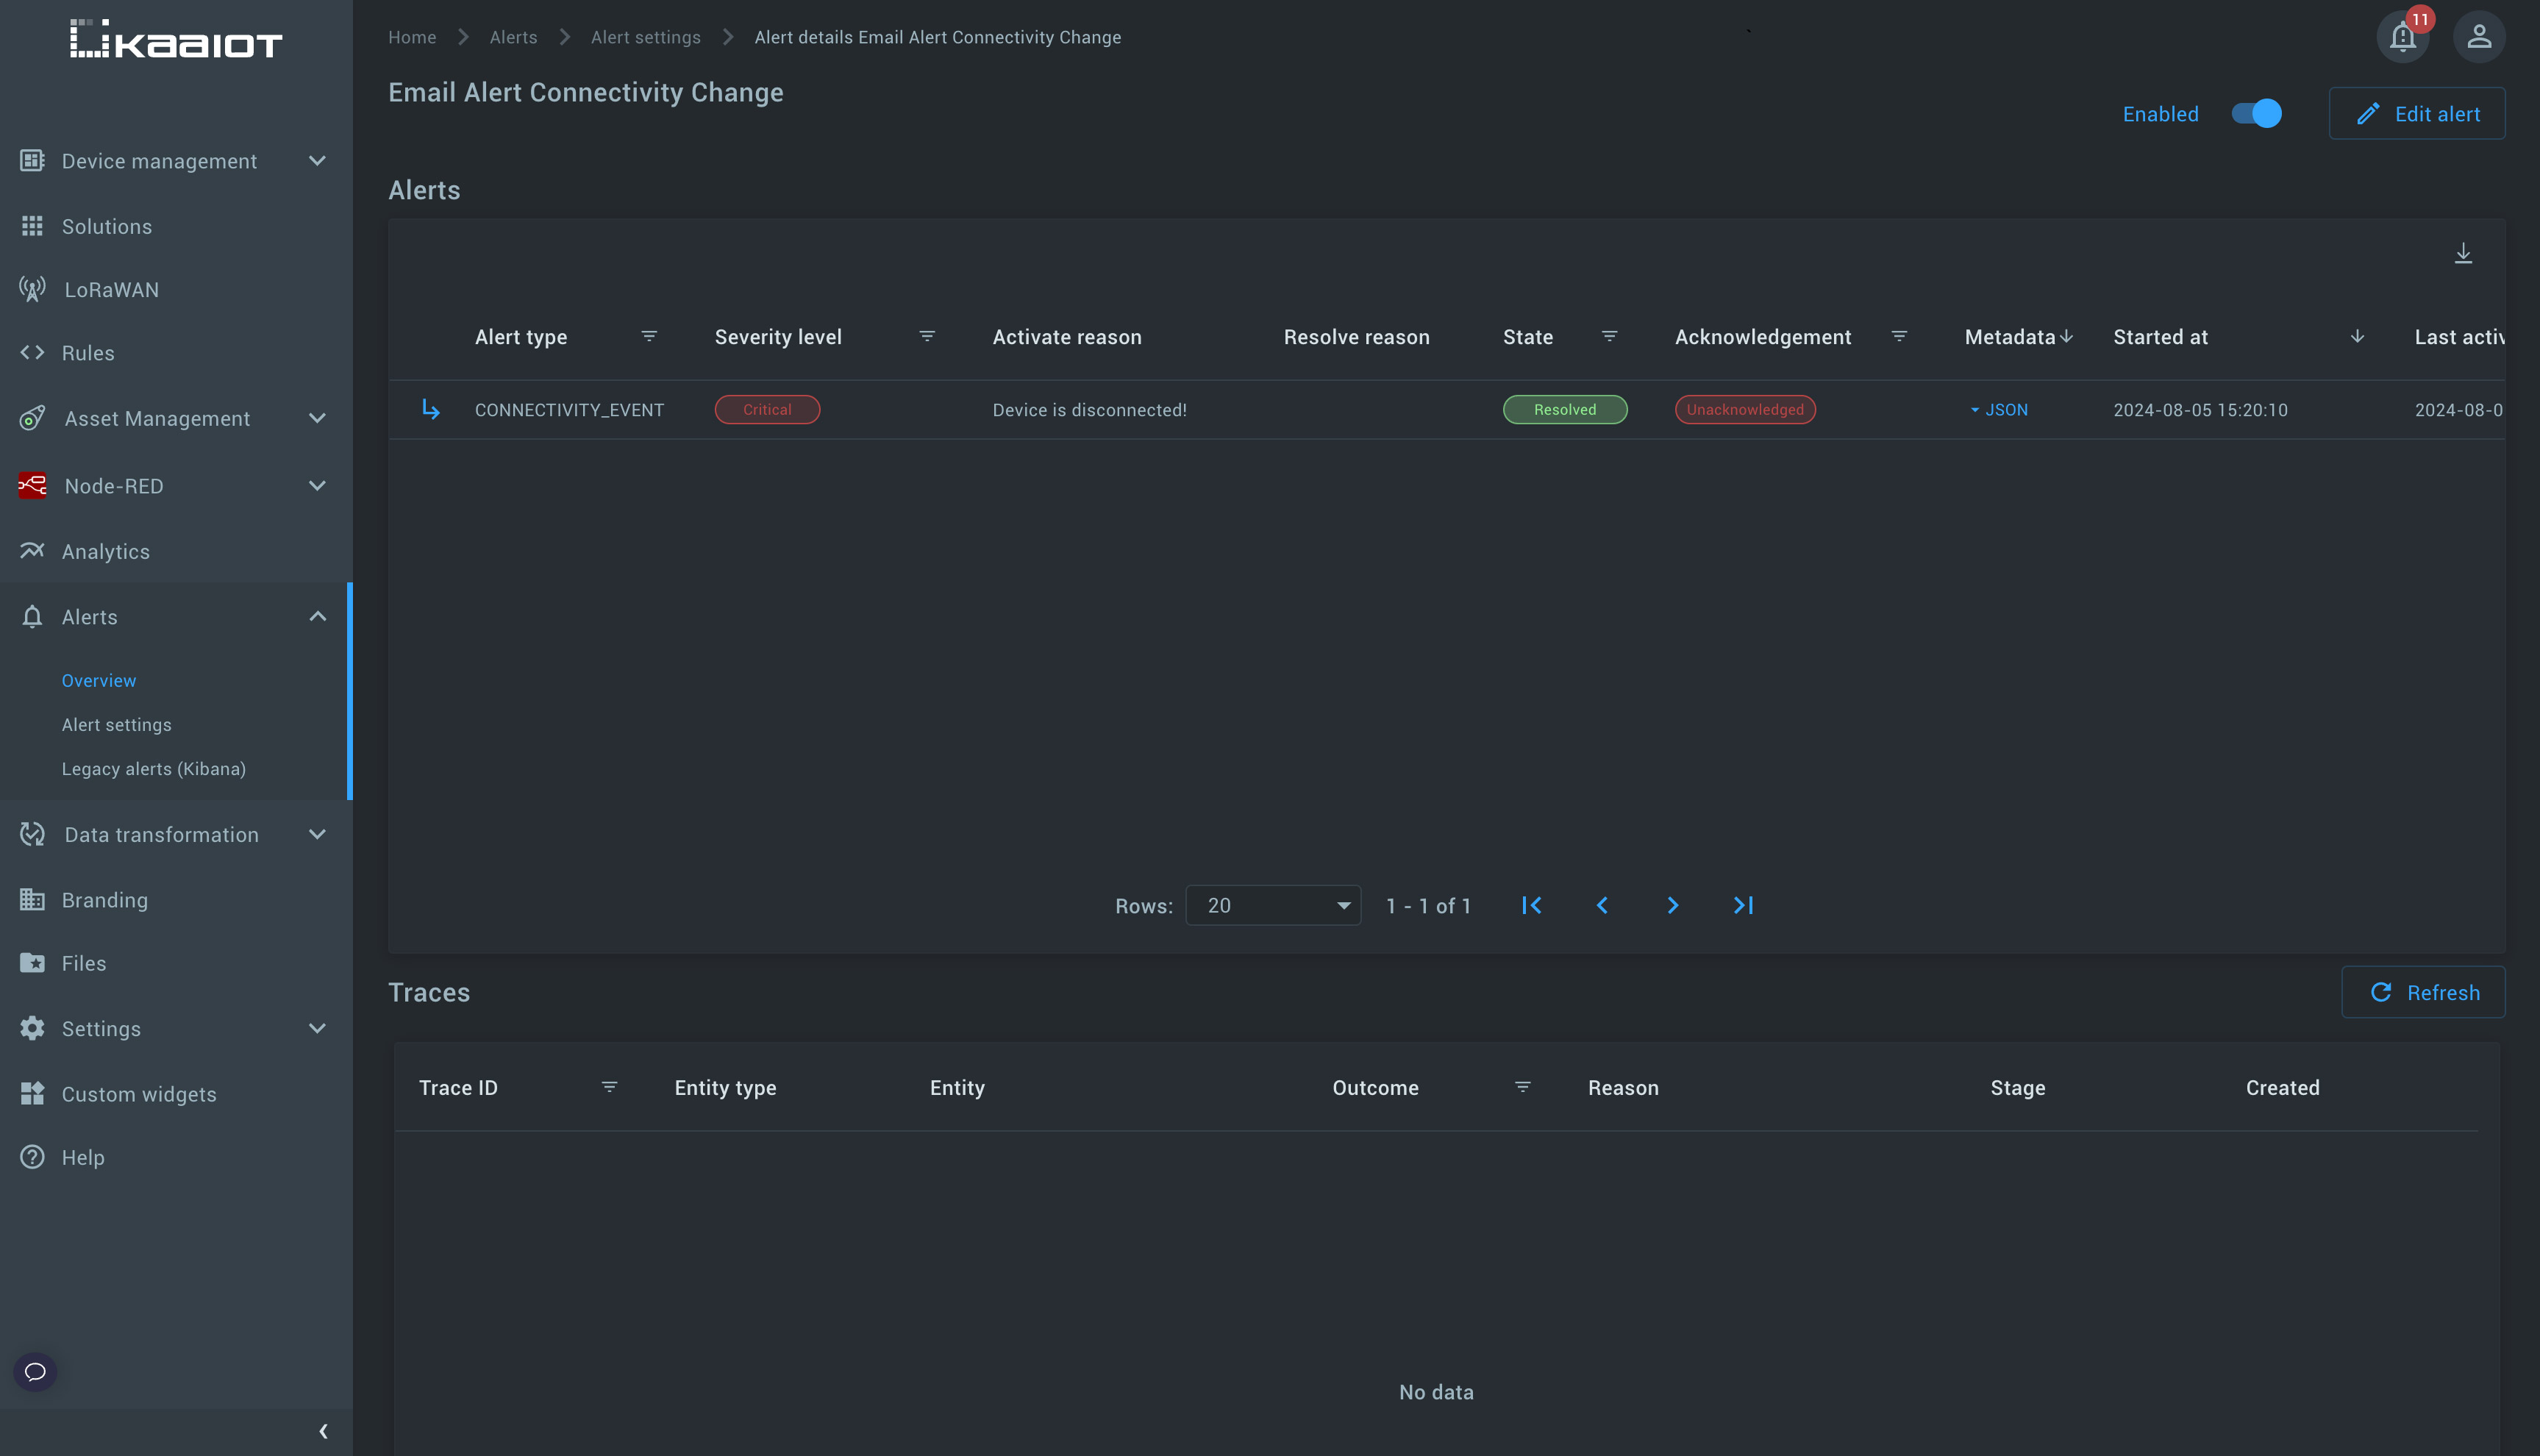
- Monitoring alert state: Monitoring Alert State: Find and click on your Alert Setting from the list to enter the Alert Setting details page. Here, you can see all alerts created from your settings and check the Traces to monitor if the Alert Setting works fine. We can see the alert and in Traces, we can verify that everything executed without errors, with rules and actions showing an Outcome of Success. If an error occurs, you can see it here and address it promptly.
Conclusion
Kaa alerts is an easy tool to set up a reliable monitoring system for your IoT project. By following the steps from the tutorial, you can customize alerts to fit the unique needs of your operations. The solution facilitates industrial equipment monitoring, smart building management, environmental tracking, and fleet management, among many other IoT use cases.
Why does this matter?
Real-time alerts are essential for proactive management. Alerting helps respond immediately to potential issues, minimize downtime, prevent damage, and optimize performance. With Kaa, you can set specific conditions and actions. In such a way, you can ensure that your team is always ready to act when necessary.
Why Kaa IoT platform?
- Flexibility. Kaa allows you to set alerts based on a variety of triggers, including scheduled intervals, metadata changes, and time series changes.
- Customization. You can define precise conditions and actions for each alert, tailoring them to your specific needs.
- Real-time monitoring. Never miss critical events with real-time notifications via email, webhook, or Slack.
- Ease of use. Even users with minimal technical expertise can create, manage, and monitor alerts with the intuitive interface.
Stay tuned for more tutorials and guides on how to maximize the potential of the Kaa IoT platform. If you have any questions or need further assistance, don’t hesitate to reach out to our support team.