Connecting LoRaWAN devices to Kaa with The Things Network (TTN)
- Overview
- Terms and concepts
- Prerequisites
- Playbook
- 1. Provision your LoRaWAN device in The Things Stack
- 2. Register LoRaWAN end device to the TTN
- 3. Integration options: MQTT vs Webhook
- 4. Configure Uplink Payload Formatter
- 5. Configure Downlink Payload Formatter
- 6. The Things Stack application integration in Kaa
- 7. The Things Stack device integration in Kaa
- 8. LoRaWAN devices data visualization
- Conclusion
Overview
In this tutorial, we will look at how to integrate a LoRaWAN device with the Kaa IoT platform using The Things Stack Sandbox as a LoRaWAN provider.
You will learn how to create a digital twin of your LoRaWAN device, connect the device to Kaa, submit telemetry, send commands, and view results in the Kaa web interface.
We will use the Sandbox environment for testing and evaluation purposes, but keep in mind that for production workloads, it would be better to consider other options (see information below).
This tutorial will also cover theoretical aspects of LoRaWAN and IoT integration, helping you understand not only how to configure your system, but also why certain steps are necessary.
Terms and concepts
The Things Stack
The Things Stack is an open-source LoRaWAN Network Server (LNS). It is a critical part of any LoRaWAN deployment, handling device registration, session management, uplink and downlink routing, and security (encryption, keys).
There are multiple flavors of The Things Stack:
- The Things Stack Sandbox: previously known as Community Edition, this is a free-to-use, shared environment for development and evaluation. It is ideal for prototyping but does not provide uptime guarantees.
- The Things Stack Open Source: self-hosted deployment of the open-source stack.
- The Things Stack Enterprise: SLA-backed, production-ready version provided by The Things Industries.
LoRa and LoRaWAN
- LoRa is a proprietary modulation technique created by Semtech, enabling long-range communication at low data rates and low power consumption.
- LoRaWAN is the open networking protocol built on top of LoRa modulation. It defines the communication between end devices and gateways, security layers, and application payload handling.
LoRaWAN defines the following core elements:
- End devices (nodes): Sensors or actuators with LoRa radios.
- Gateways: Devices that forward LoRa radio messages to the network server via IP backhaul.
- Network server (LNS): Responsible for deduplication, routing, and security.
- Application server: Where decoded payloads are delivered for consumption (Kaa IoT platform in our case).
LoRaWAN uses different device activation methods:
- OTAA (Over-The-Air Activation): The device joins dynamically with AppEUI, DevEUI, and AppKey. It is a preferable variant for the security reasons.
- ABP (Activation By Personalization): The session parameters are hardcoded.
Payload formatters
Raw LoRaWAN payloads are byte arrays. For applications, it is inconvenient to work with raw bytes. The Things Stack provides payload formatters:
- Uplink formatter: Used for the incoming uplink messages.
- Downlink formatter: Used for the outgoing downlink messages.
This separation allows developers to focus on application logic while leaving binary encoding/decoding to small reusable functions.
Kaa platform integration (brief description)
Kaa is an IoT platform that manages device digital twins, telemetry storage, visualization, and device command execution. When integrated with The Things Stack:
- The Things Stack handles the LoRaWAN stack and connectivity.
- Kaa platform receives telemetry in JSON format, stores and processes the data, visualizes it.
- Commands in JSON from Kaa platform are passed through The Things Stack and converted into binary payloads for devices.
Prerequisites
- An account in The Things Stack Sandbox.
- An account in Kaa Next.
- A basic understanding of LoRaWAN device activation and payload encoding.
Playbook
1. Provision your LoRaWAN device in The Things Stack
First, create a new application in your The Things Stack Sandbox account.

Then go to MQTT integration, generate an API key, and copy it for later.
Choose Grant all current and future rights or manually select the required permissions (see note below). This step is mandatory for the Kaa IoT platform.
Note: Minimal required permissions are:
- view devices in application,
- create devices in application (for batch operations),
- view application information,
- link Application to a Network Server for traffic exchange,
- write downlink application traffic.
- read application traffic (uplink and downlink).
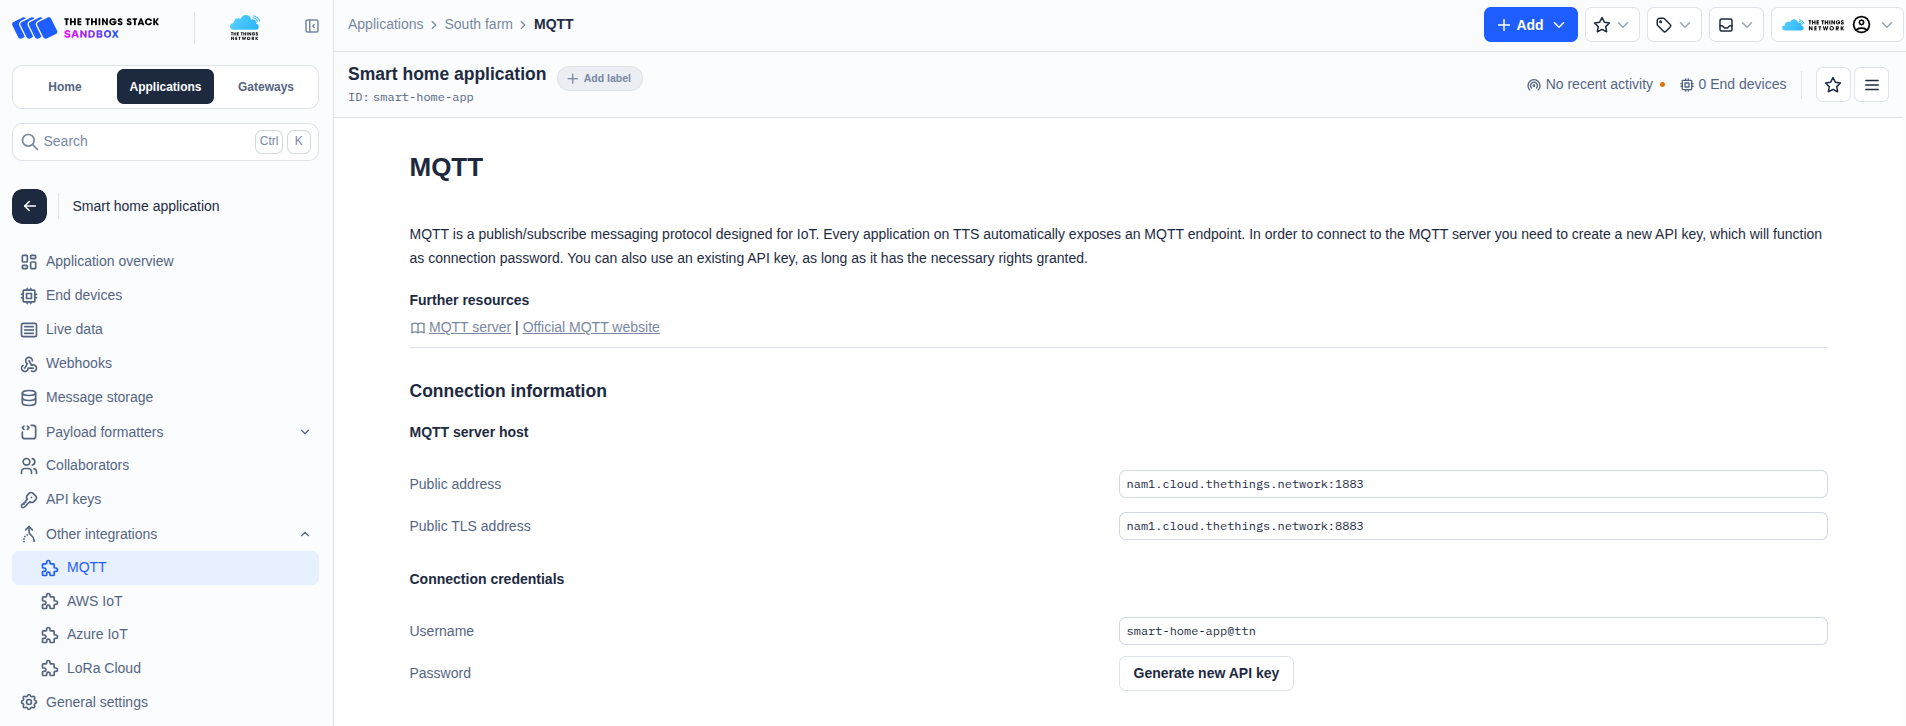

Theory: MQTT is a lightweight publish/subscribe messaging protocol ideal for IoT. The Things Stack exposes application data over MQTT, which makes it straightforward for Kaa platform to consume telemetry.
2. Register LoRaWAN end device to the TTN
In The Things Stack Console. Let’s register mock device manually:
- Frequency plan
- LoRaWAN version
- JoinEUI (enter random EUI)
- DevEUI (generate)
- AppKey (generate)

3. Integration options: MQTT vs Webhook
There are two main integration approaches:
-
MQTT — recommended when The Things Stack payload formatter can reliably convert uplink payloads into JSON that Kaa platform can directly process.
In this case, Kaa subscribes to The Things Stack MQTT endpoint and consumes the decoded messages.
This approach is best for real-time data collection, monitoring, and when downlink communication is required.
See Kaa Data Collection over MQTT. -
Webhook — recommended when payloads are encoded in a format that cannot be easily decoded by the uplink formatter (e.g., Protobuf).
In this case, The Things Stack forwards uplinks via a webhook to a middleware service (e.g., Node-RED, custom microservice).
The middleware decodes the payload using the proper libraries and then forwards JSON to Kaa platform via HTTP or MQTT.
This approach fits event-driven integrations and third-party workflows.
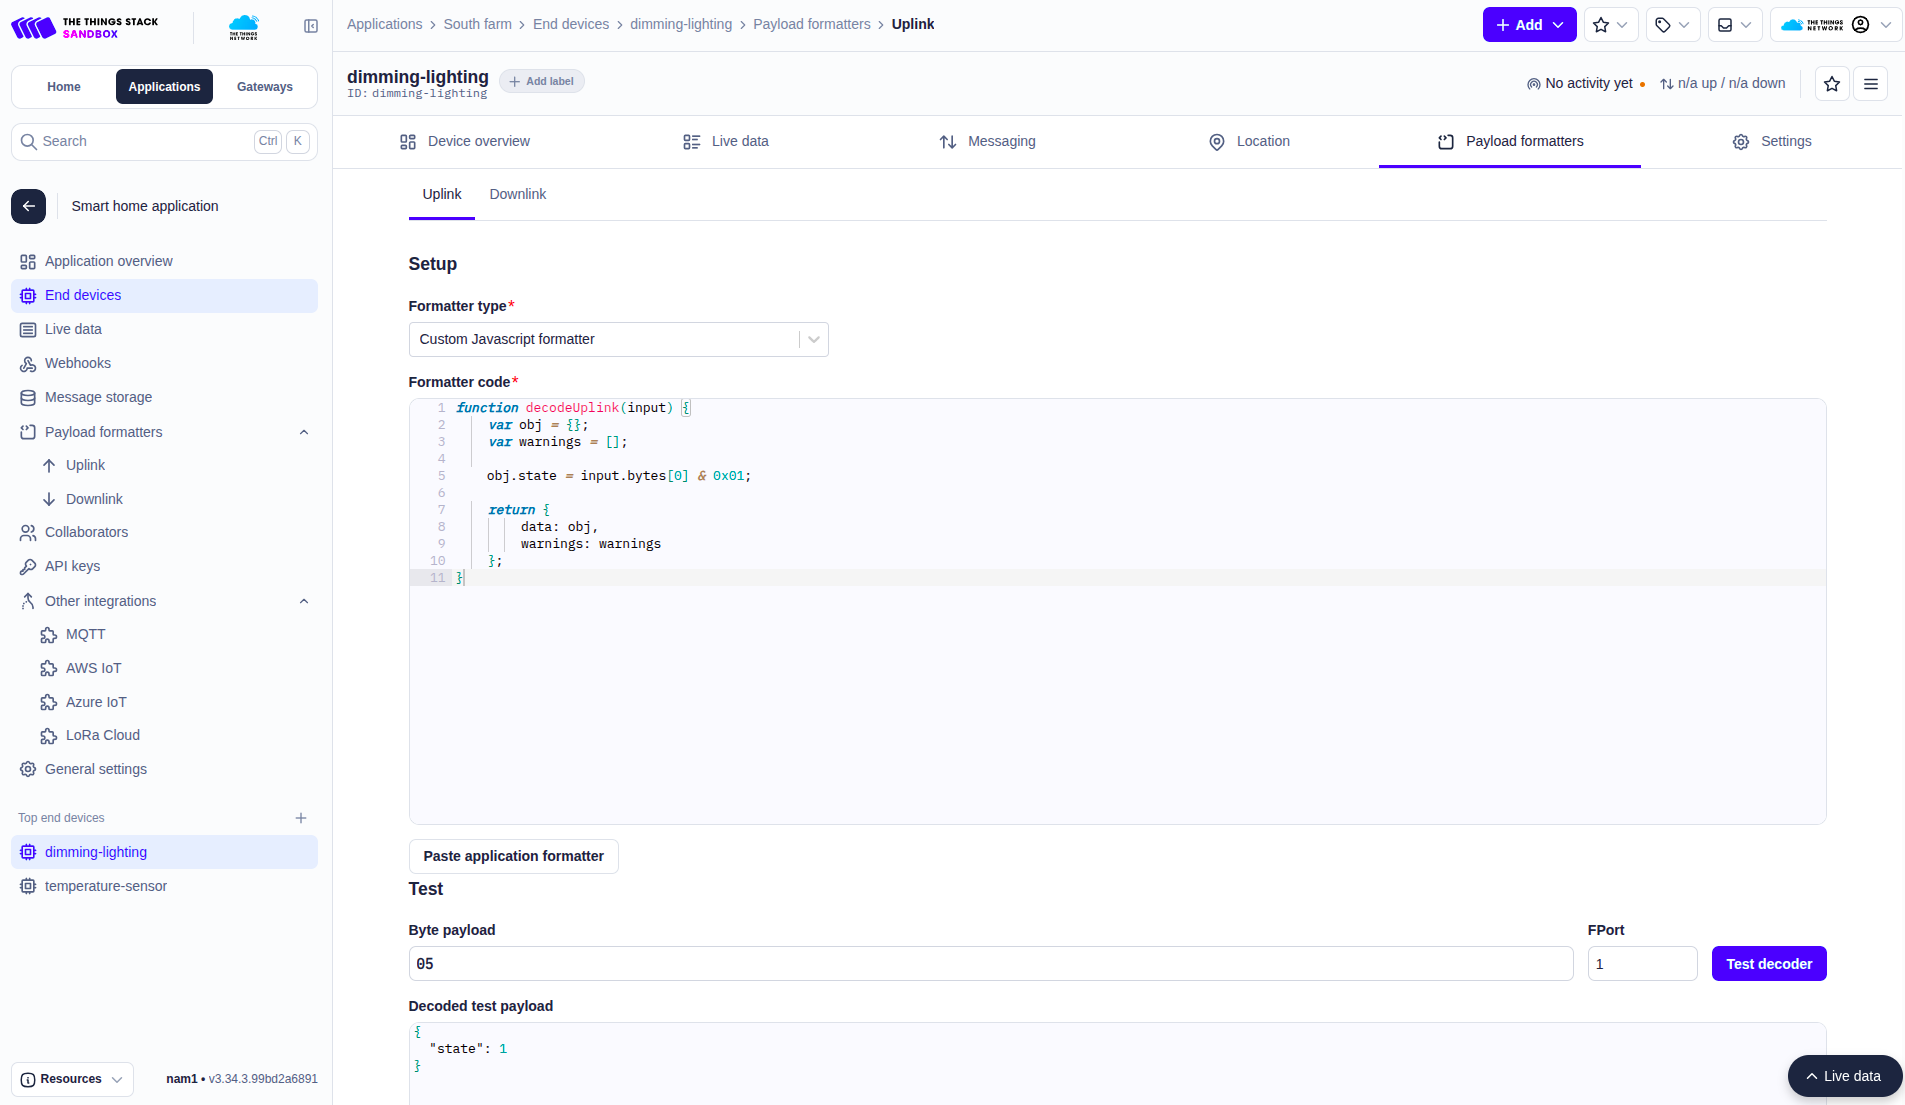
4. Configure Uplink Payload Formatter
Switch to device Payload formatters and select Custom Javascript formatter and enter your decode logic.
For example, suppose that our device is dimmable lighting and the device reports only its state. It sends a single byte, where the first bit represents the device state. In this case, the payload formatter can be very simple, for instance:
function decodeUplink(input) {
    var obj = {};
    var warnings = [];

    obj.state = input.bytes[0] & 0x01;

    return {
        data: obj,
        warnings: warnings
    };
}
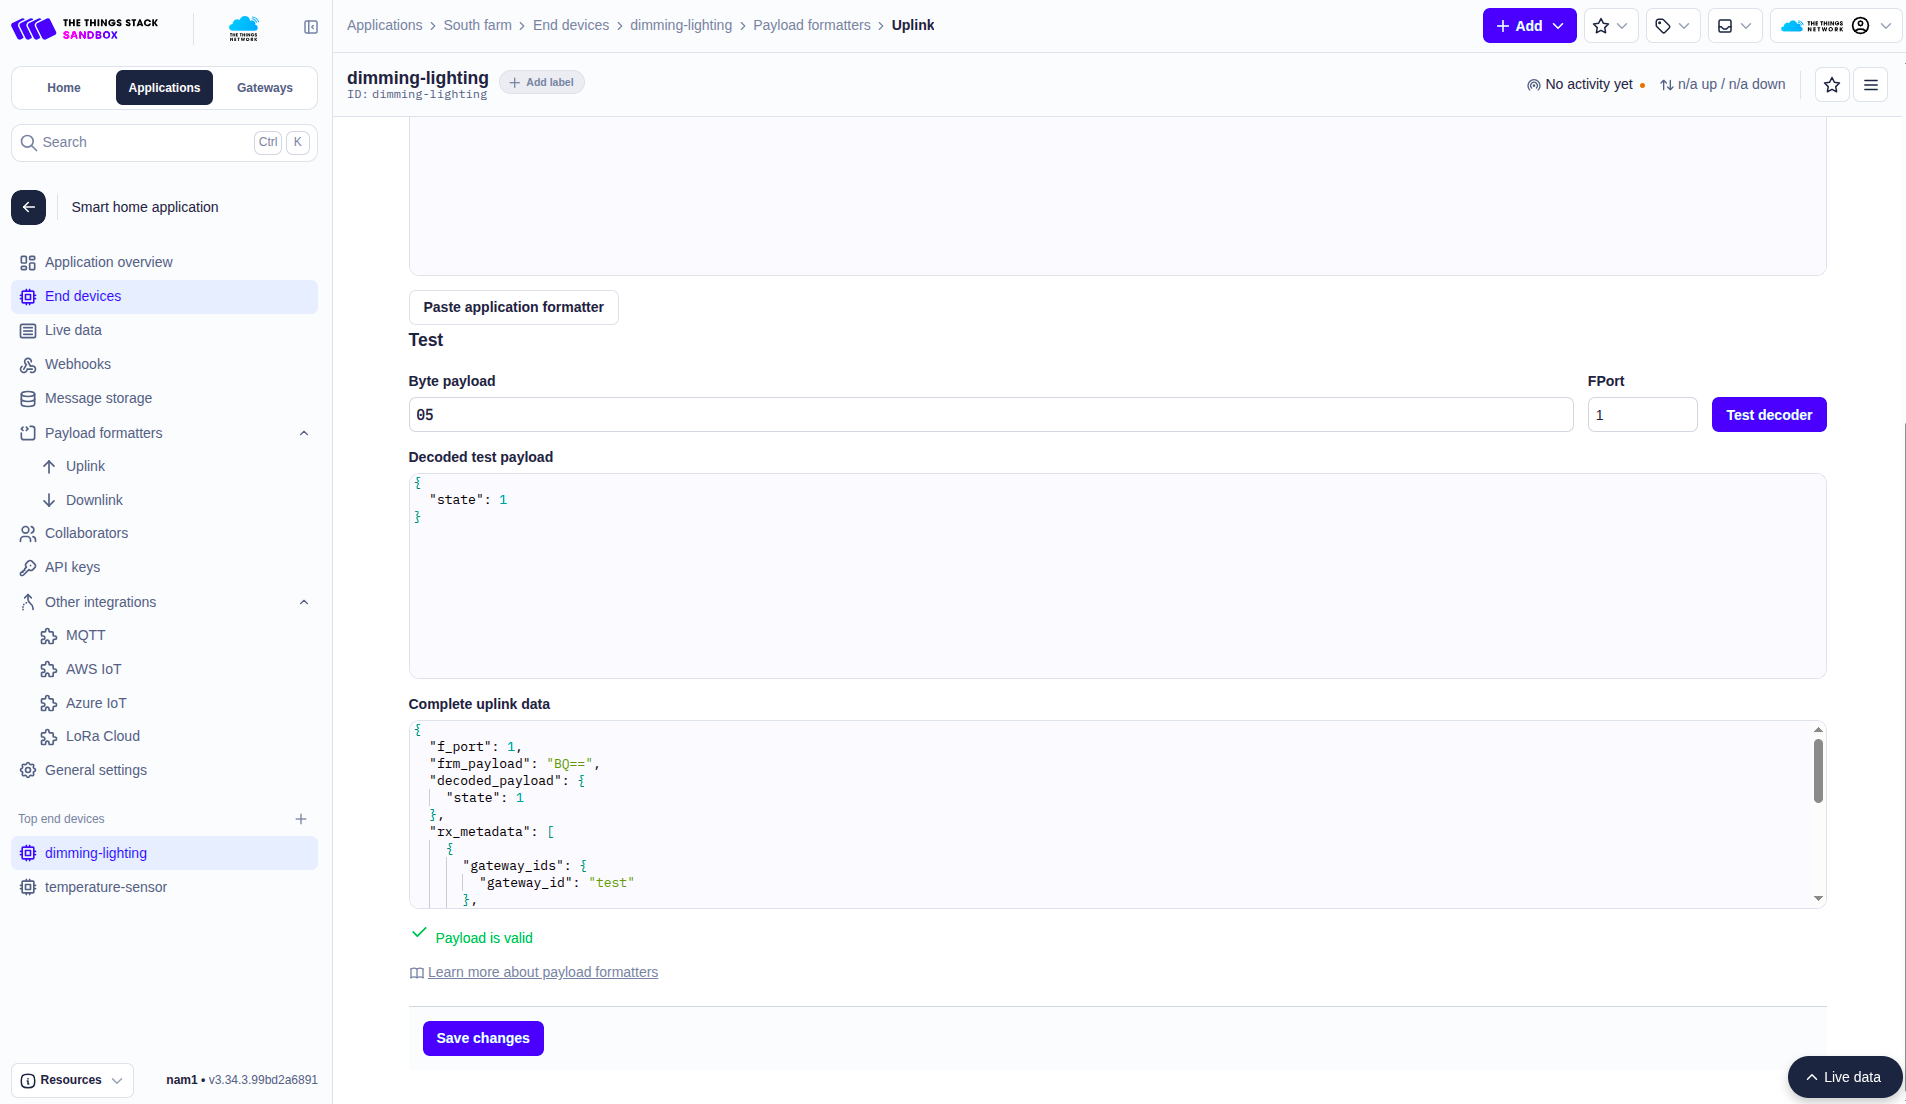
If the input is byte 0x05, the decoded payload will be:
{
  "state": 1
}
because first bit is 1.
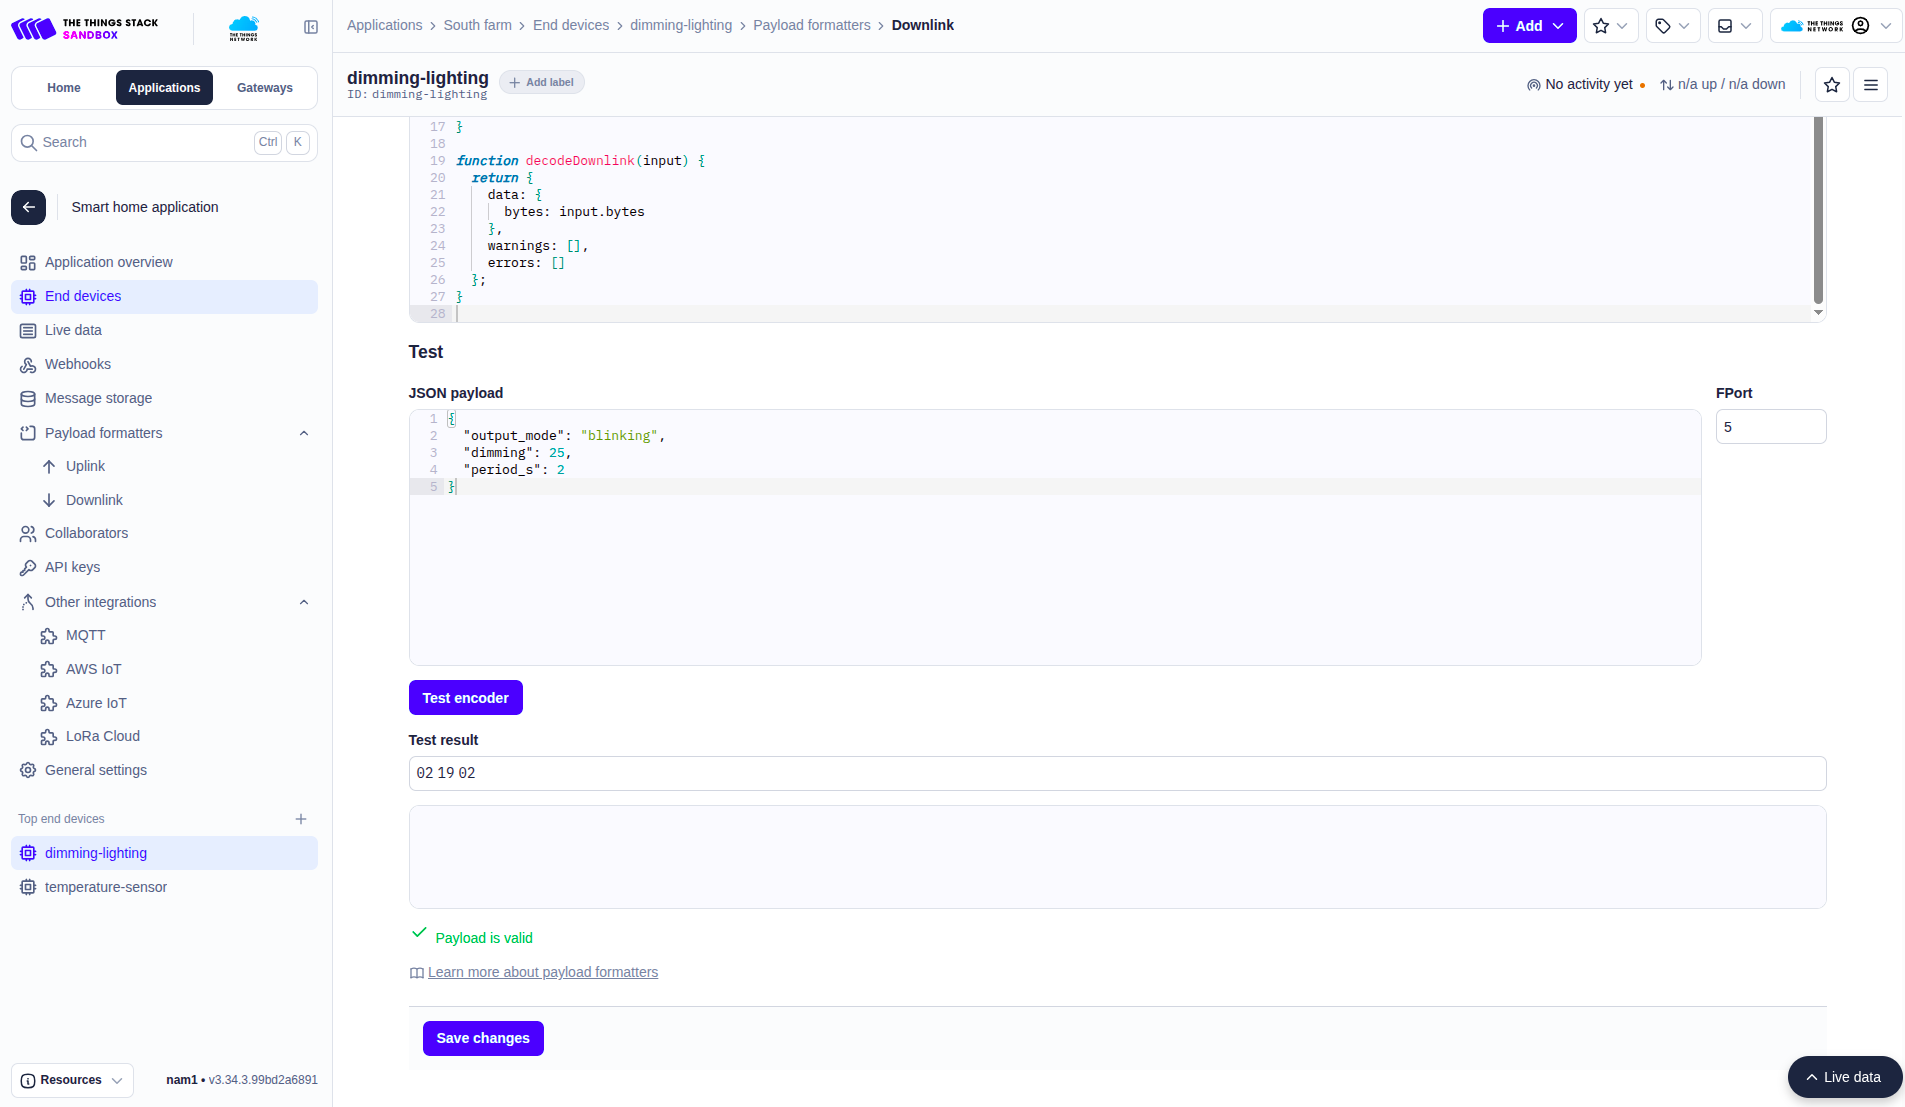
5. Configure Downlink Payload Formatter
To send commands from Kaa platform through The Things Stack, you need an encodeDownlink function.
As a reminder, in this example we are working with a dimmable light that supports multiple output modes:
- Constant ON with dimming:
{
  "output_mode": "on",
  "dimming": 50
}
- Blinking mode with period:
{
  "output_mode": "blinking",
  "dimming": 25,
  "period_s": 2
}
Downlink formatter code:
const OUTPUT_MODE = ["off", "on", "blinking"];

function encodeDownlink(input) {
  var binaryData = {
    bytes: [
      OUTPUT_MODE.indexOf(input.data.output_mode),
      input.data.dimming
    ],
    fPort: input.fPort,
  };

  if (input.data.output_mode == "blinking") {
    binaryData.bytes.push(input.data.period_s);
  }

  return binaryData;
}

function decodeDownlink(input) {
  return {
    data: { bytes: input.bytes },
    warnings: [],
    errors: []
  };
}
Note:
fPortis configured on the Kaa side when forming commands. See device command docs for details.
6. The Things Stack application integration in Kaa
First, we should create the Kaa application for the LoRaWAN devices.
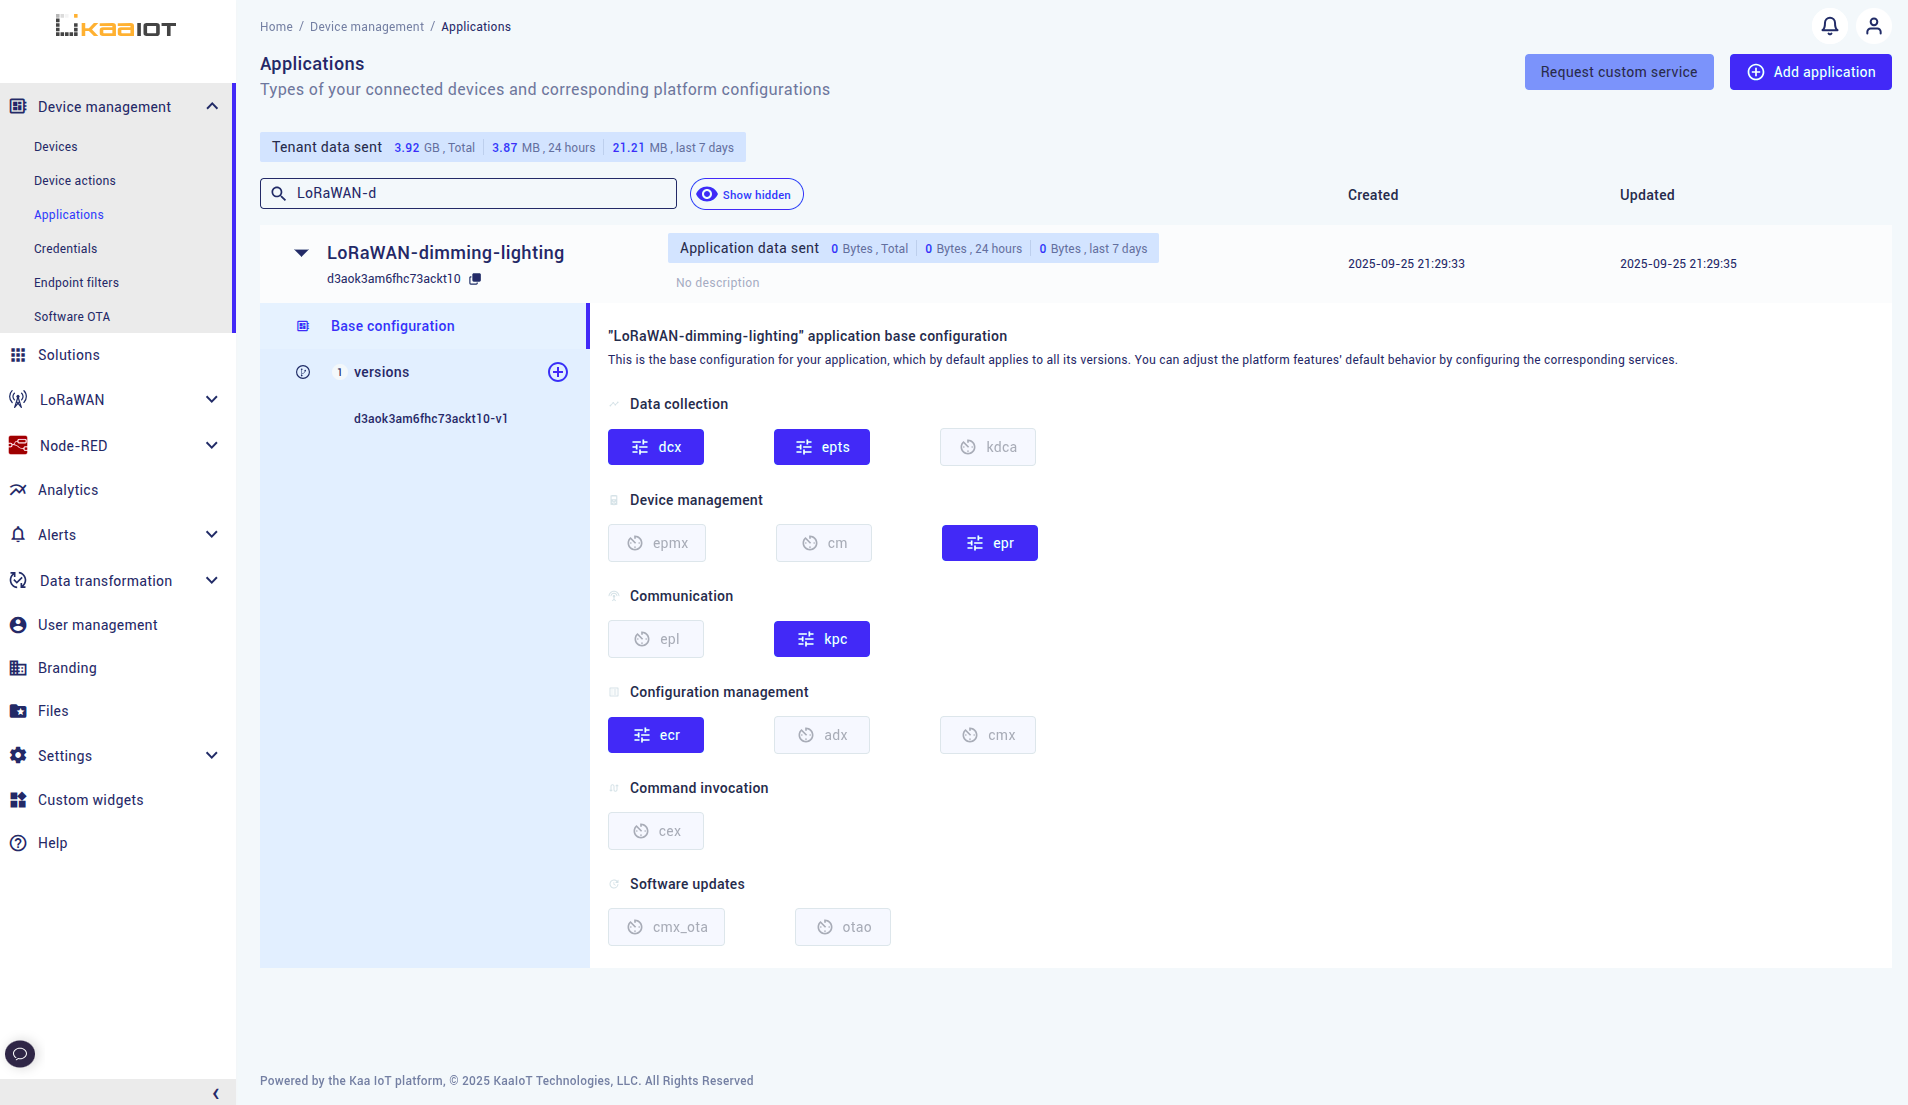
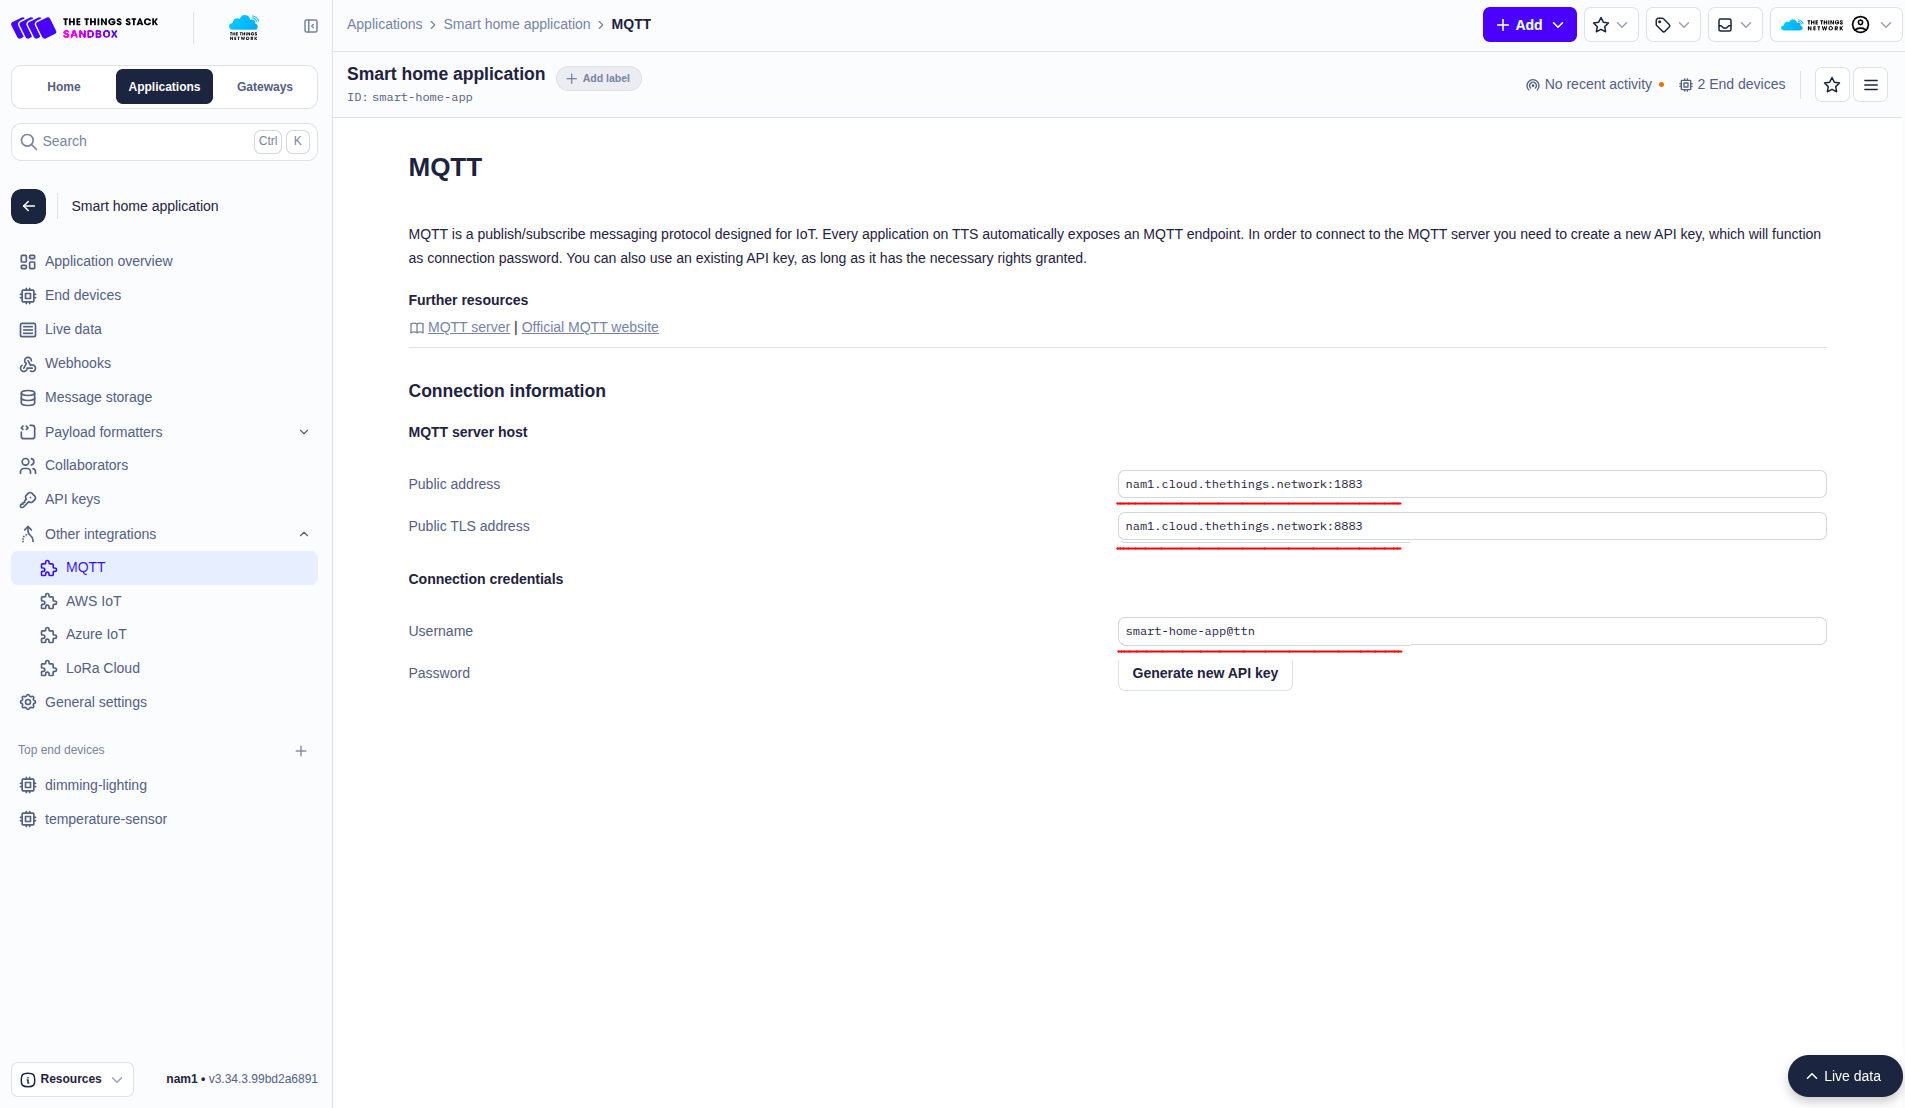
Then create Kaa integration with The Things Stack using the settings:
- The Things Stack username:
<application ID>@ttn - API key: from MQTT integration
- Identity server host:
eu1.cloud.thethings.network(for Sandbox) - MQTT server host: from The Things Stack Console (from MQTT integration)
We can get parameters from this page:
Note:
Even if your application runs in the nam1 cluster, you must use eu1 as the Identity Server.
The Identity Server component is hosted only in theeu1cluster for both The Things Stack Cloud and The Things Stack Sandbox.
Therefore, all Identity API requests (users, applications, API keys, organizations) must be directed toeu1.cloud.thethings.network.
Requests tonam1will fail because no Identity Server is available there.
Our integration:
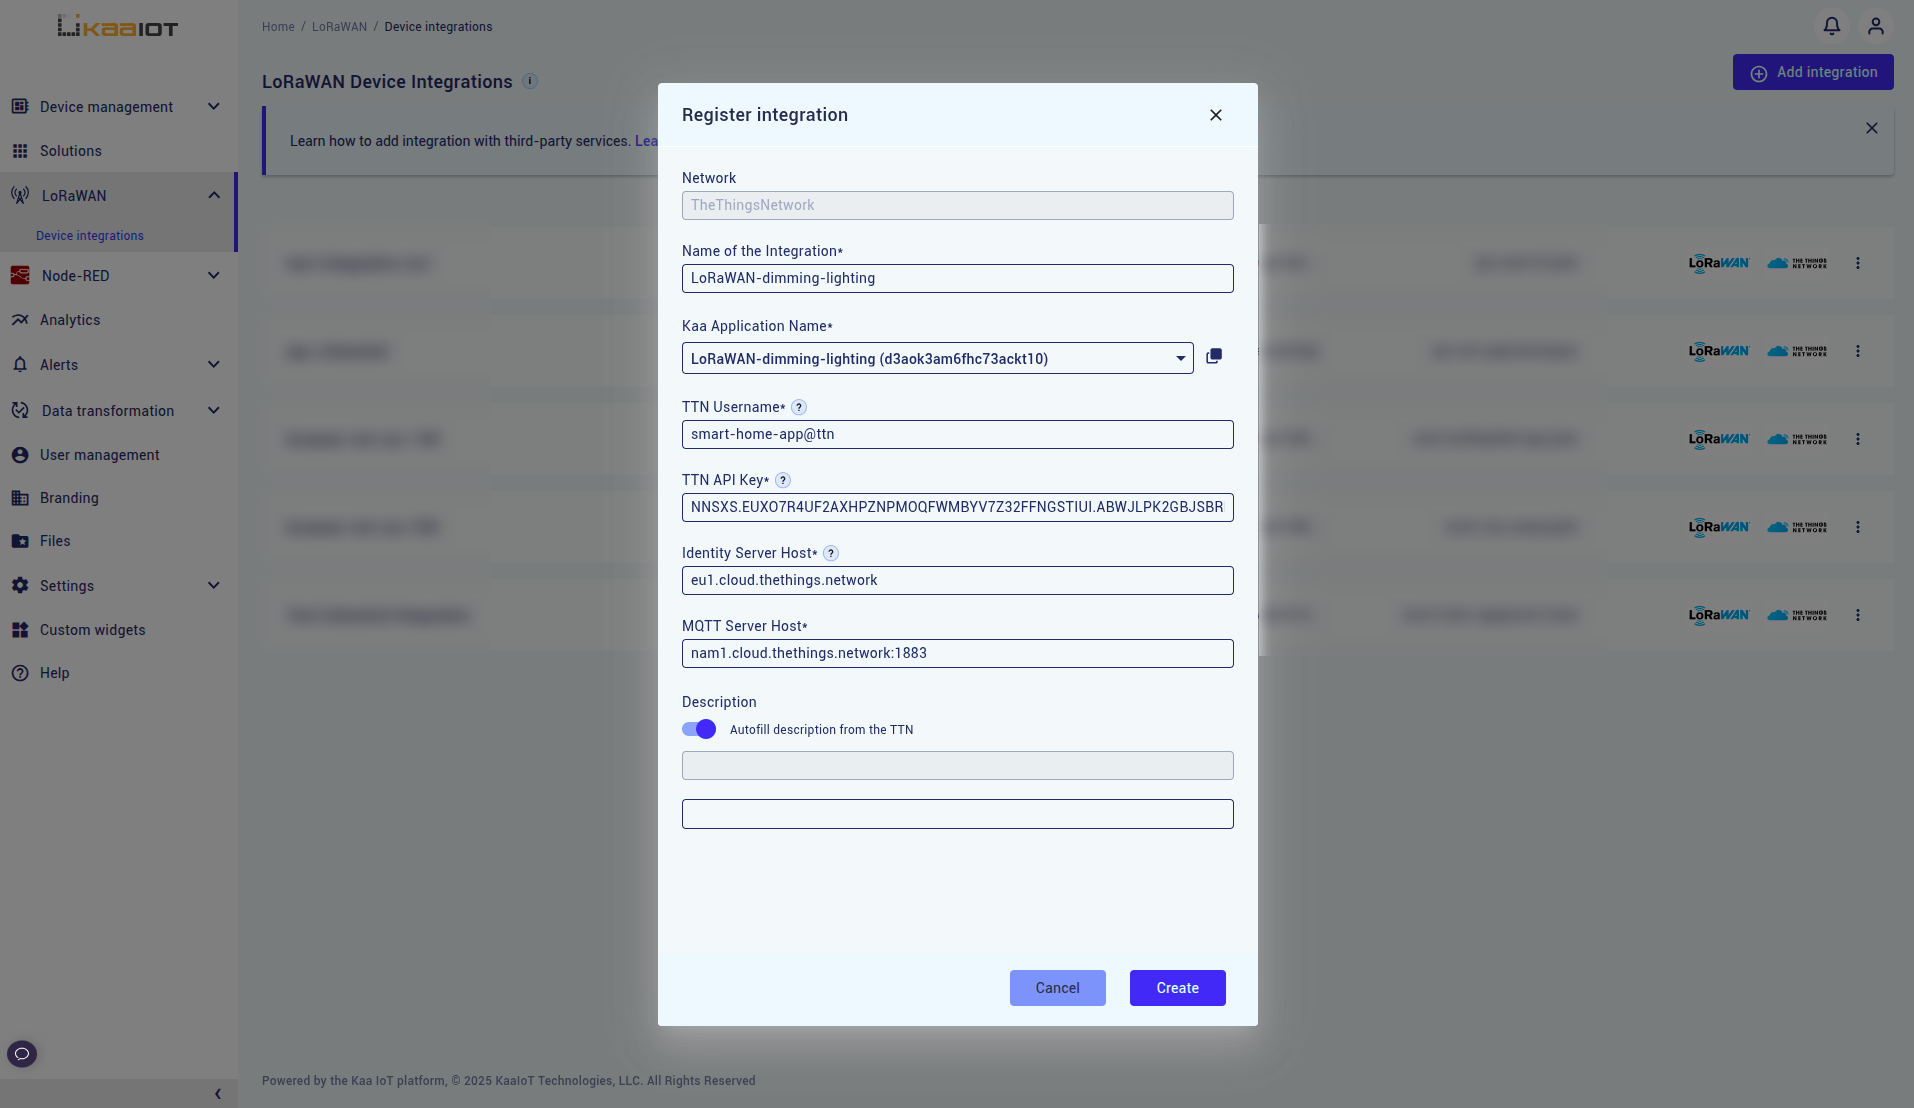
Toggling the “Autofill description from the TTN” slider lets you verify that your credentials are valid.
If the credentials are incorrect, an error message will be displayed.
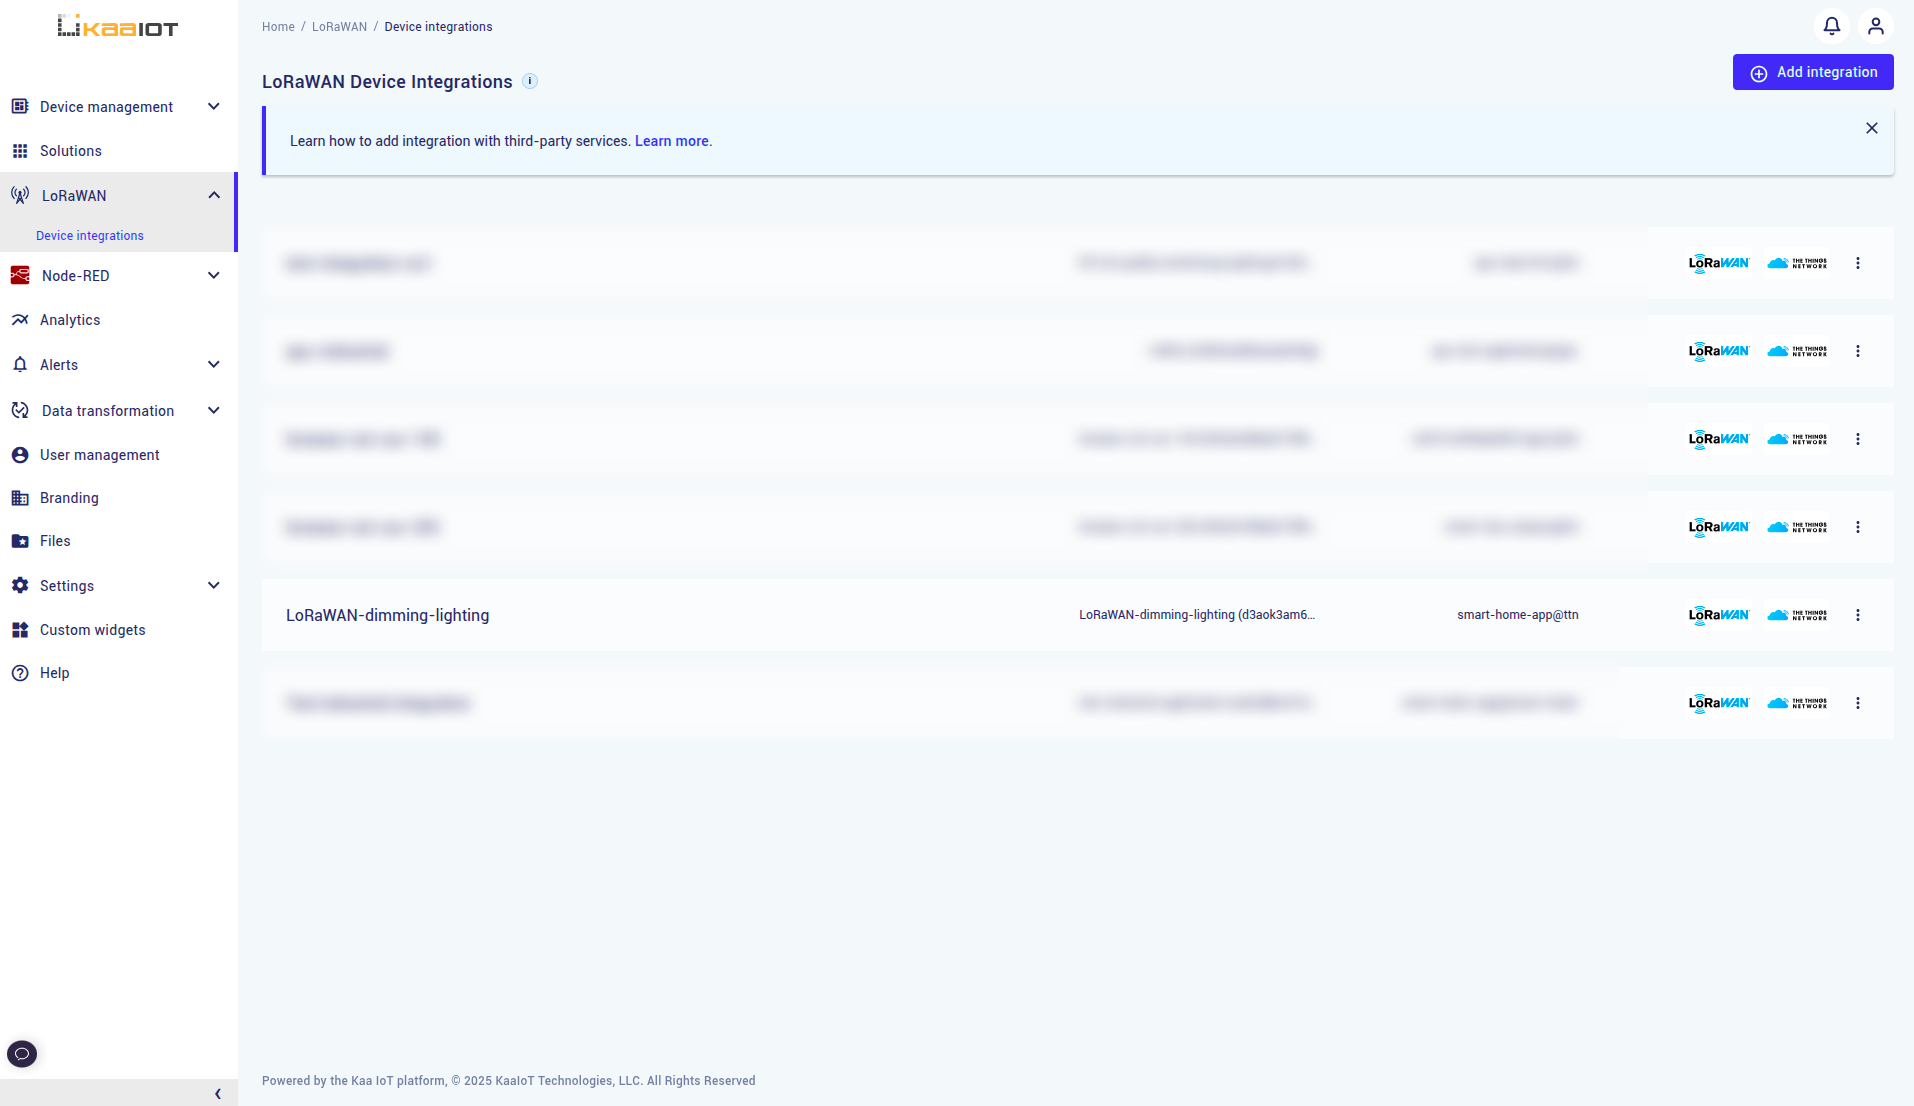
Now the integration appears in the list alongside other LoRaWAN integrations:
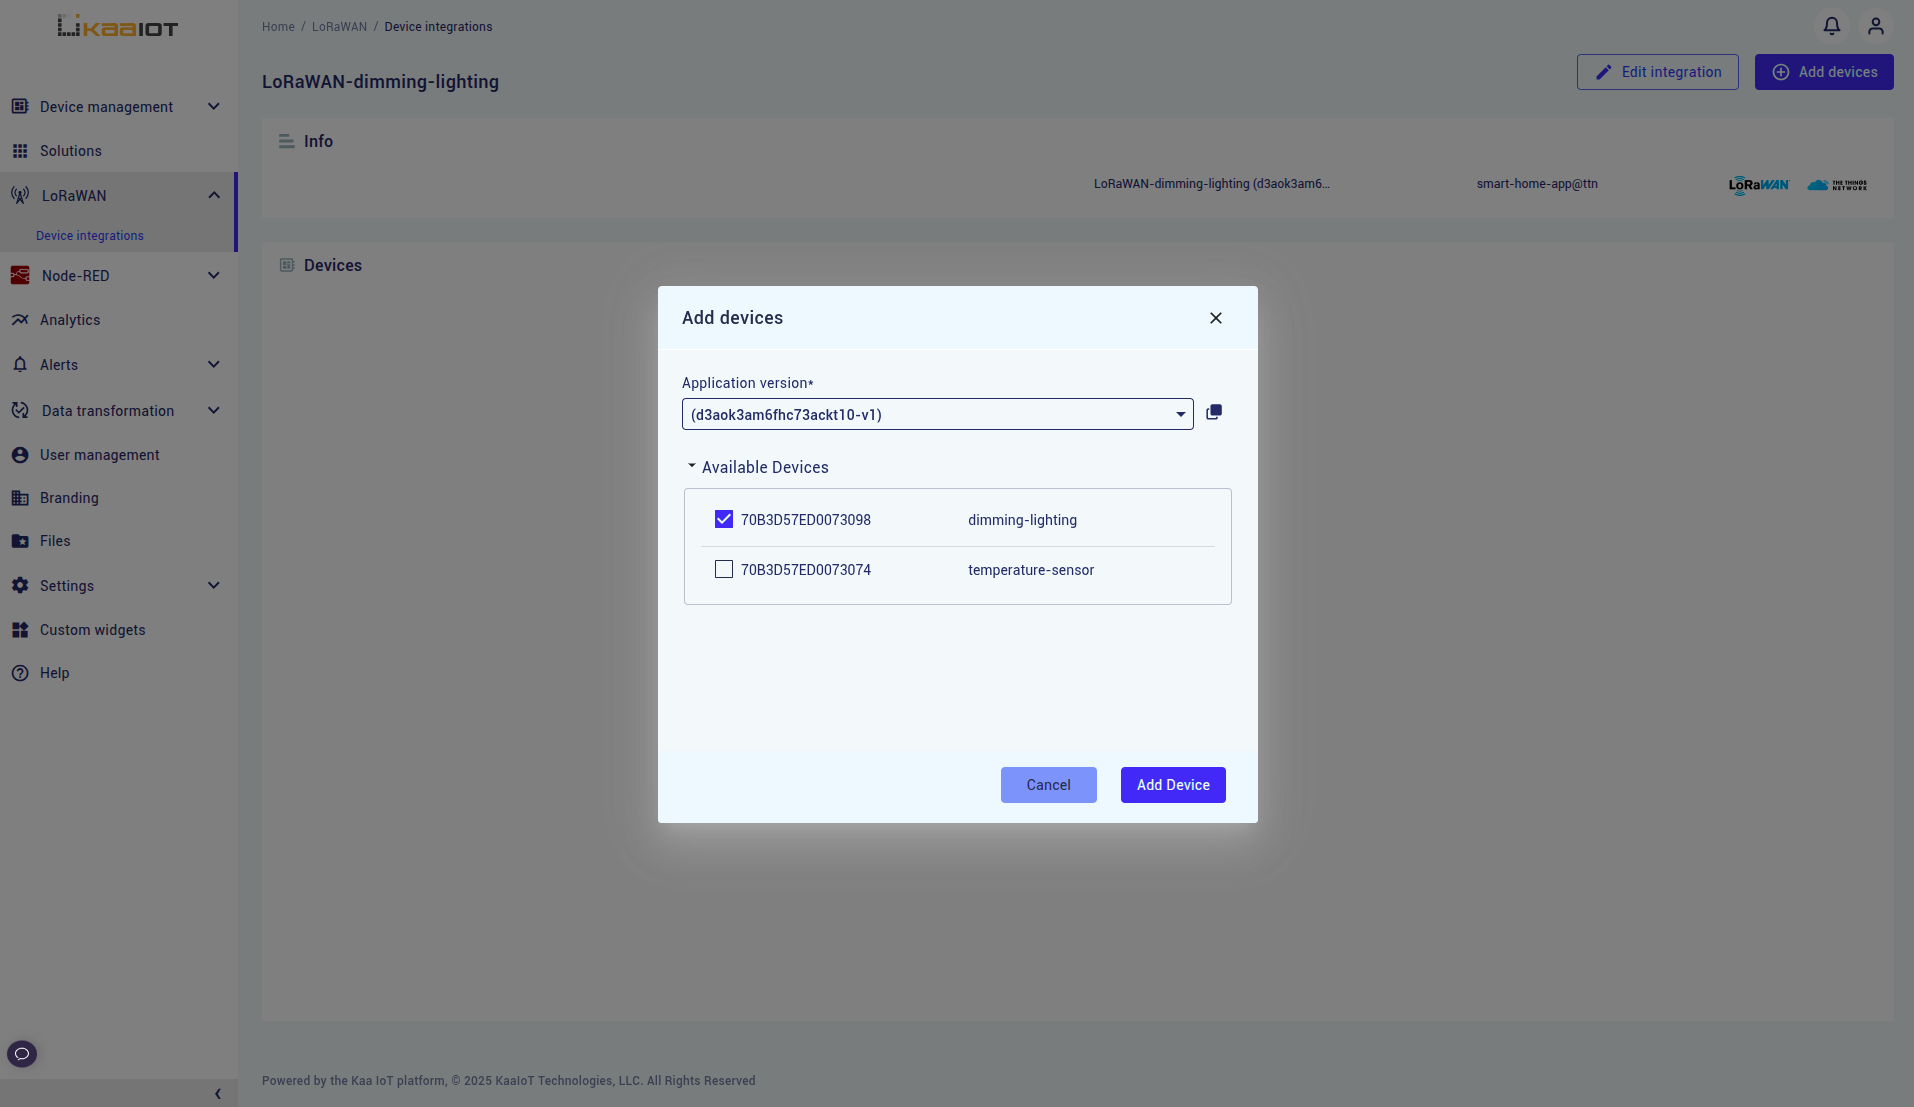
7. The Things Stack device integration in Kaa
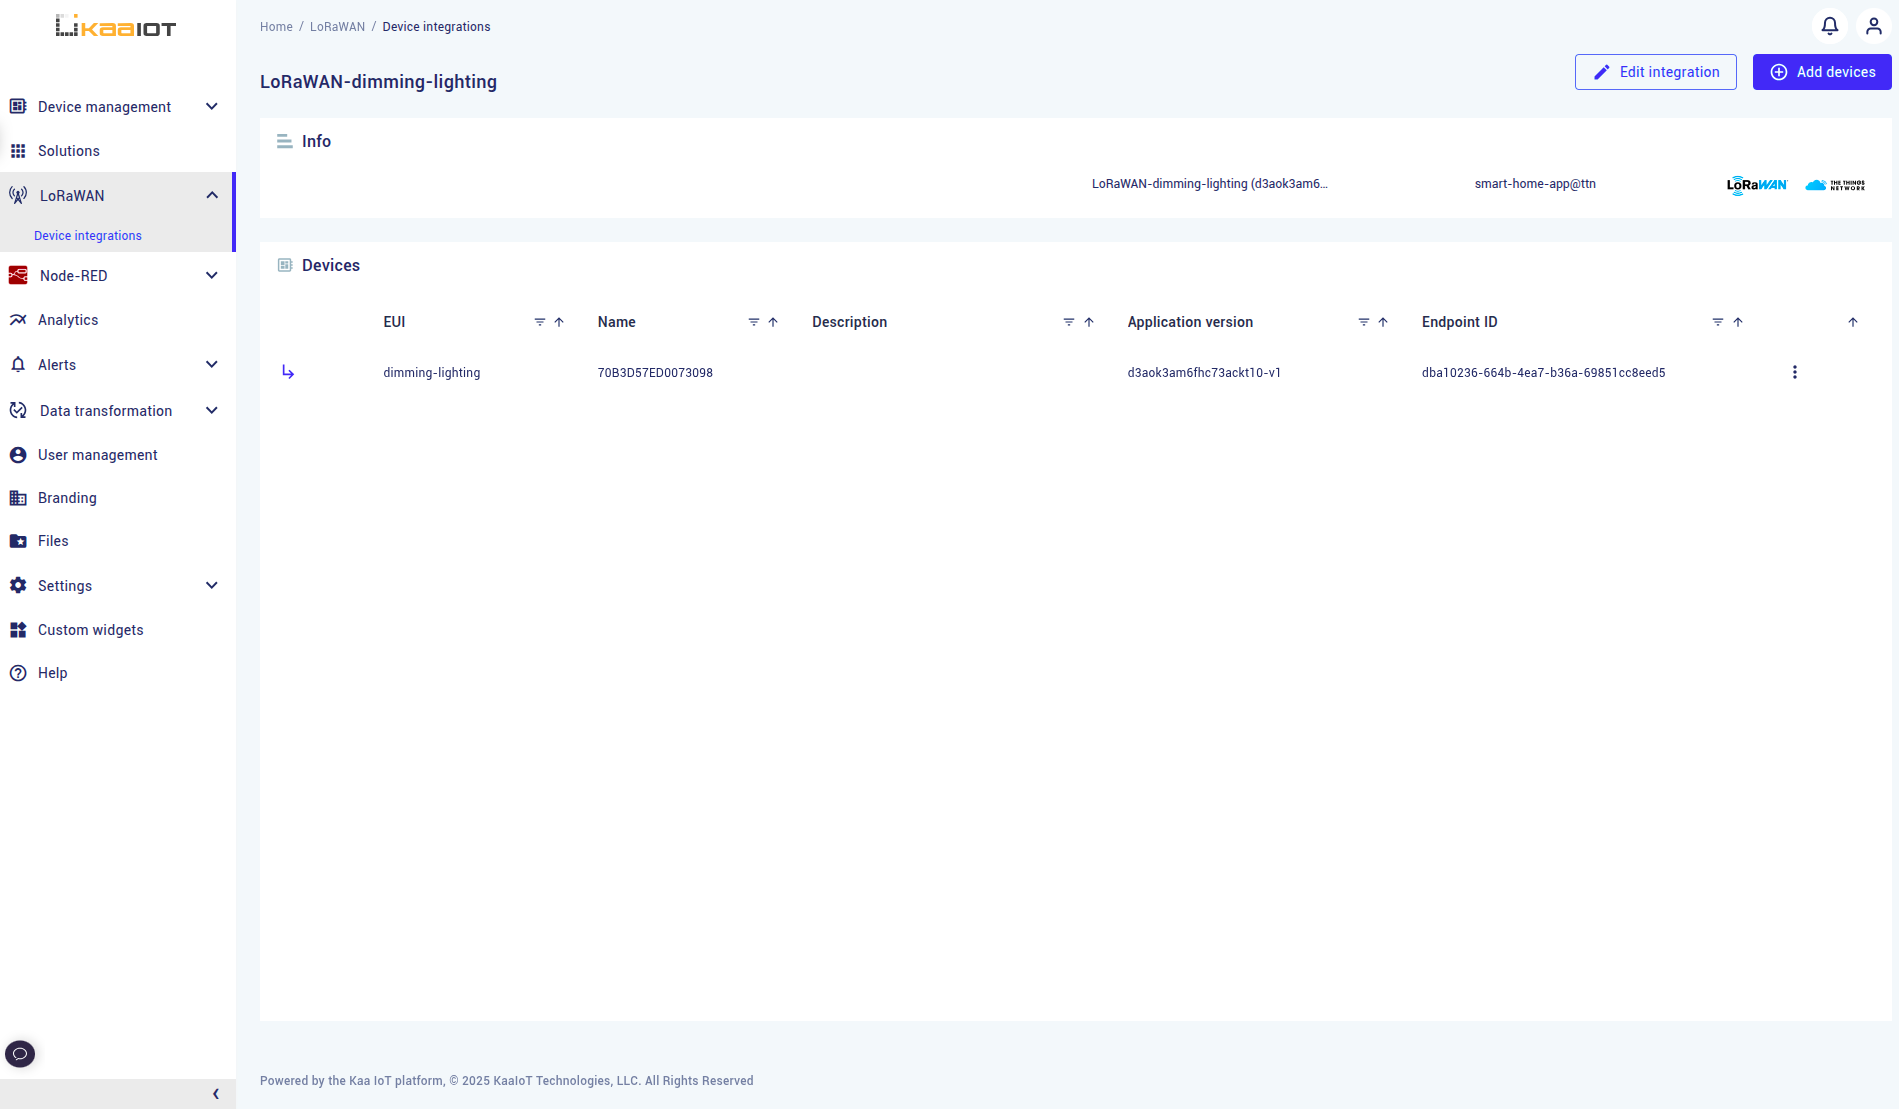
Next step is mapping The Things Stack devices to Kaa endpoints.
Click Add devices in the created application integration and choose the TTN LoRaWAN devices you want to integrate.
8. LoRaWAN devices data visualization
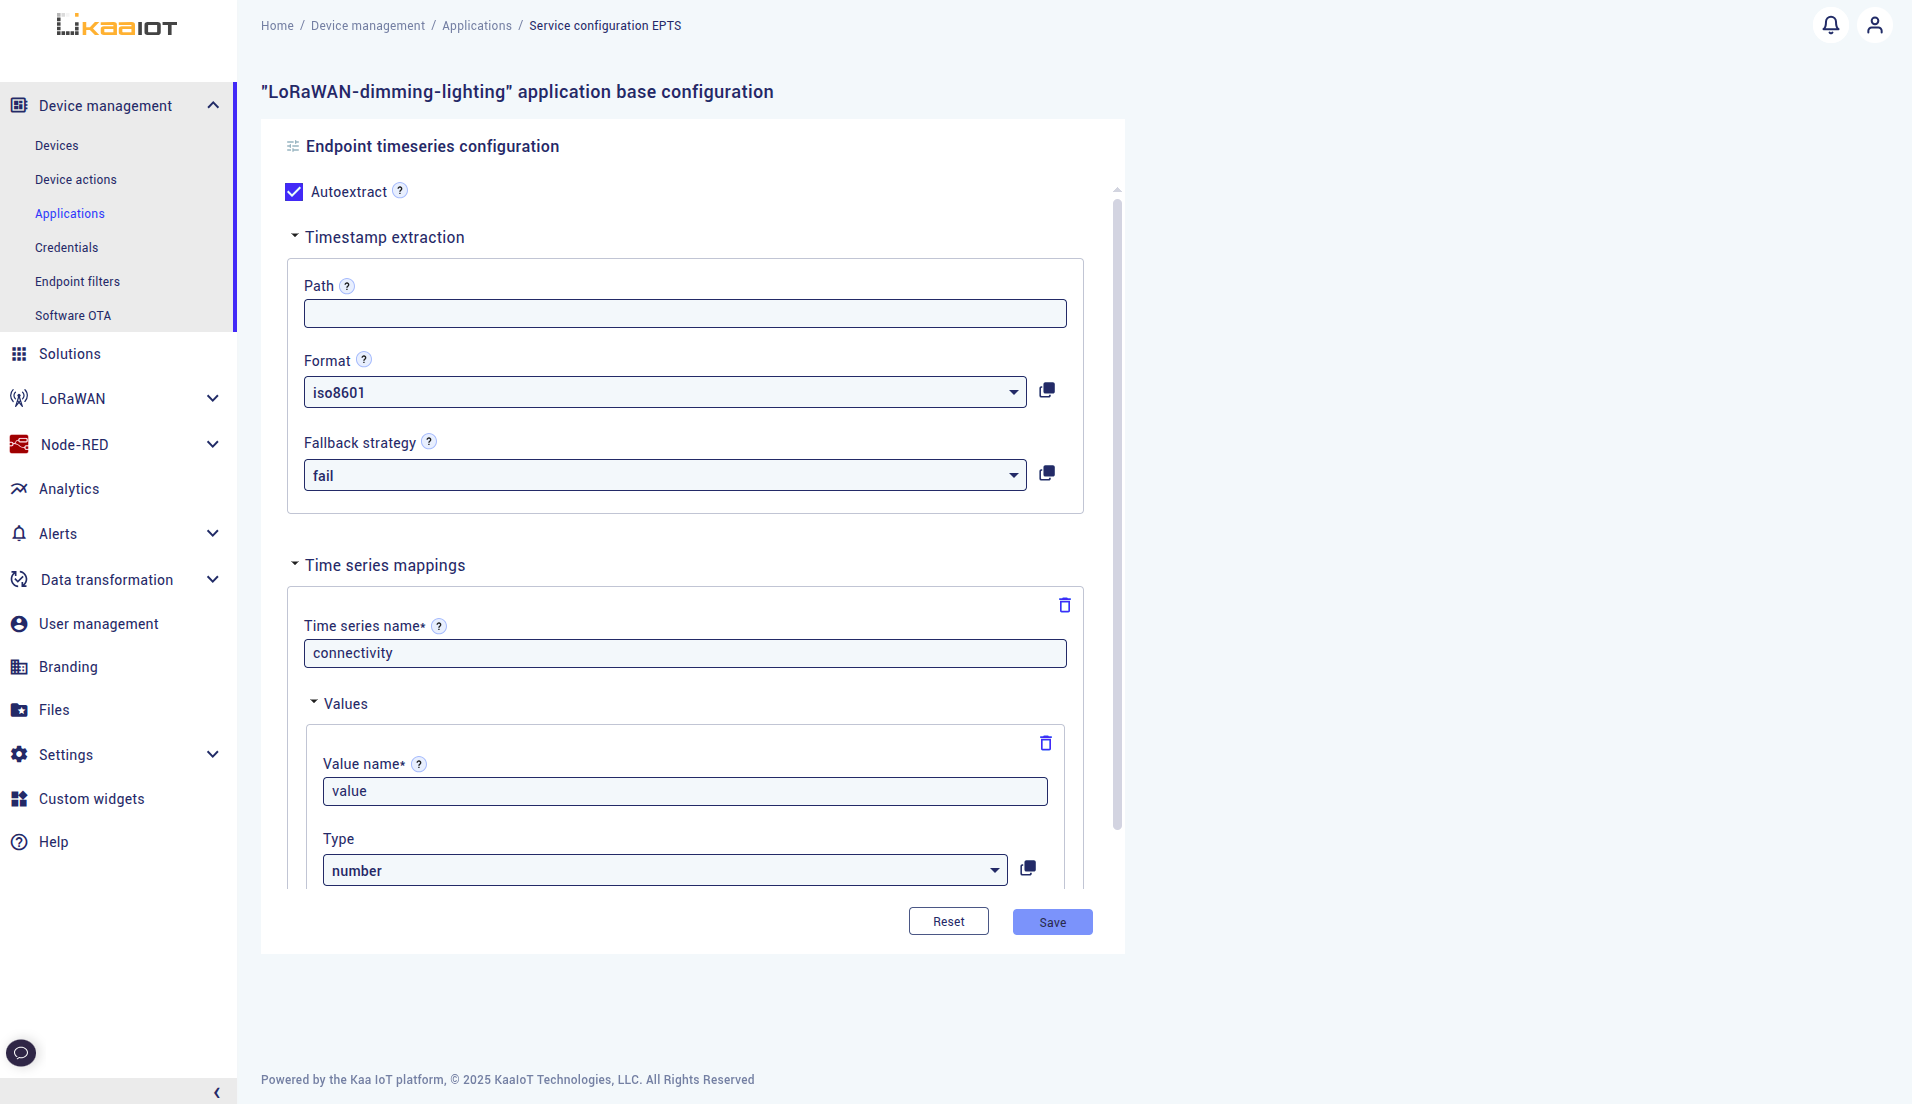
Enable Autoextract of time series for the application and application version.

Now we can verify that the integration is working.
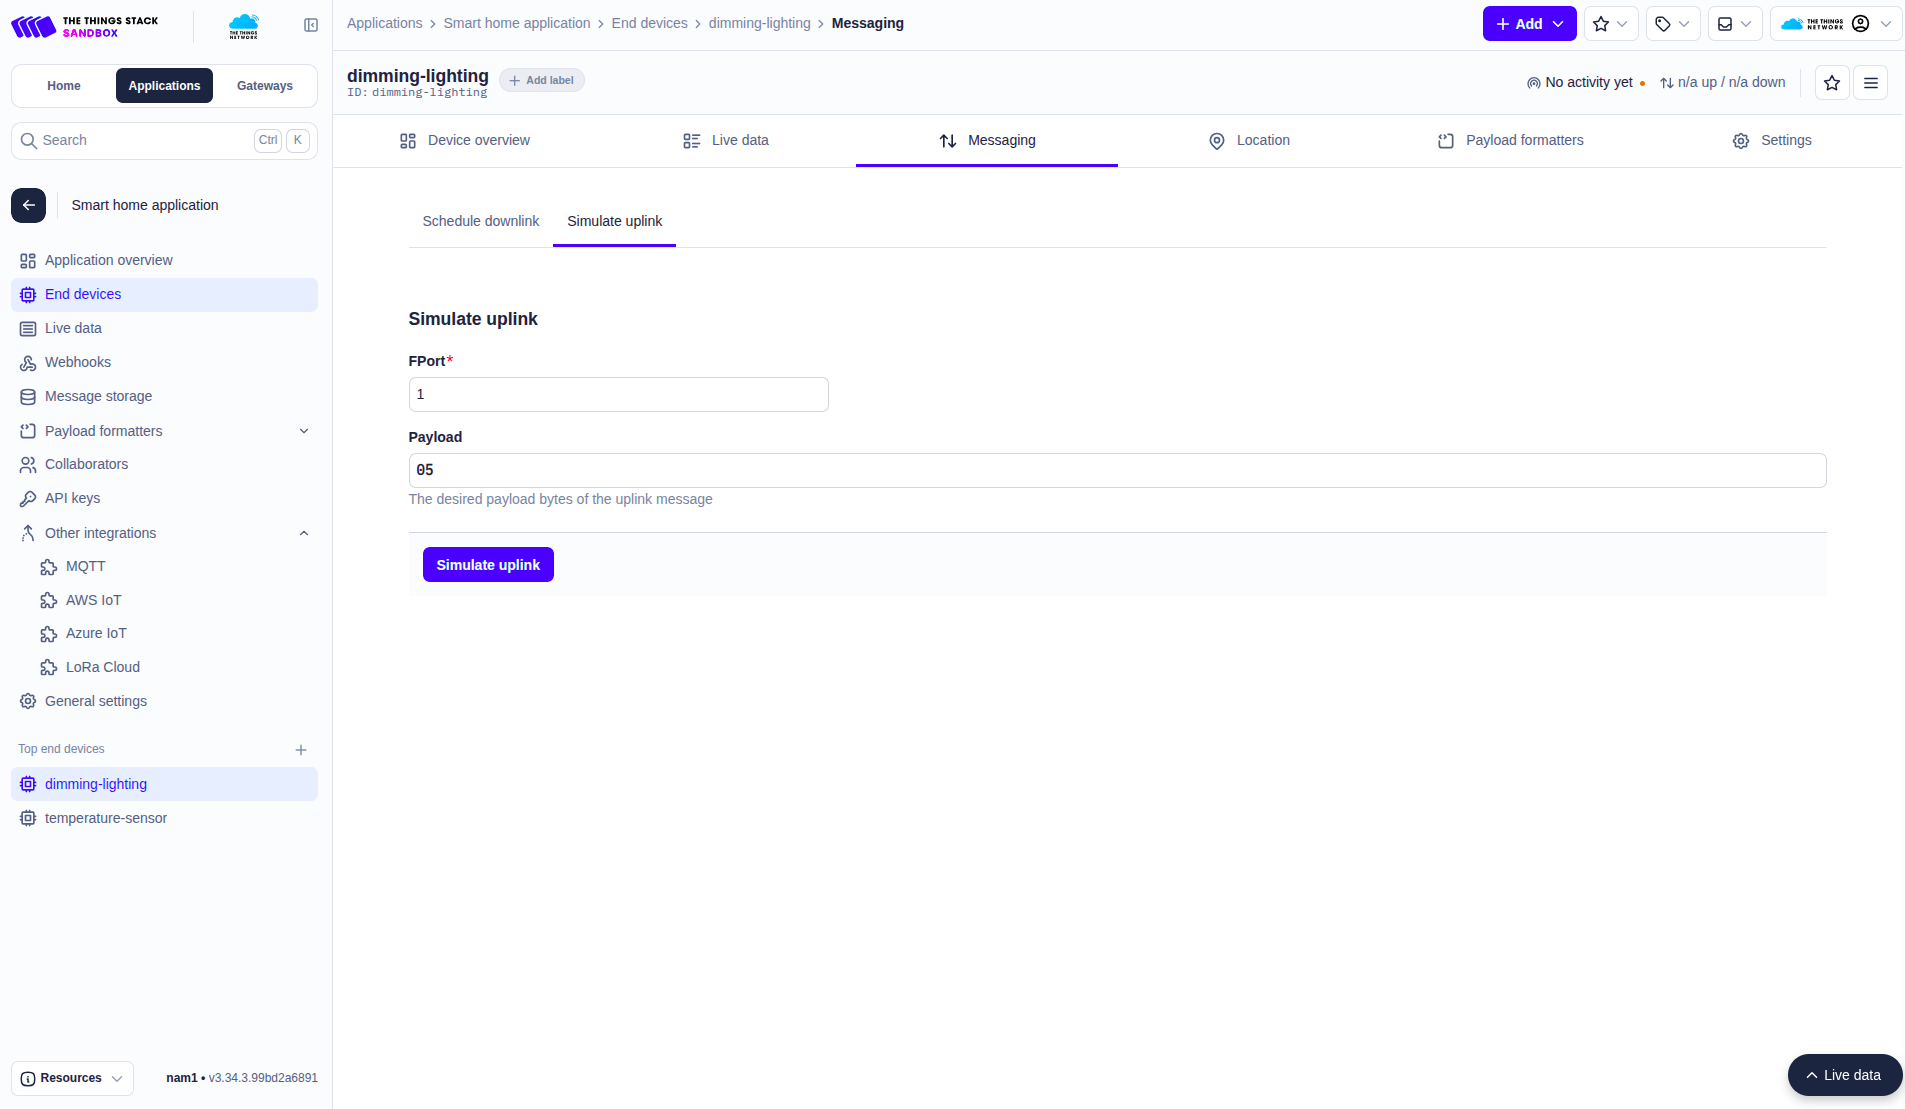
Open the TTN device Messaging tab, go to Simulate uplink, and send a test message matching the expected payload.
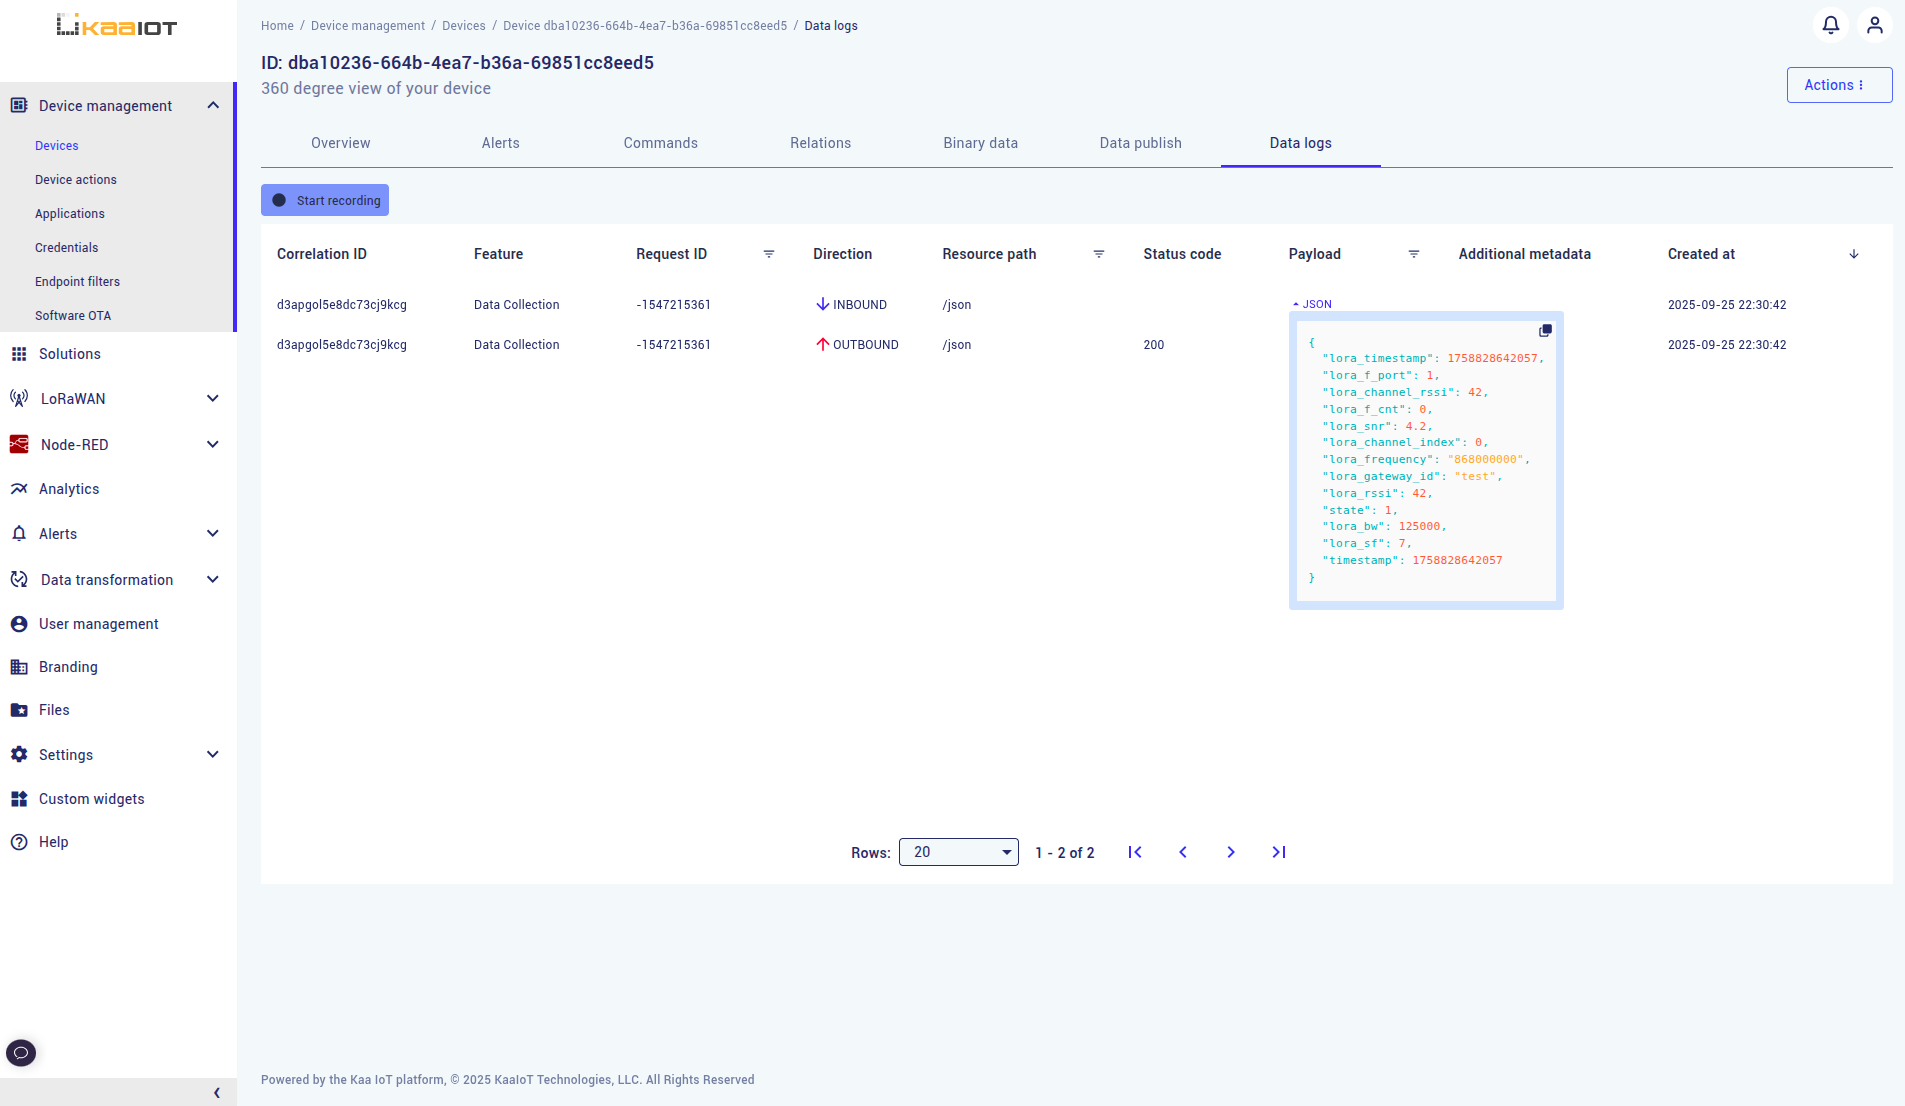
After that, open the Kaa endpoint and check the Data logs and telemetry to see the incoming data:

Conclusion
You have successfully integrated The Things Stack Sandbox and Kaa IoT platform, set up uplink and downlink formatters, and connected a device.
Commands can now be sent from Kaa platform → The Things Stack → device, while telemetry flows back into Kaa platform for visualization.