Connecting the Sensative LoRa Multi-Sensor
- Overview
- Prerequisites
- About Sensative Strips Drip Multi-Sensor
- Installation
- Integrating Sensative Strips Drip Multi-Sensor with KaaIoT
Overview
This tutorial explains how to:
- Connect the Sensative Strips Drip multi-sensor to The Things Network (TTN) using the MikroTik Knot LR8 Kit LoRa gateway.
- Integrate the device with KaaIoT.
You’ll learn how to set up the tools needed for the Strips Drip sensor to send data to TTN, which will then forward it to KaaIoT for monitoring.
Prerequisites
To follow this guide, you’ll need an account on The Things Network. To apply your data in KaaIot platform, you’ll also need an account on Kaa Cloud.
About Sensative Strips Drip Multi-Sensor
The Sensative Strips Drip multi-sensor is a LoRa device that can record temperature, detect water leaks, and monitor magnetic contact (for windows and doors). Its slim design and long-lasting battery, which can last up to 10 years, make it ideal for hard-to-reach or cramped spaces. The device uses LoRa technology to transmit data over a range of up to 10 km (6 miles).
Note: You can read more about the device here.
Installation
In the following sections, we will cover:
- How to set up the MikroTik device to act as a LoRa gateway.
- How to connect the MikroTik gateway to The Things Network (TTN).
- How to configure the Sensative Strips Drip sensor.
- How to integrate TTN with KaaIoT for data monitoring.
Each section will provide the details needed to complete these steps.
MikroTik Knot LR8 Kit Initial Setup
To start with the MikroTik configuration:
- Power on your MikroTik device and connect it to your LAN network.
- Access the MikroTik UI: Use Winbox to configure your device. You can download it from the official website.
Note: You can use MikroTik’s web interface if you prefer not to download Winbox. To do this, find the MikroTik’s
IPaddress in your router’sDHCPclient list, copy theIP, and navigate to it using your browser.
If connected correctly, your MikroTik will appear in the Neighbors list.
The default login is admin with no password.
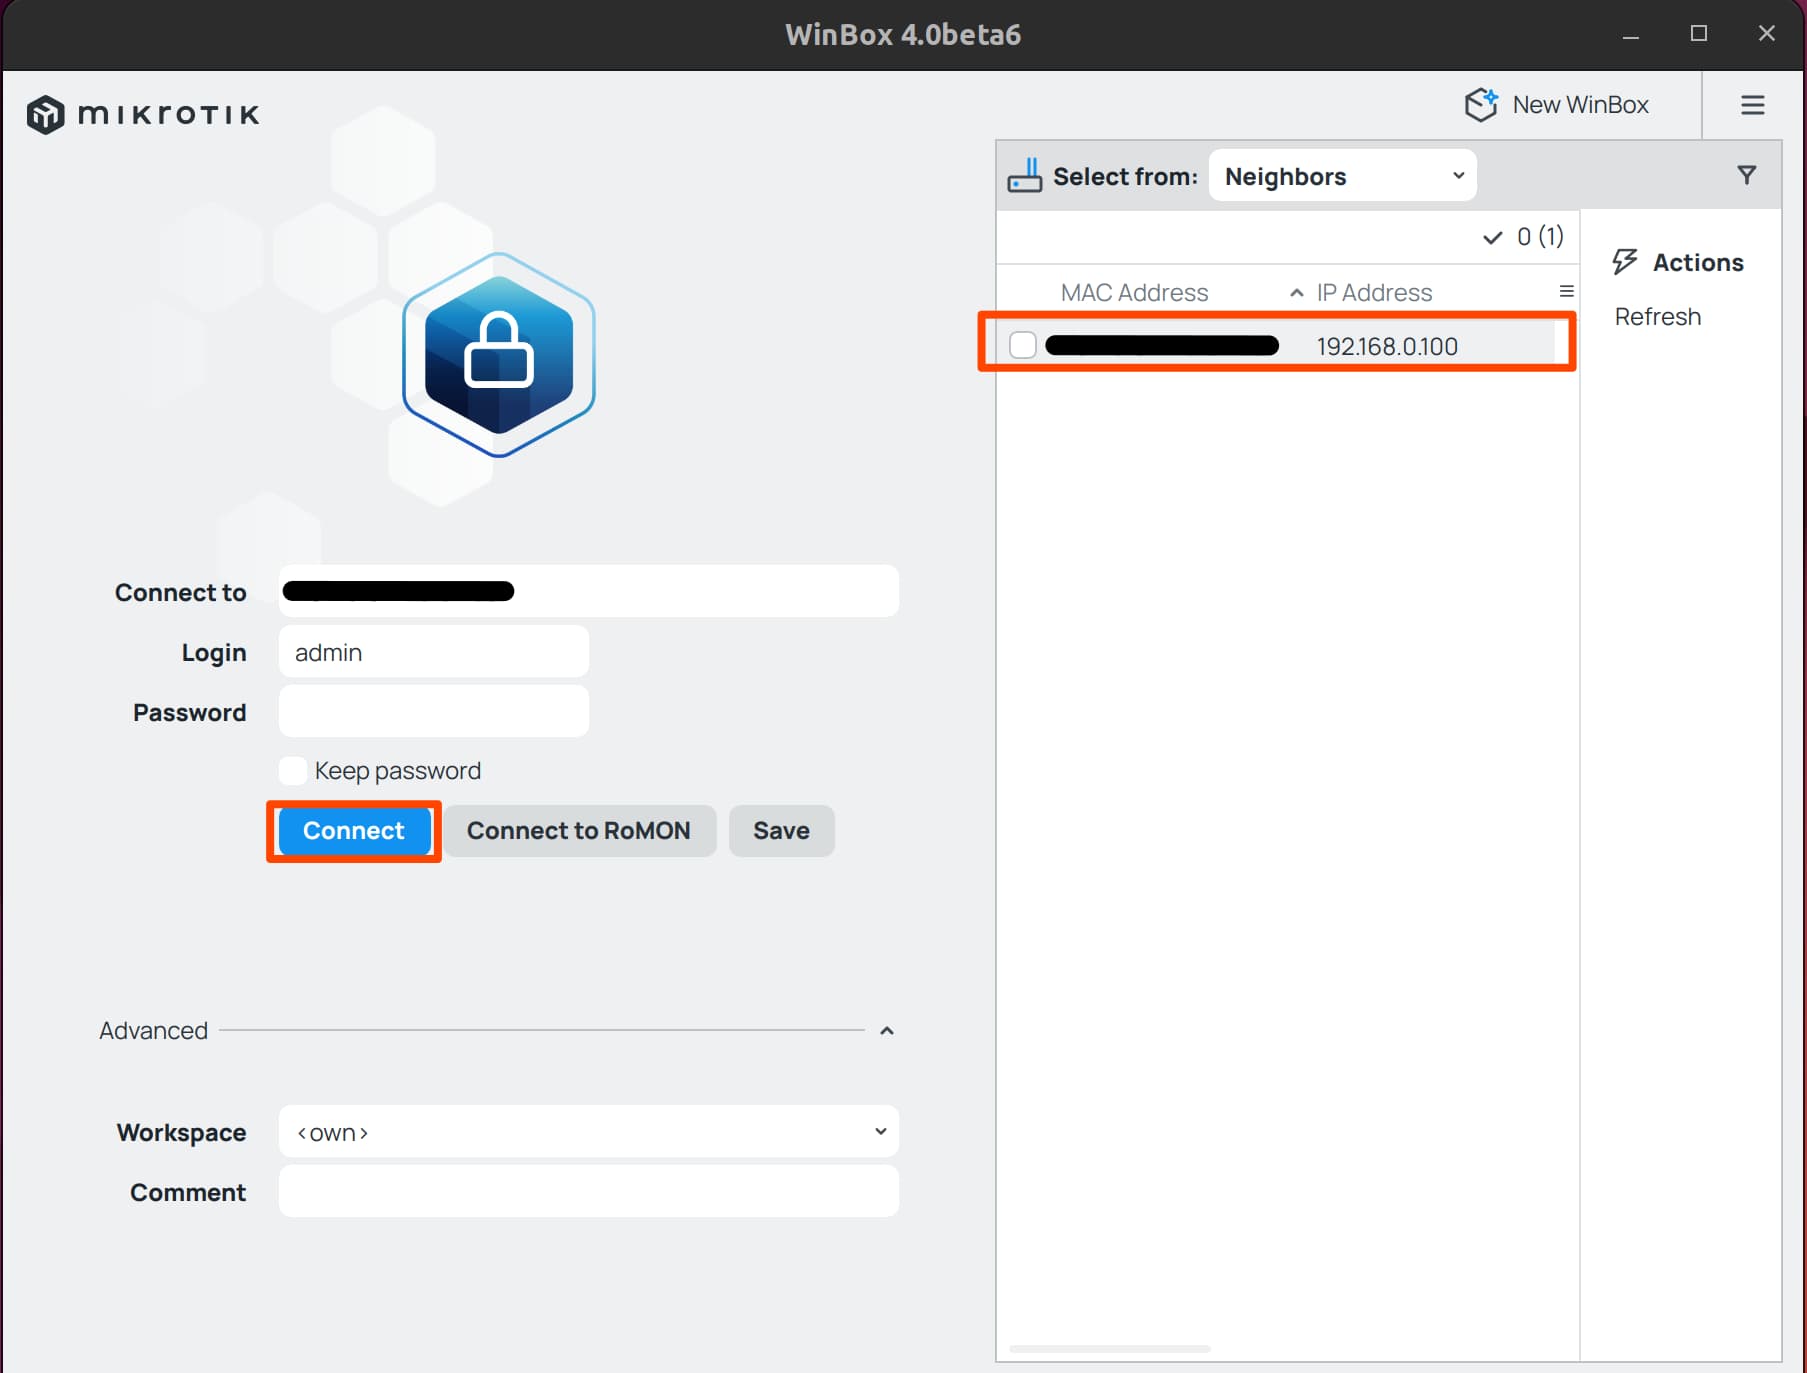
Note: If you encounter issues, you may need to reset your MikroTik to factory settings. Check this page on how to do it.
Upon logging in, keep the default settings as they are fine for this experiment. However, it is advisable to set a password by going to System > Password.
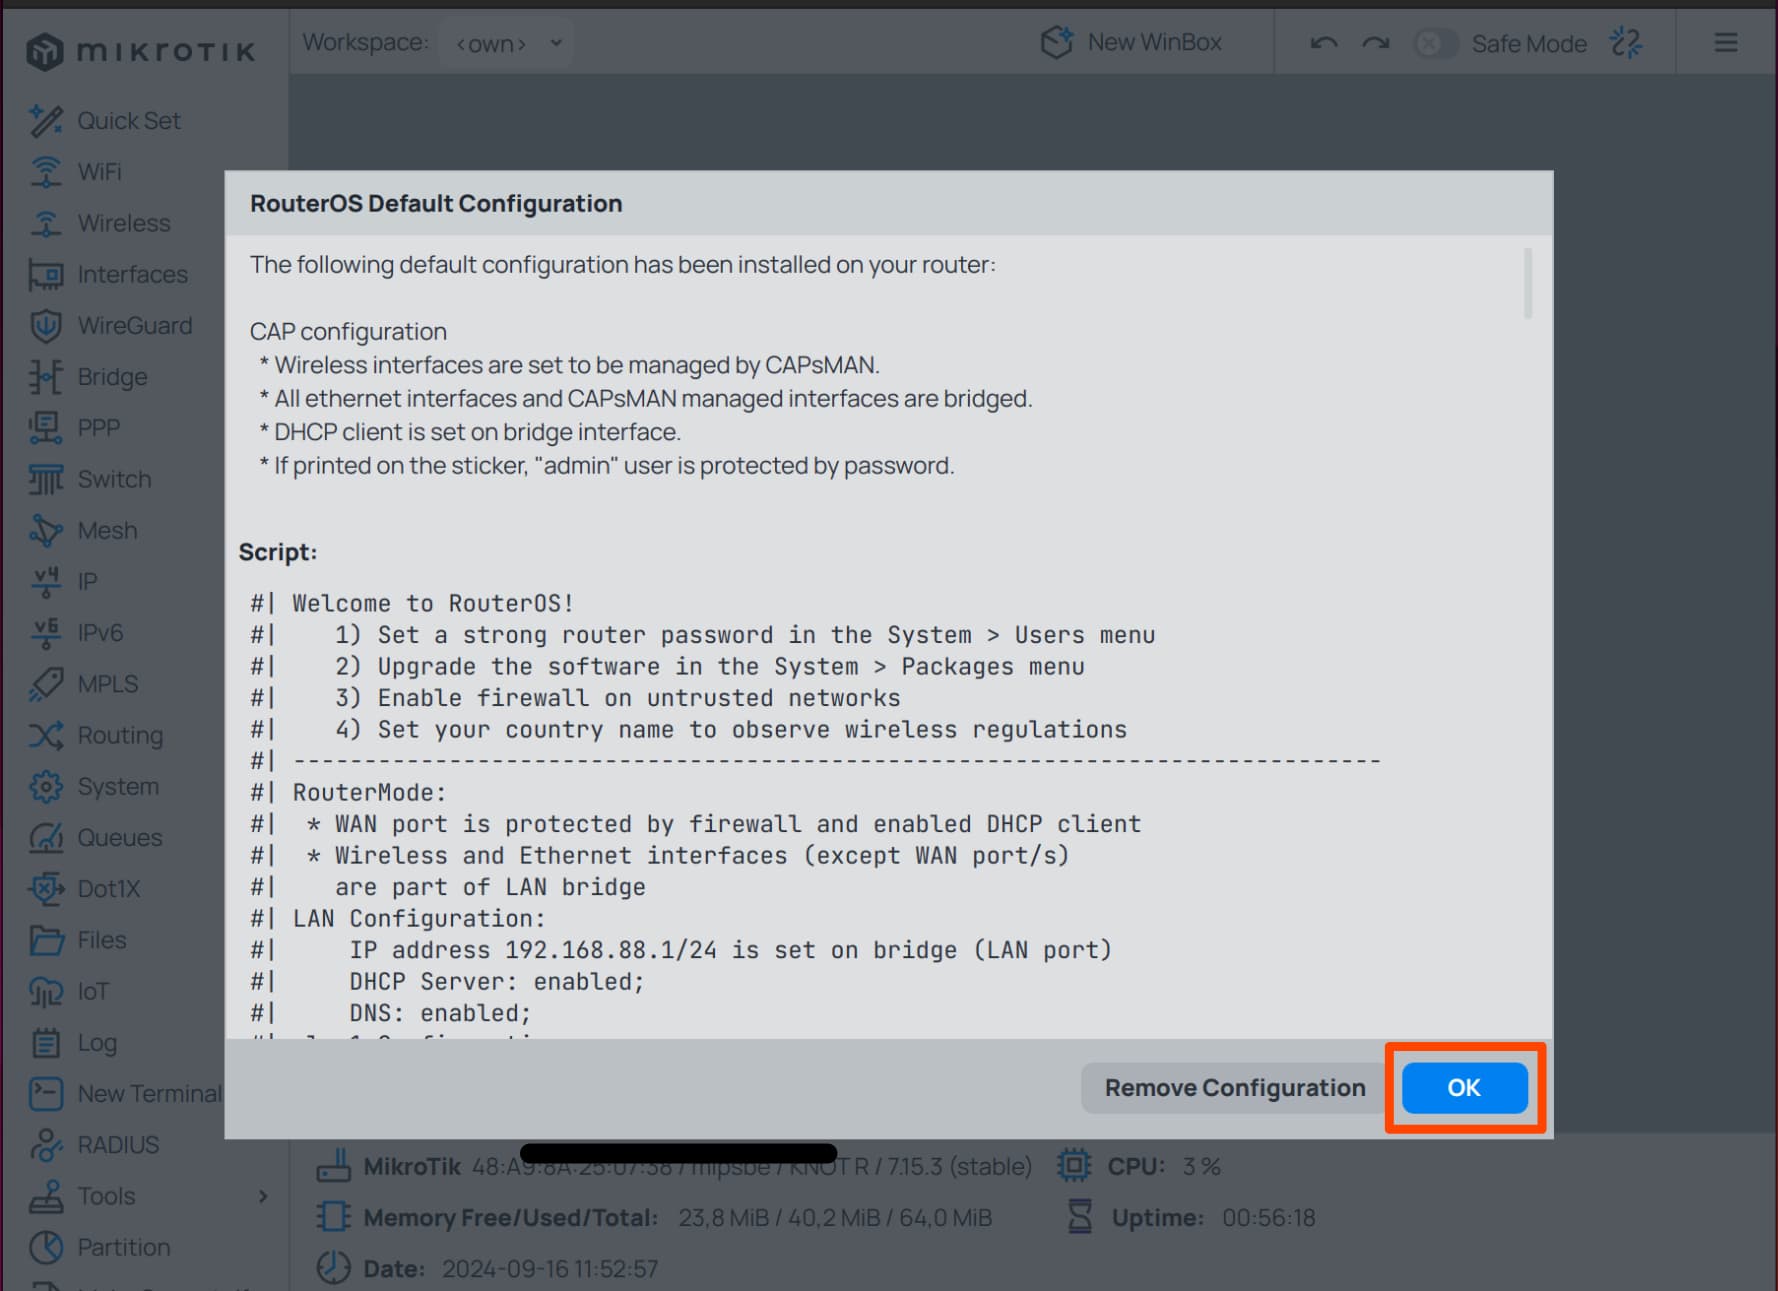
For now, the initial configuration is complete, but we will return to it shortly.
TTN Gateway Setup
We’ll use TTN to connect MikroTik router, allowing data received on the MikroTik’s LoRa gateway to be transmitted over the internet for further analysis.
Note: If you don’t have a TTN account, you can sign up for free.
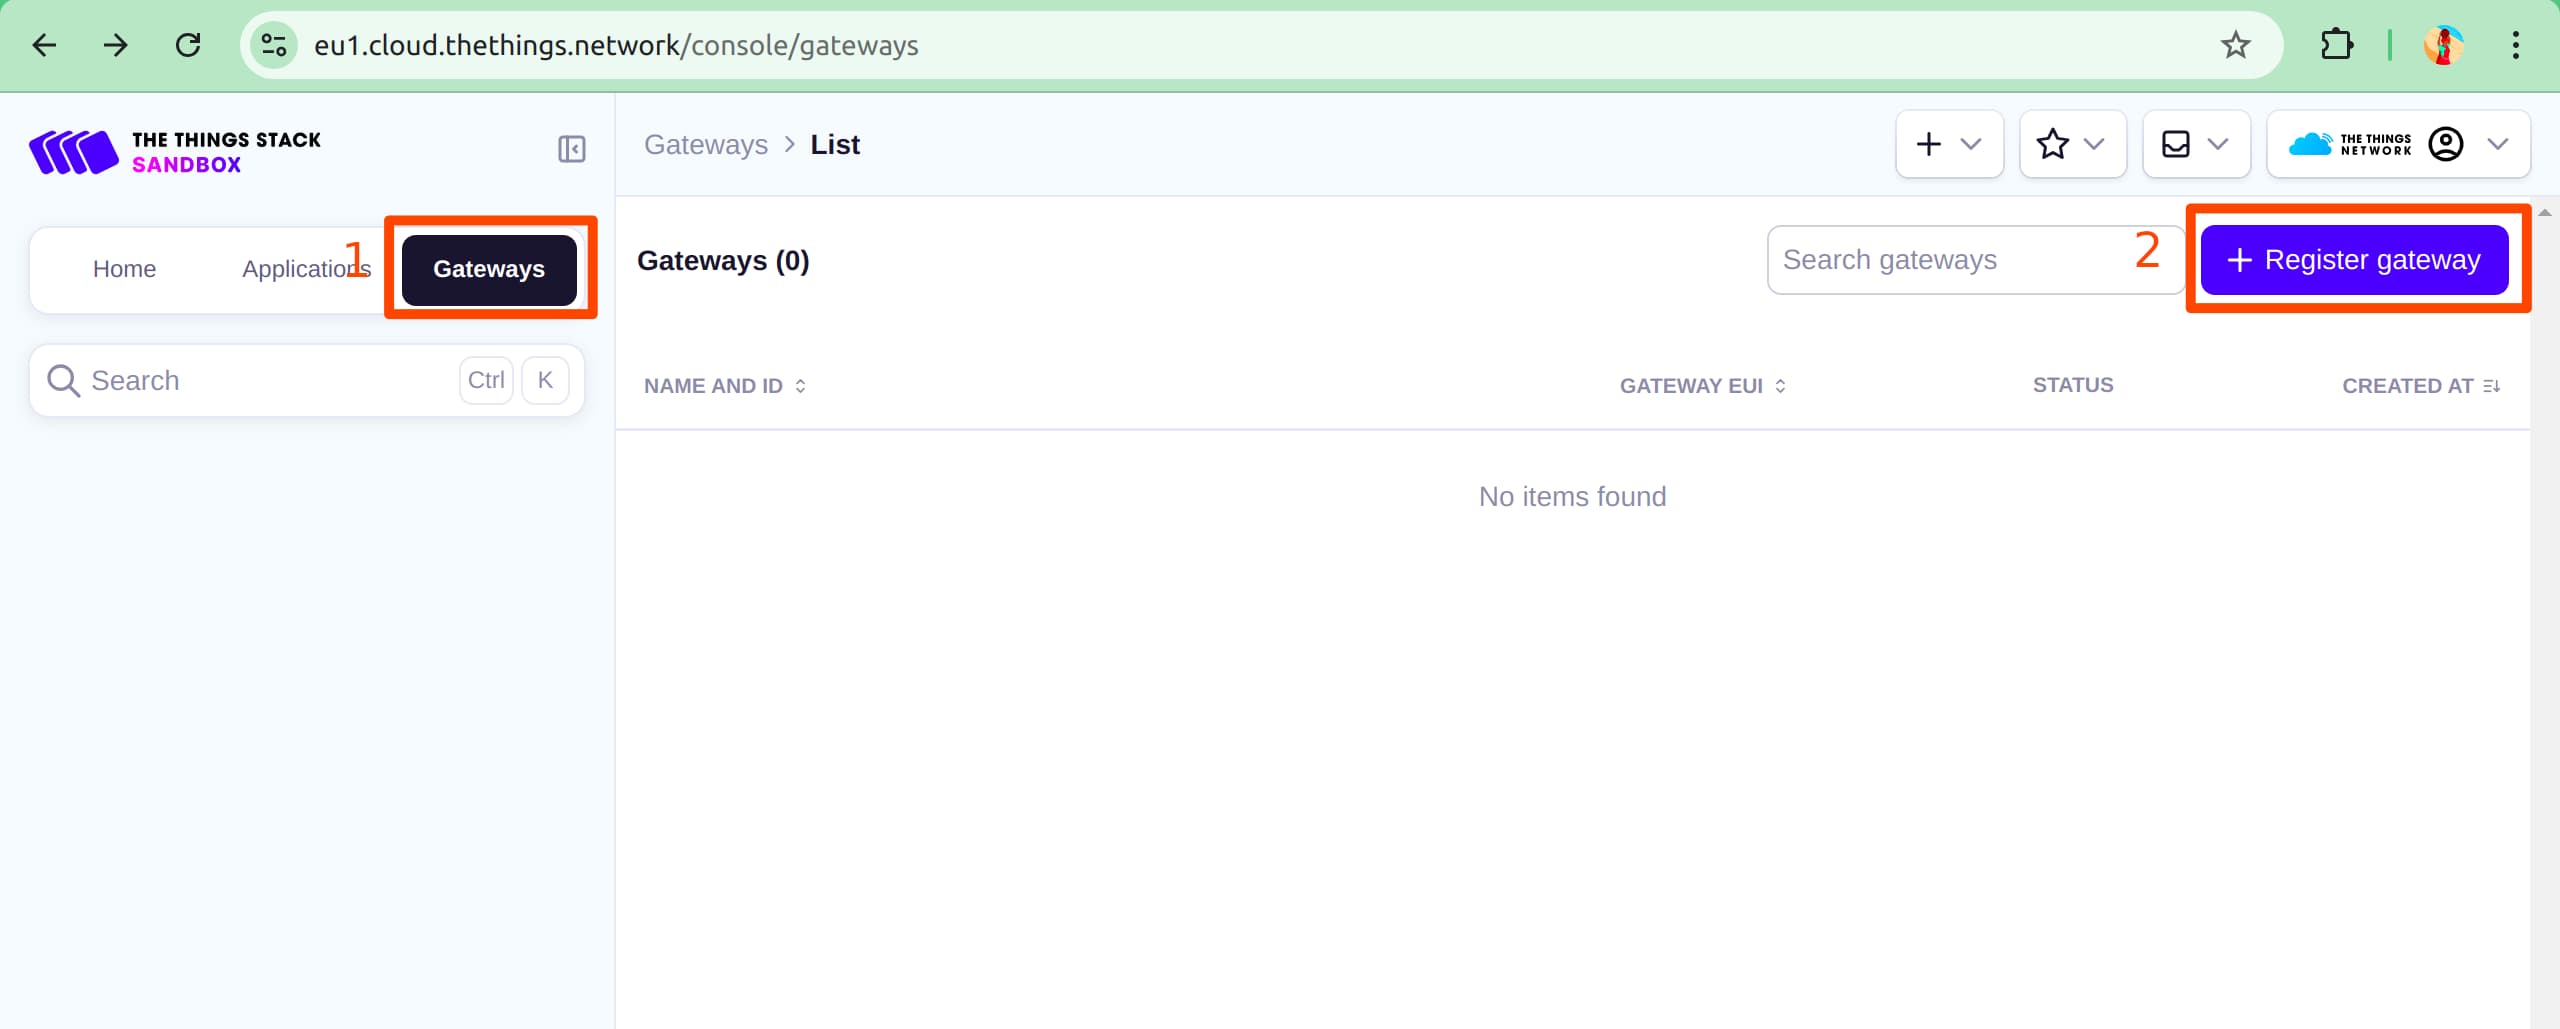
After logging in successfully, navigate to the TTN console.
You’ll be presented with three common choices (eu1, nam1, au1), and you should select the region that matches the LoRa sensor’s band, which you can check on the box in which your device arrived.
For example, if you are connecting the Sensative Strips Drip, which requires the 868 MHz LoRa band (part of the European band 863-870 MHz), you should select Europe 1 (EU-1).
Note: You can check LoRa frequencies here
After choosing your LoRa frequency, you will be redirected to the TTN console. To connect your MikroTik to TTN, navigate to Gateways > Register Gateway.
At this point, we’ll pass data between the TTN console and MikroTik’s UI.
Follow these steps:
-
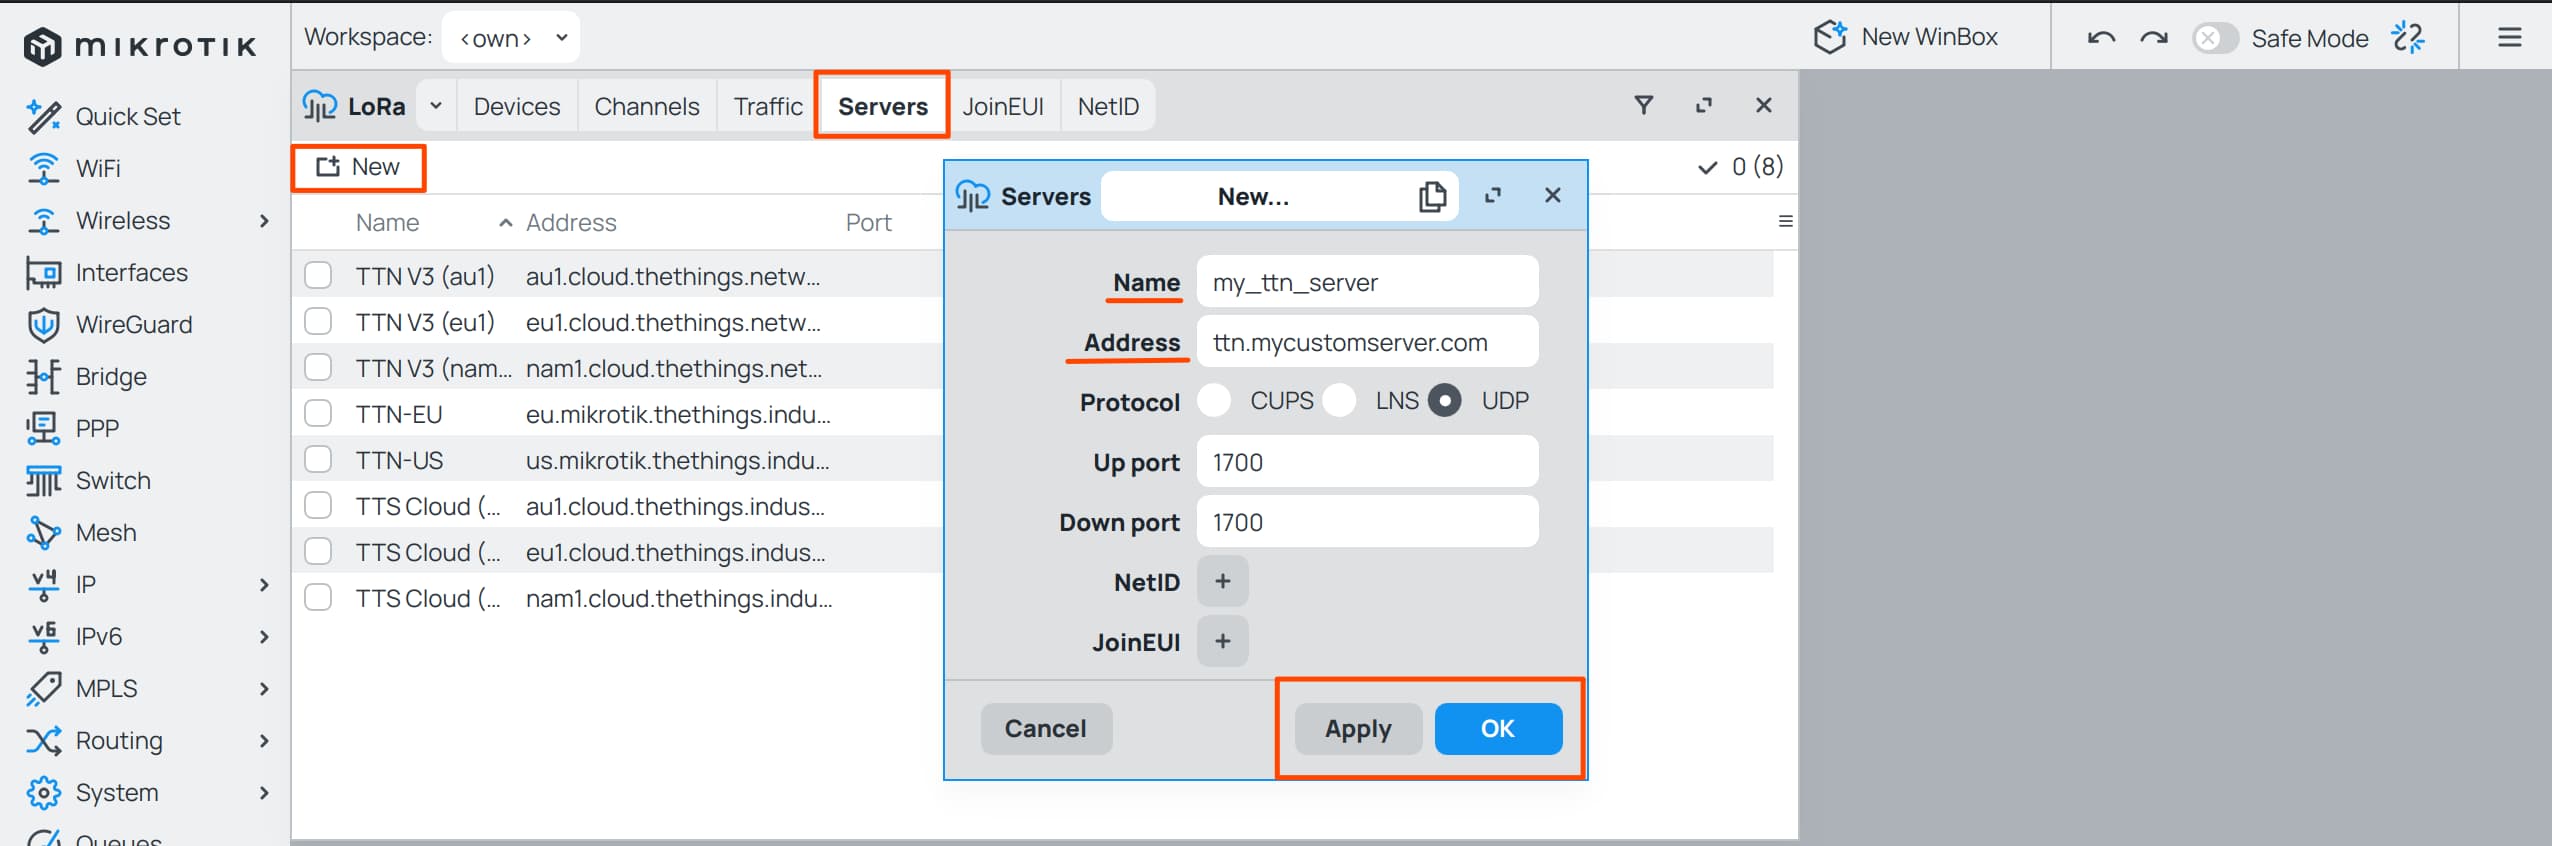
Open MikroTik’s LoRa settings: Go to IoT > LoRa > Devices Tab and double-click on the first item in the list.
- Configure the following fields:
- GateWay ID (or Gateway EUI): This is the unique identifier for your LoRa gateway.
Enter the
Gateway IDfrom MikroTik’s settings, ensuring that the letters are lowercase in the TTN console. - Network Server: Set this to the server you chose when logging into the TTN console.
For example, if you selected
EU1, configure this in MikroTik’s settings as well. - Channel Plan: This should match the frequency plan you set in MikroTik’s settings.
Note: If you’re using a self-hosted TTN server, you should indicate this in MikroTik by creating a new route to that server.
- GateWay ID (or Gateway EUI): This is the unique identifier for your LoRa gateway.
Enter the
-
Fill in these fields.

-
In the TTN UI, scroll down and click Register Gateway.
- In the MikroTik’s UI, enable your gateway and apply the changes.
Your router should connect to the TTN server within 1-3 minutes. If it doesn’t, try powering off your MikroTik router and then powering it back on. Wait another 1-3 minutes for it to connect. If it still doesn’t connect, recheck all the fields to ensure they were copied correctly.
TTN Application Setup
The TTN application is required to store your devices. Follow these steps to set it up:
-
Navigate to the Applications tab and click Add Application.
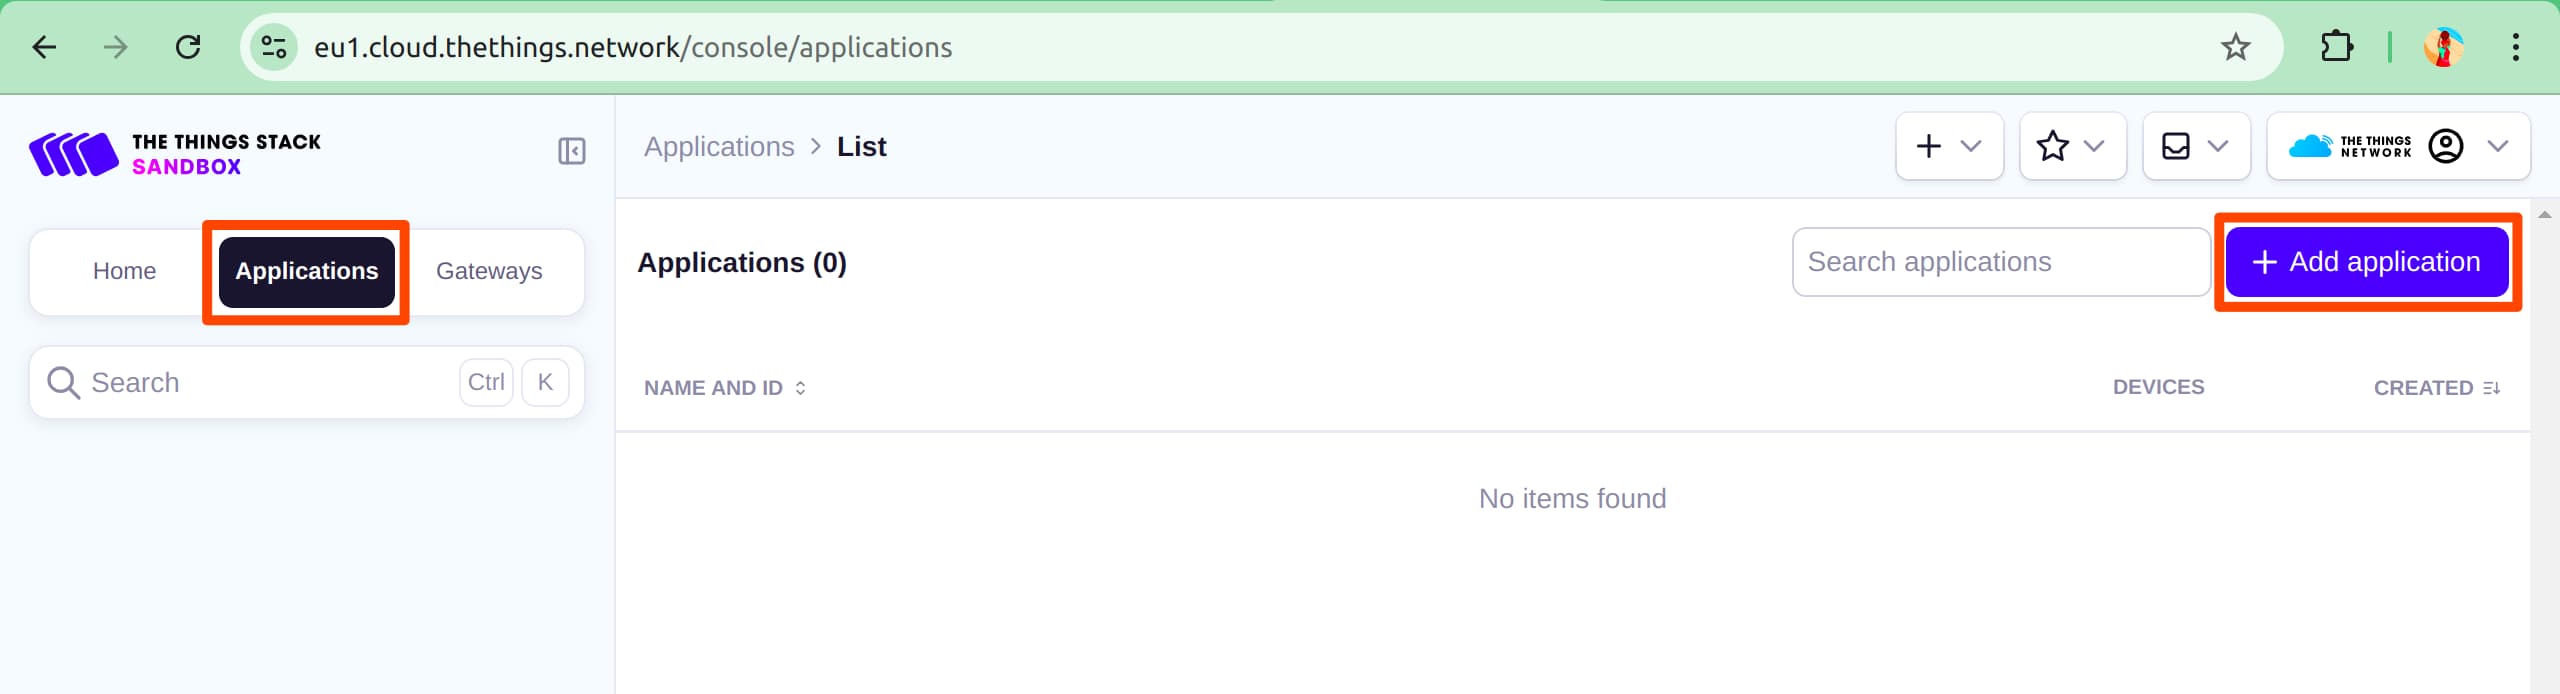
-
Create a new application:
- Enter a unique Application ID (you can choose any name).
- The App Name and Description are optional.
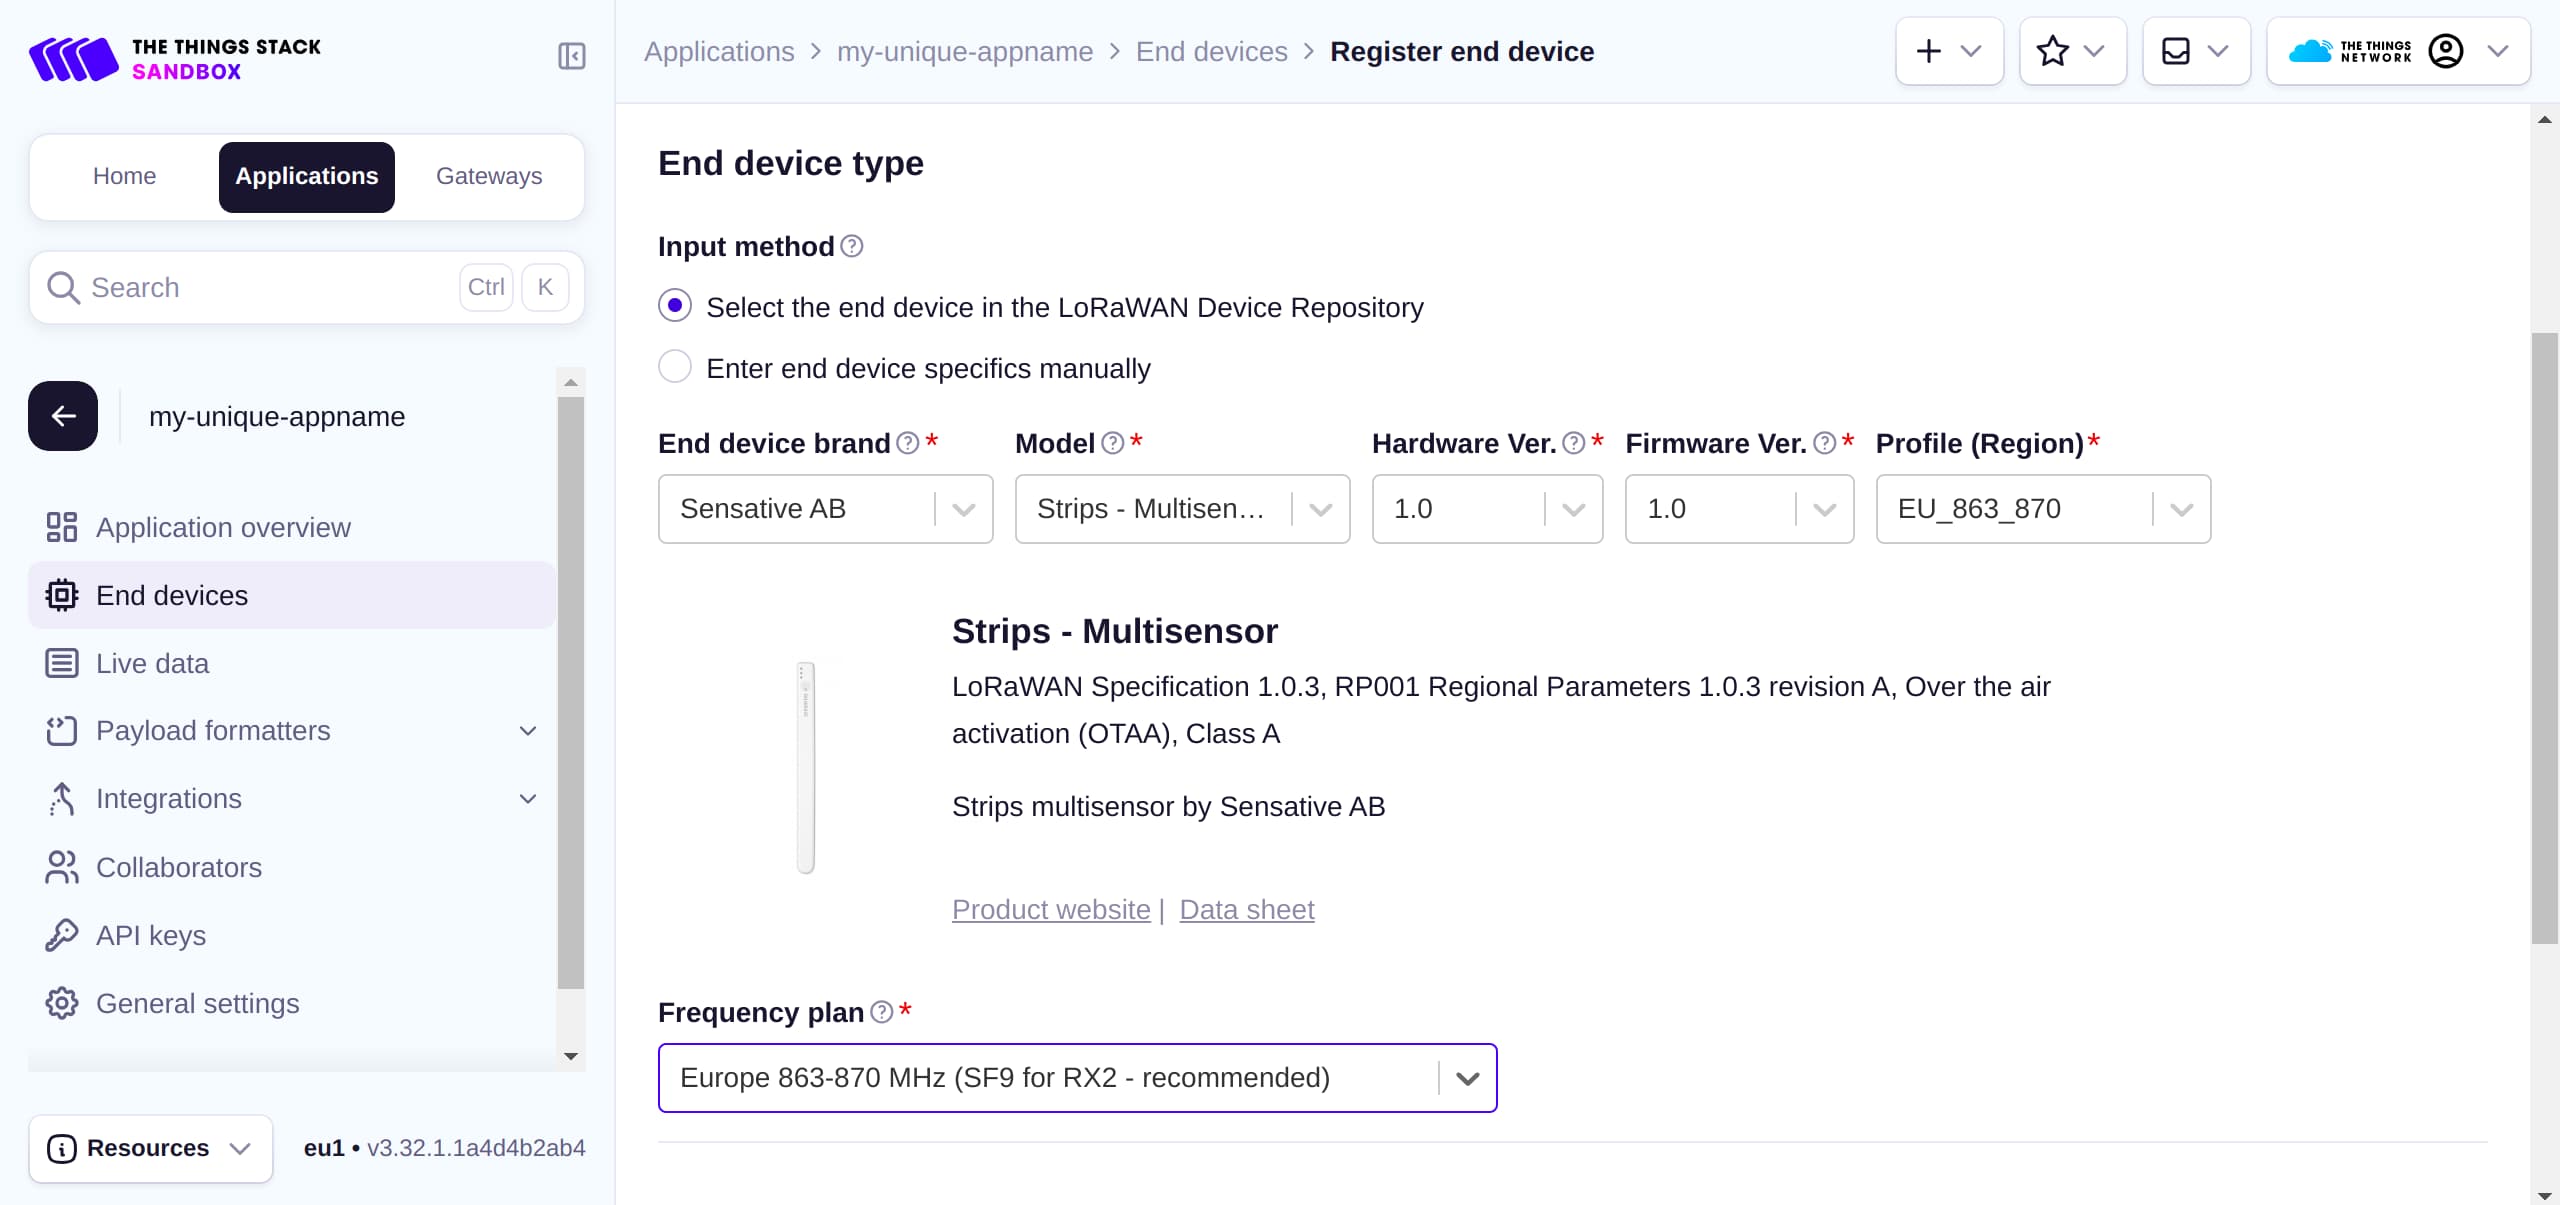
TTN Register New Device
After creating the new app, you’ll be redirected to the app’s UI. From there, click Register New Device.
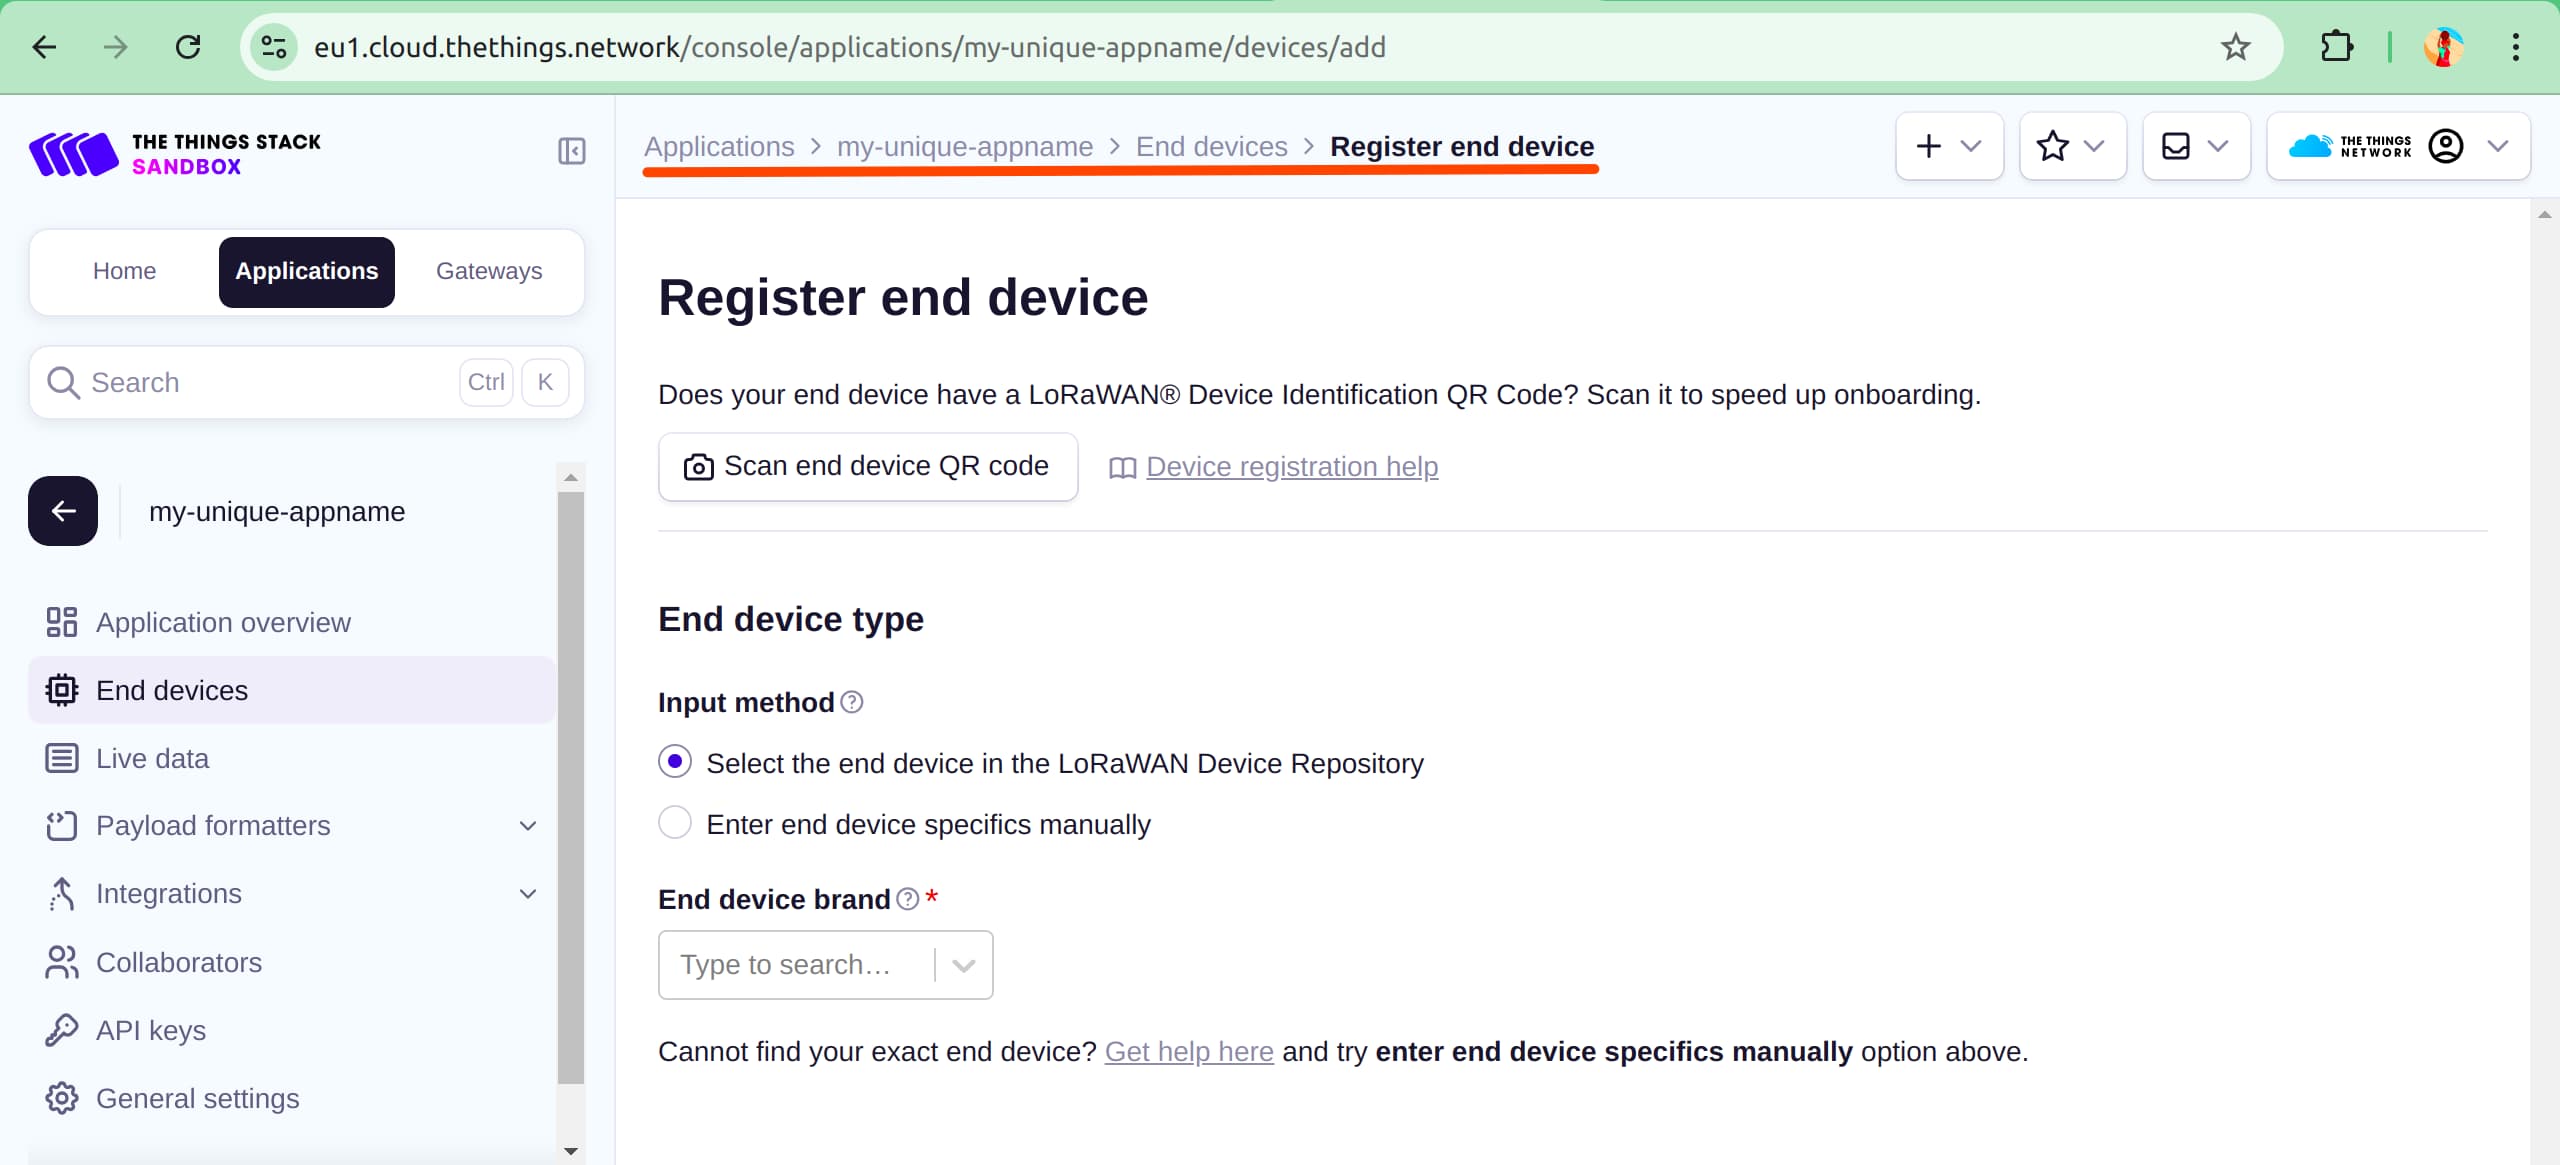
- Register your device:
- Look for your manufacturer name (for Sensative Multi-Sensors, it’s Sensative AB).
- Select the sensor type Strips.
- For the Profile Region, choose the one that matches your device’s LoRa frequency.
- Obtain device credentials:
- You need the
APP_EUI (JOIN_EUI),DEV_EUI, andAPP_KEY. These should be in the box your sensor arrived in. If you can’t find them or they’re invalid, contact the manufacturer to renew your credentials using your sensor’s serial number.
- You need the
- Enter the credentials:
- Copy the
APP_EUI (JOIN_EUI),DEV_EUI, andAPP_KEYinto their respective fields and complete the device registration.
- Copy the
- Prepare your sensor:
- Remove any stickers and magnets from your Sensative Strips Drip.
- Perform a factory reset to ensure the device is clean. This video explains how to do that.
- Follow this video to manually send a payload to your TTN application through your MikroTik LoRa gateway.
Note: For troubleshooting, refer to this page.
- Check live data:
- Manually send another payload from the Sensative Strips Drip to monitor its data in the Live Data tab.
- If the data is not decoded, go to your device’s page, select Payload Formatter > Use device repository formatters, and apply the changes.
- If the data is still not readable, select Custom JavaScript Formatter, copy this formatter into the textbox, and apply the changes.
- Configure your device (Optional):
- If you want to configure the settings of your sensor, follow this guide here.
- Apply the payload (Optional):
- Open your TTN device page and fill out the payload field.
Send it on
port 11. The changes will apply after the Sensative Strip sends an uplink.
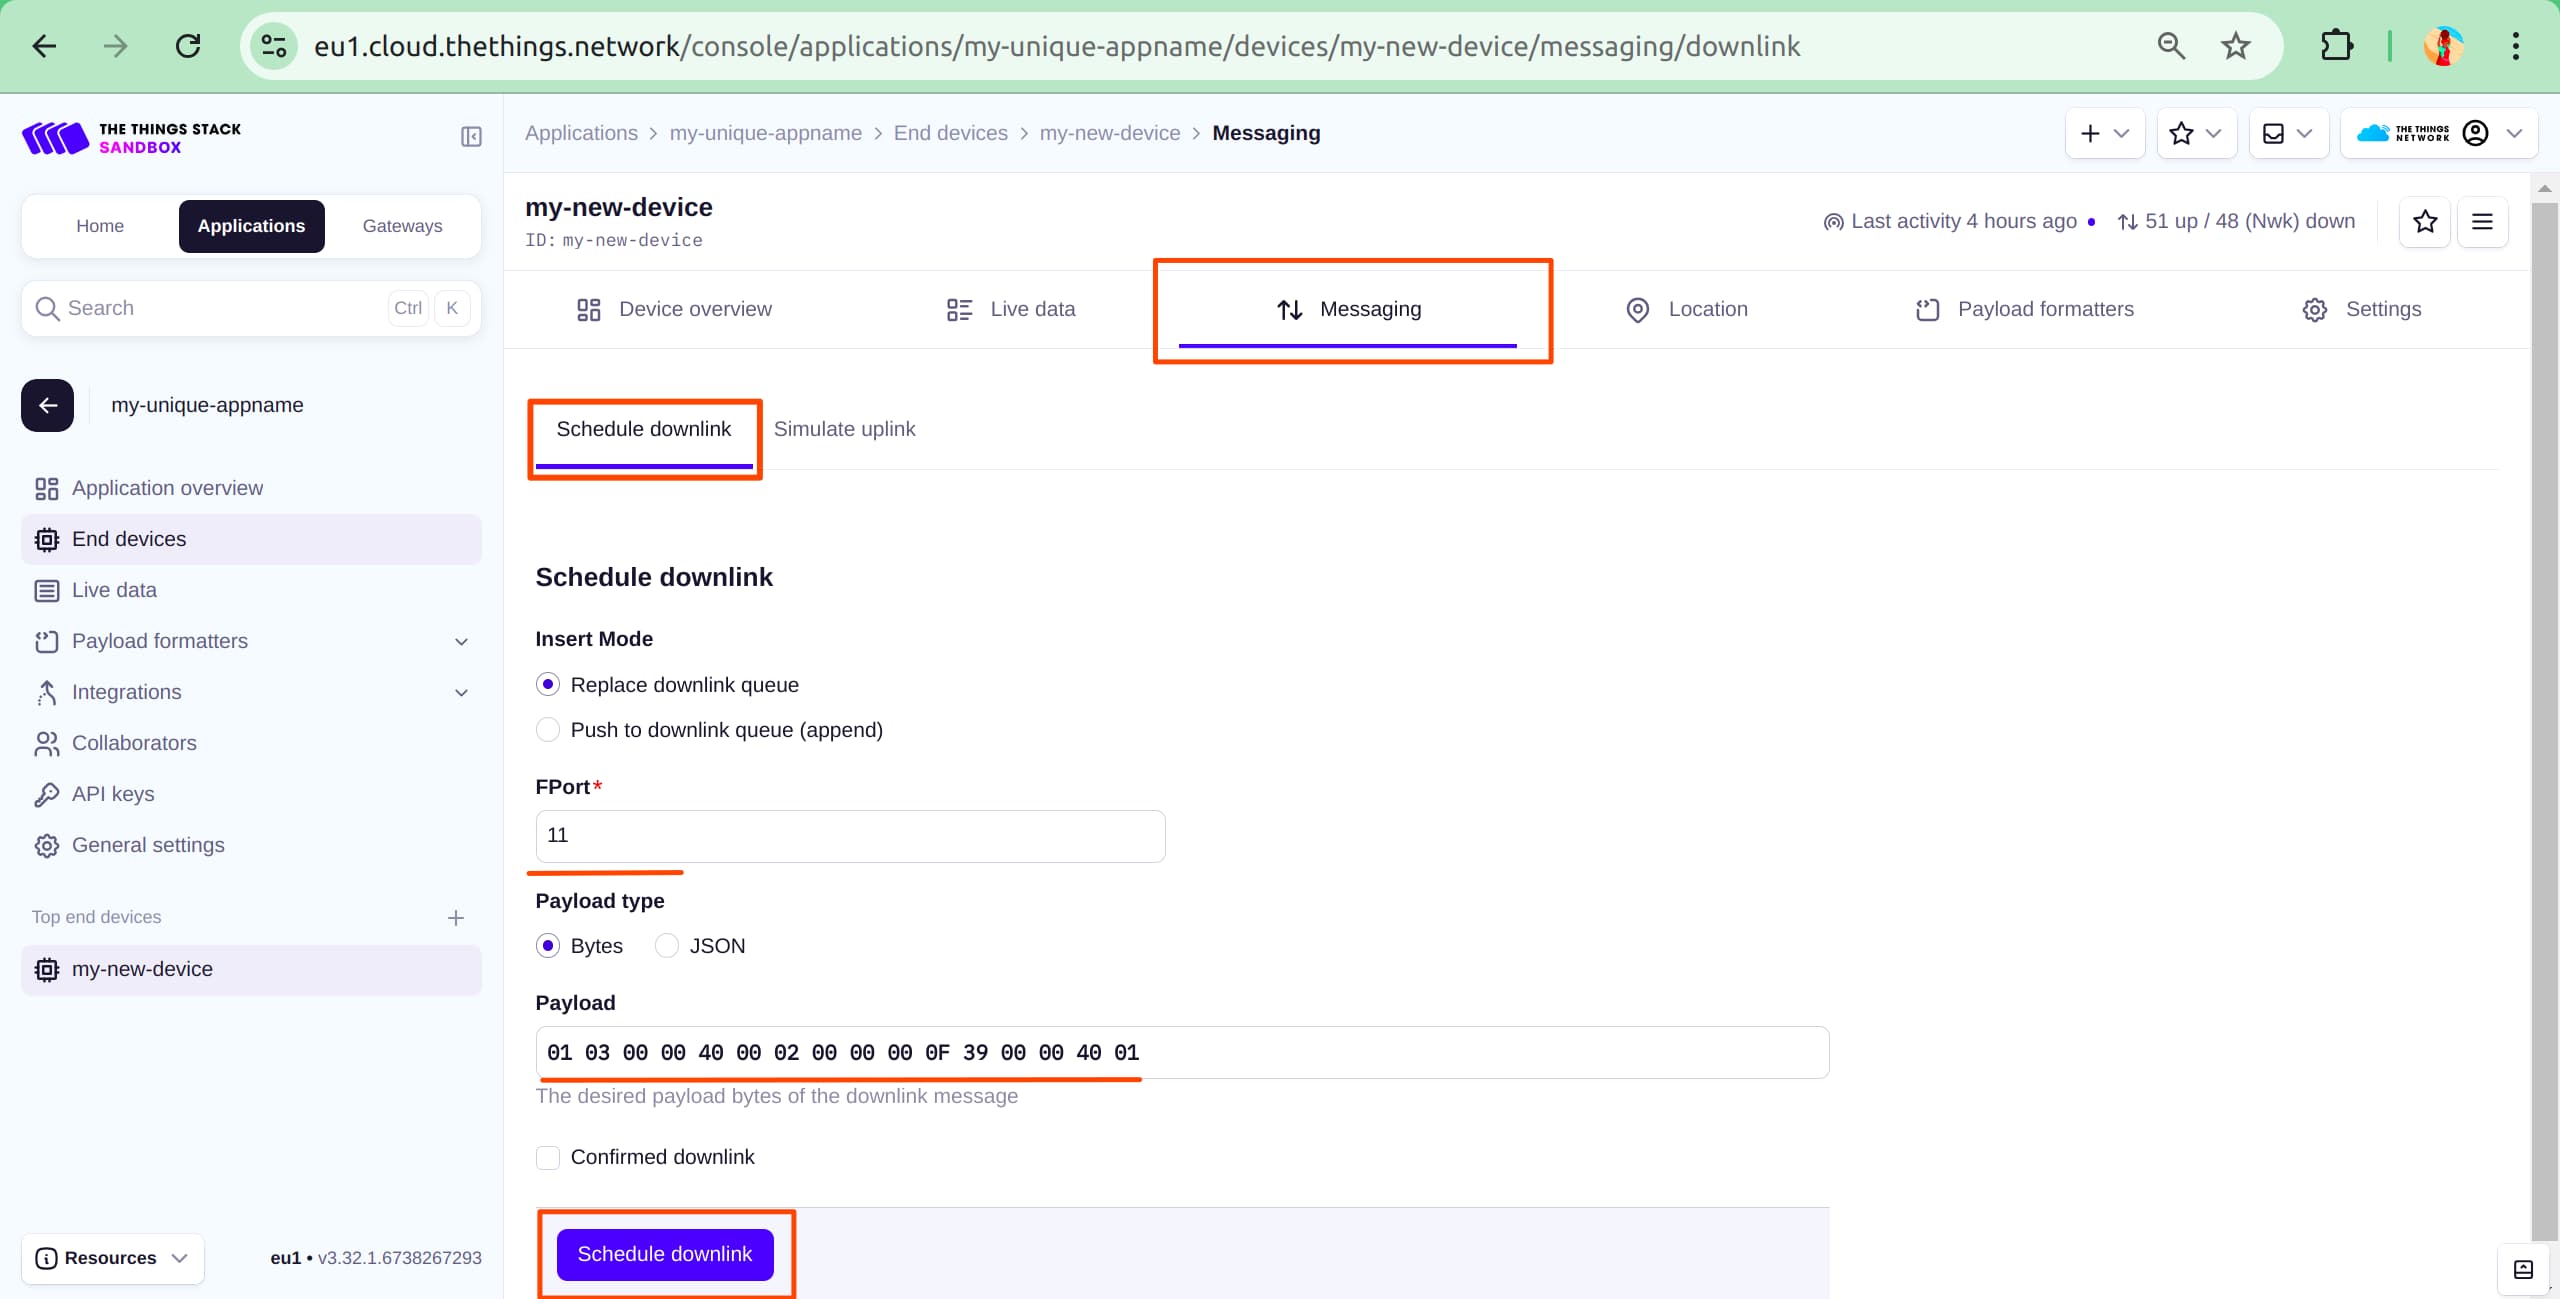
- Open your TTN device page and fill out the payload field.
Send it on
You have now successfully connected your Sensative Strips Drip Multi-Sensor. From TTN, you can now pass data to any application of your choice for further operations!
One option is the KaaIoT platform, which allows you to monitor the data, set custom alarms, and implement complex behaviors adjusted to your needs.
Integrating Sensative Strips Drip Multi-Sensor with KaaIoT
Note: If you don’t have an account with KaaIoT, refer to this page.
Linking a Sensative Strips Drip Multi-Sensor connected to TTN with KaaIoT is easy. Follow these steps:
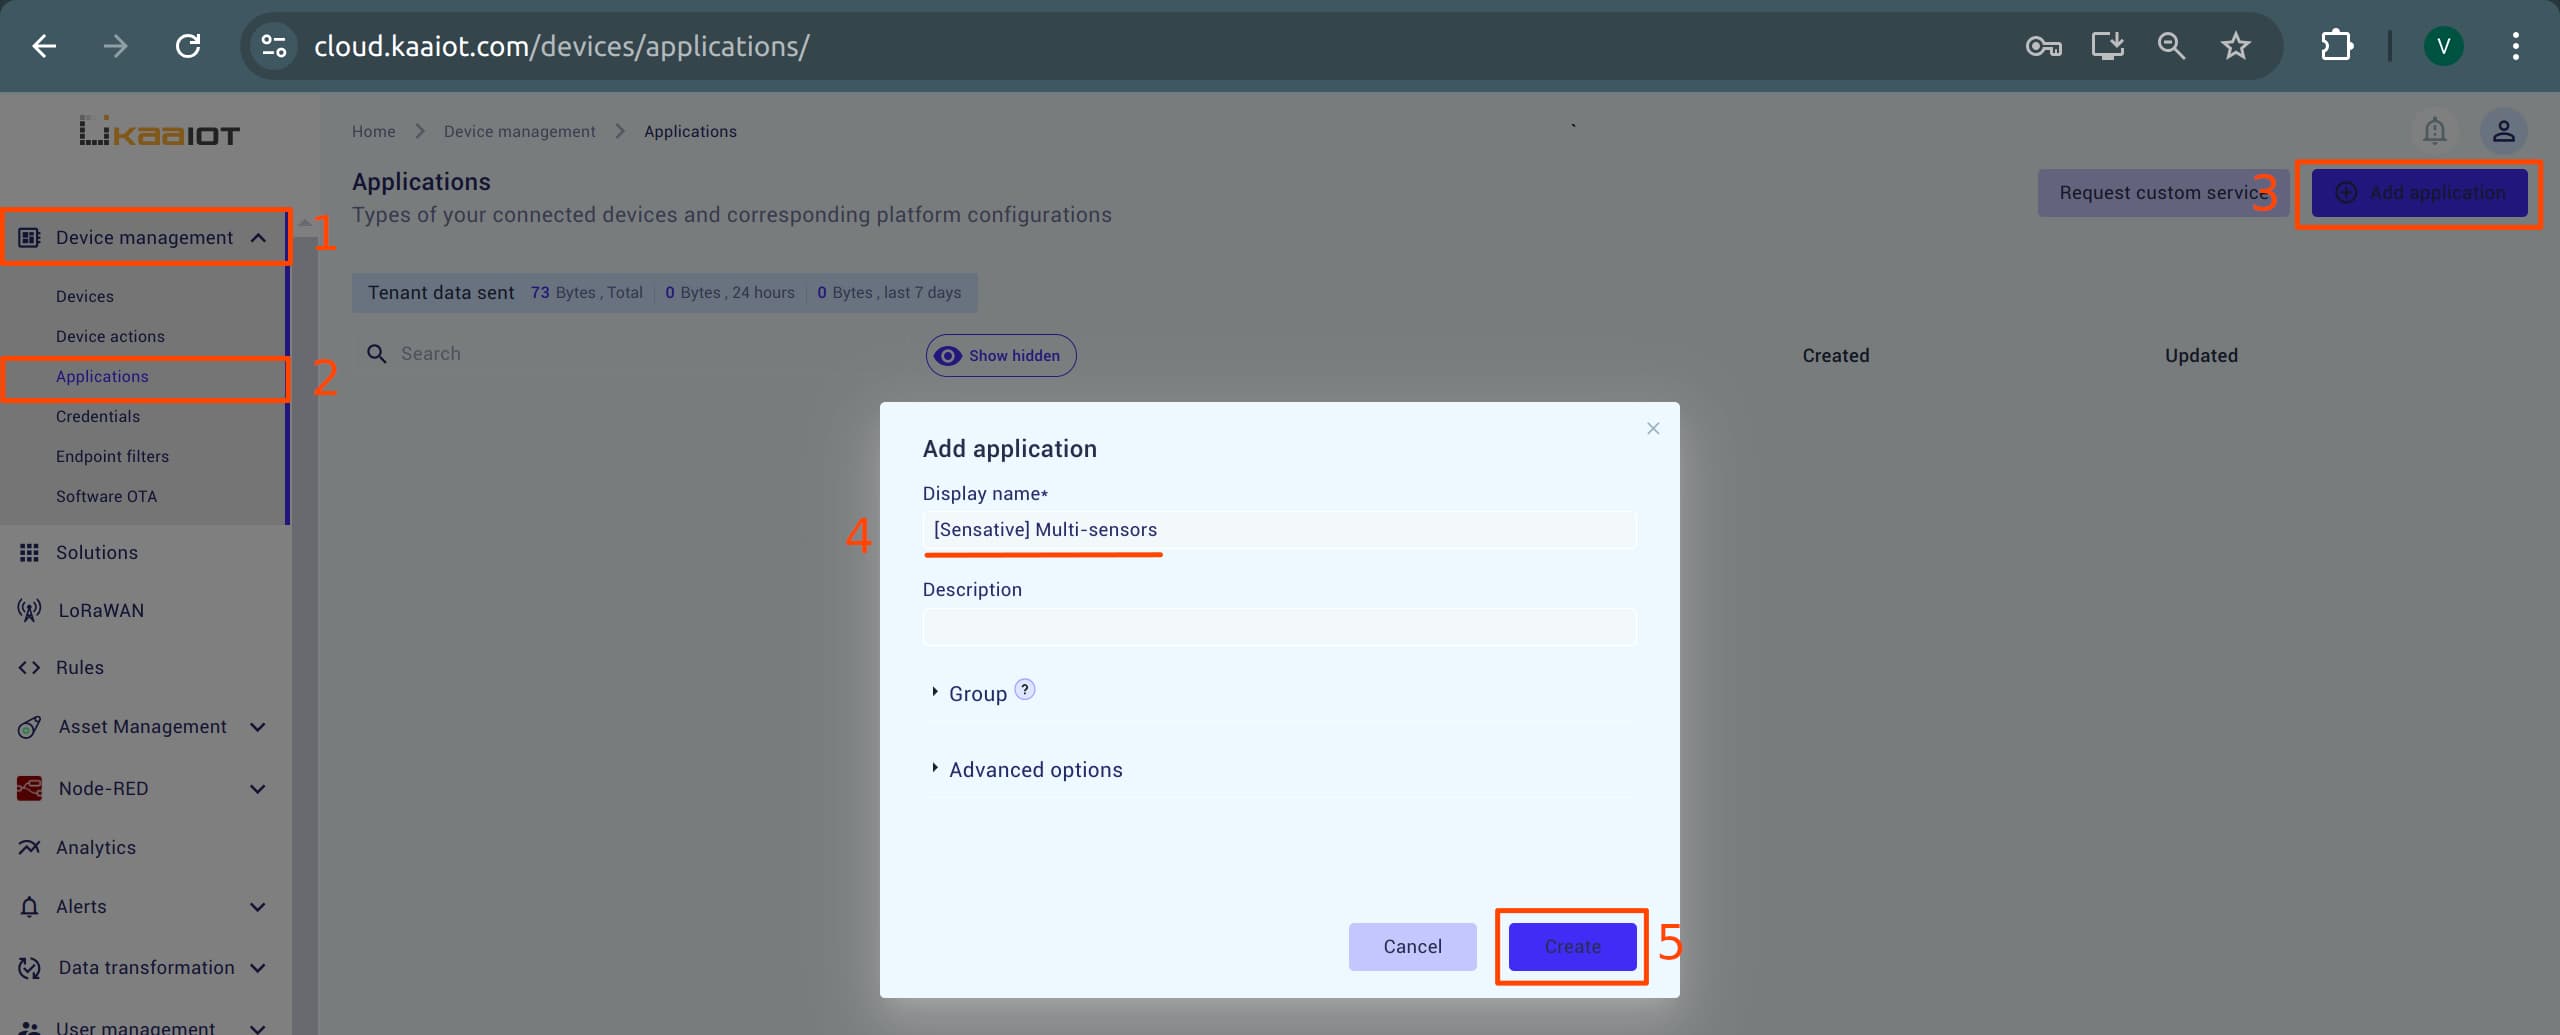
- Create a New KaaIoT Application:
- Navigate to the KaaIoT console.
- Similar to TTN, create a new KaaIoT application.
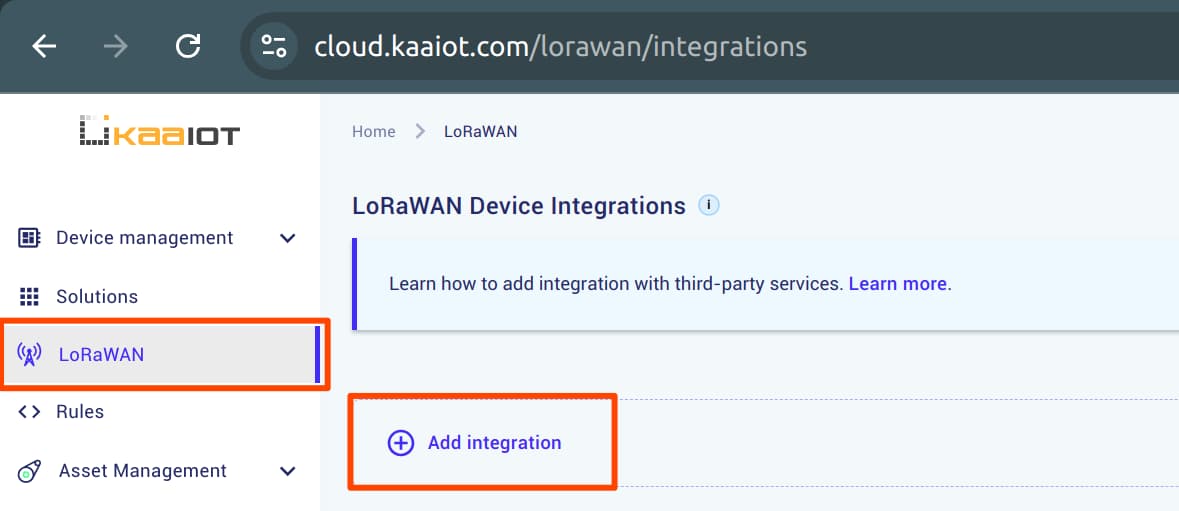
- Add Integration in KaaIoT:
- In the KaaIoT console, go to the LoRaWAN tab and click Add Integration.
- Register the Integration:
- From the popup menu, you’ll need to register an integration. You can find the required data on your TTN device’s MQTT page.
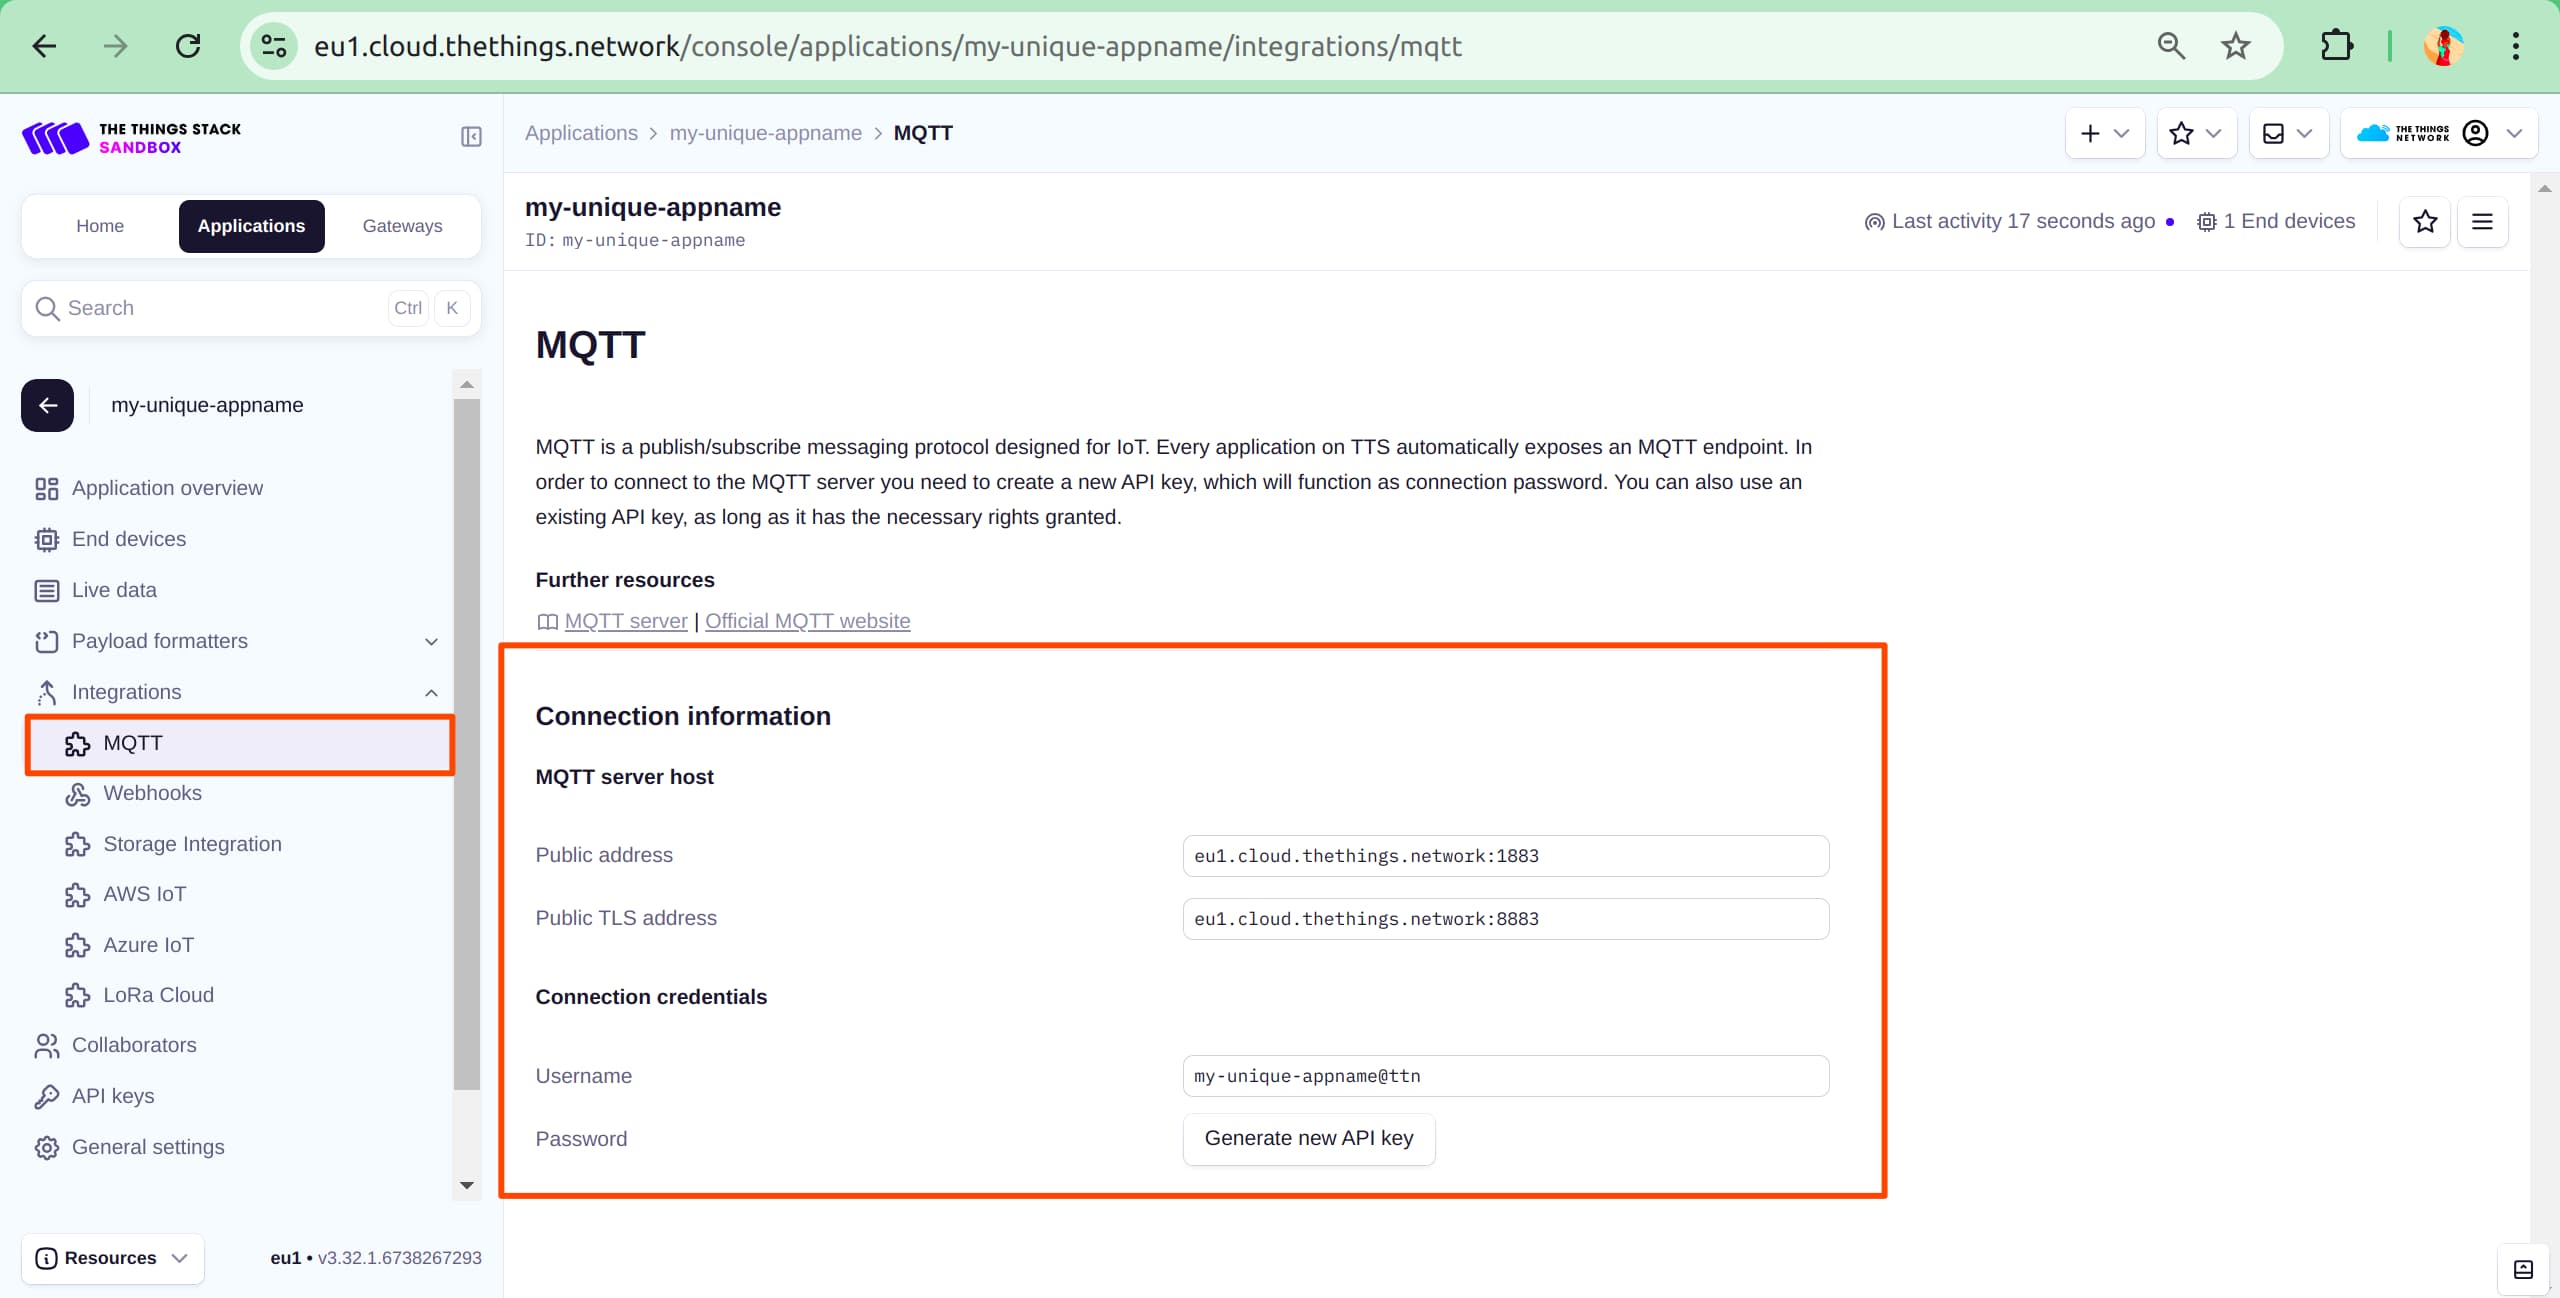
- Fill out the parameters and click Create If you encounter an error, its because KaaIoT requires an API key with full permissions to access TTN data.

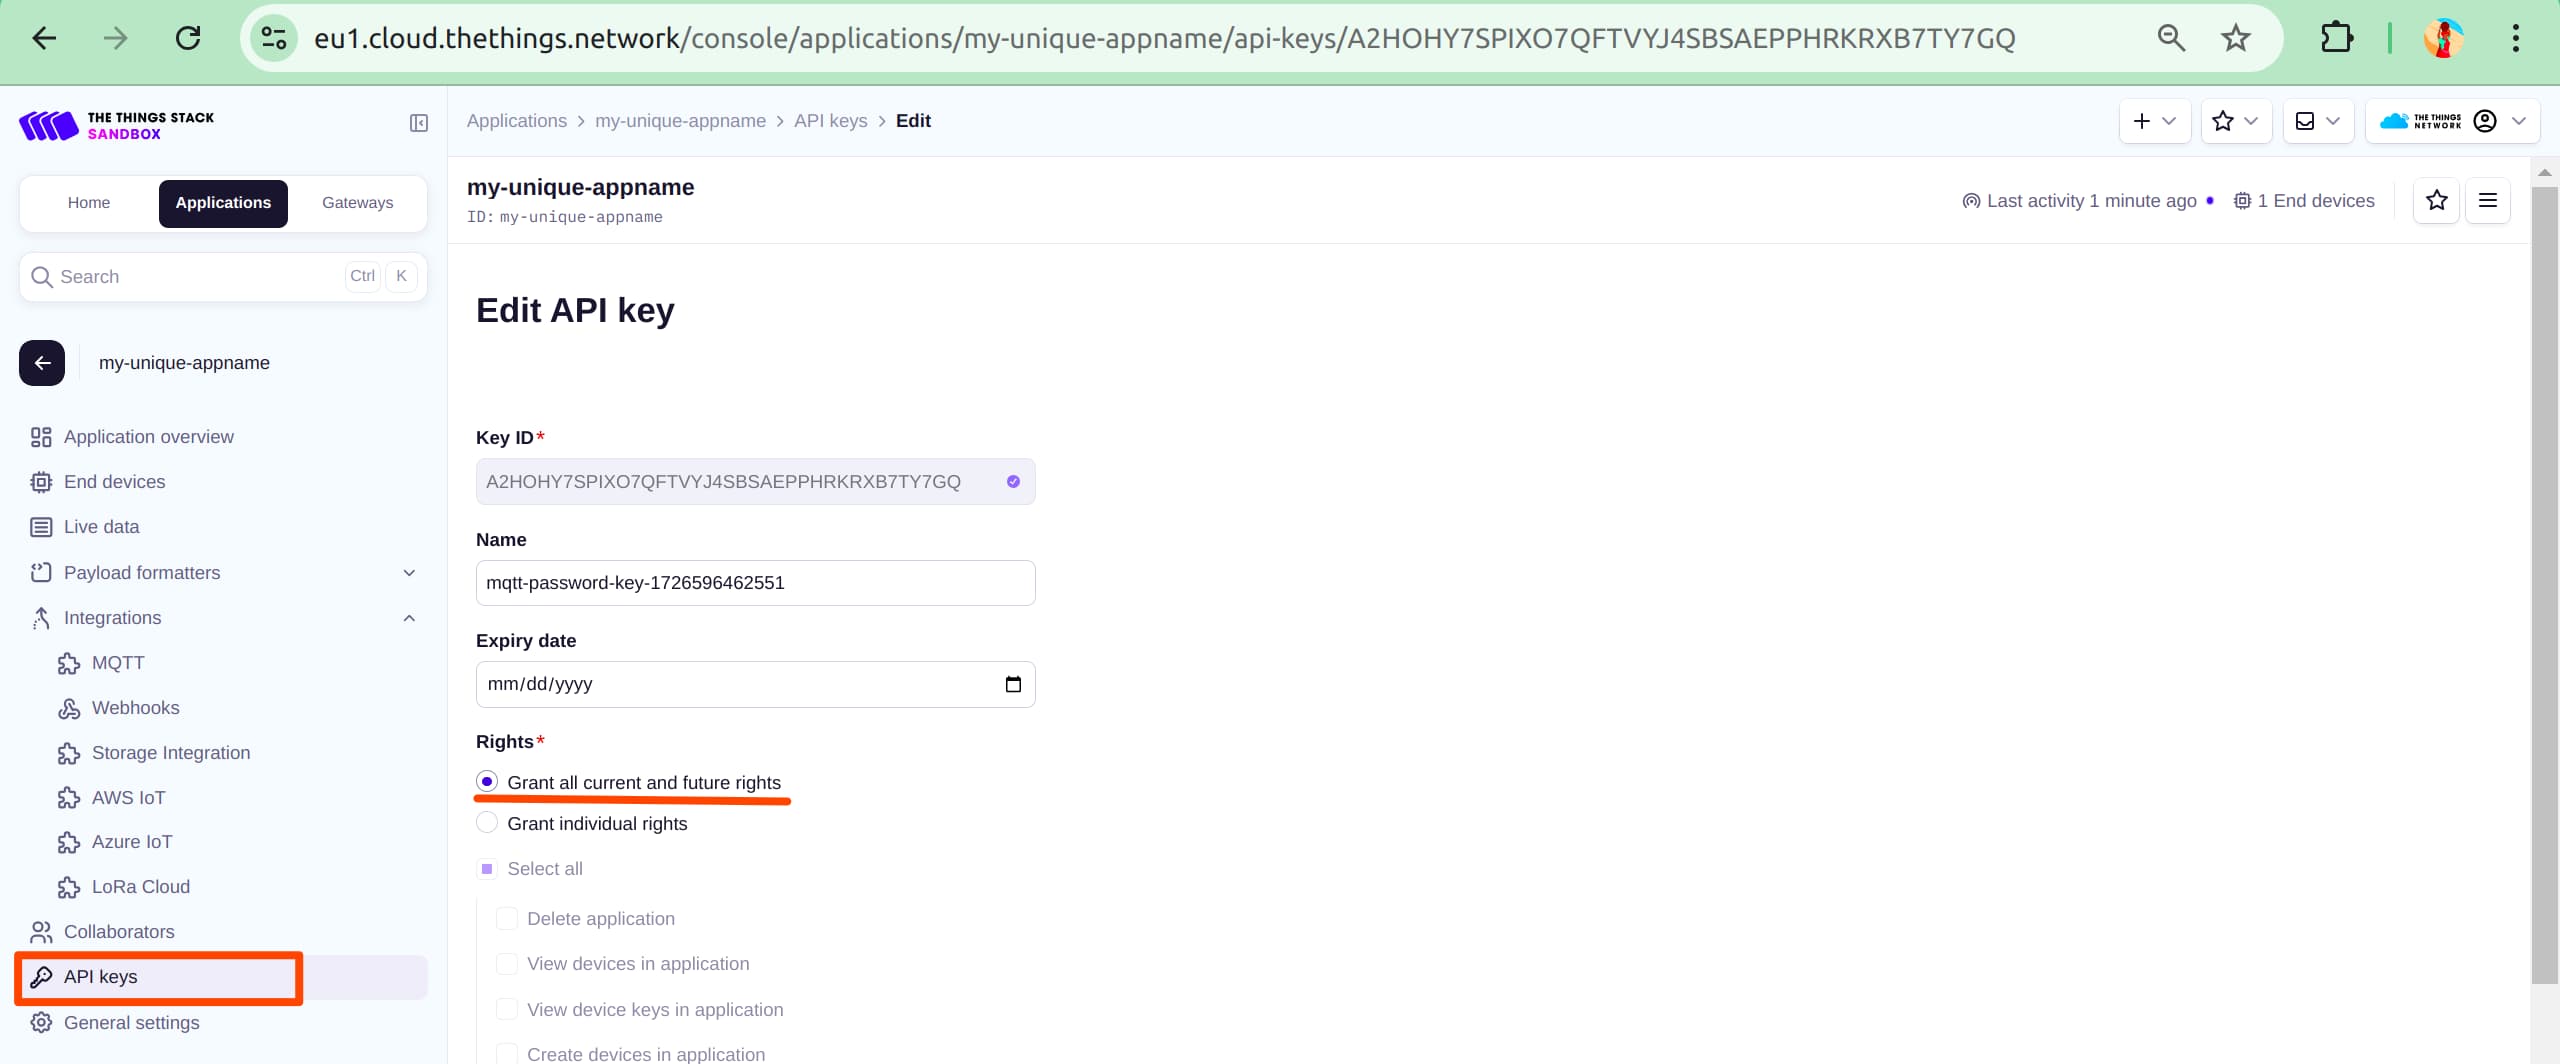
- Grant API Key Full Access:
- Go back to the TTN console.
- Open the API Keys tab and grant the necessary permissions. Scroll down and apply the changes.
- Complete Integration in KaaIoT:
- Head back to KaaIoT and try creating the integration again. It should complete successfully.
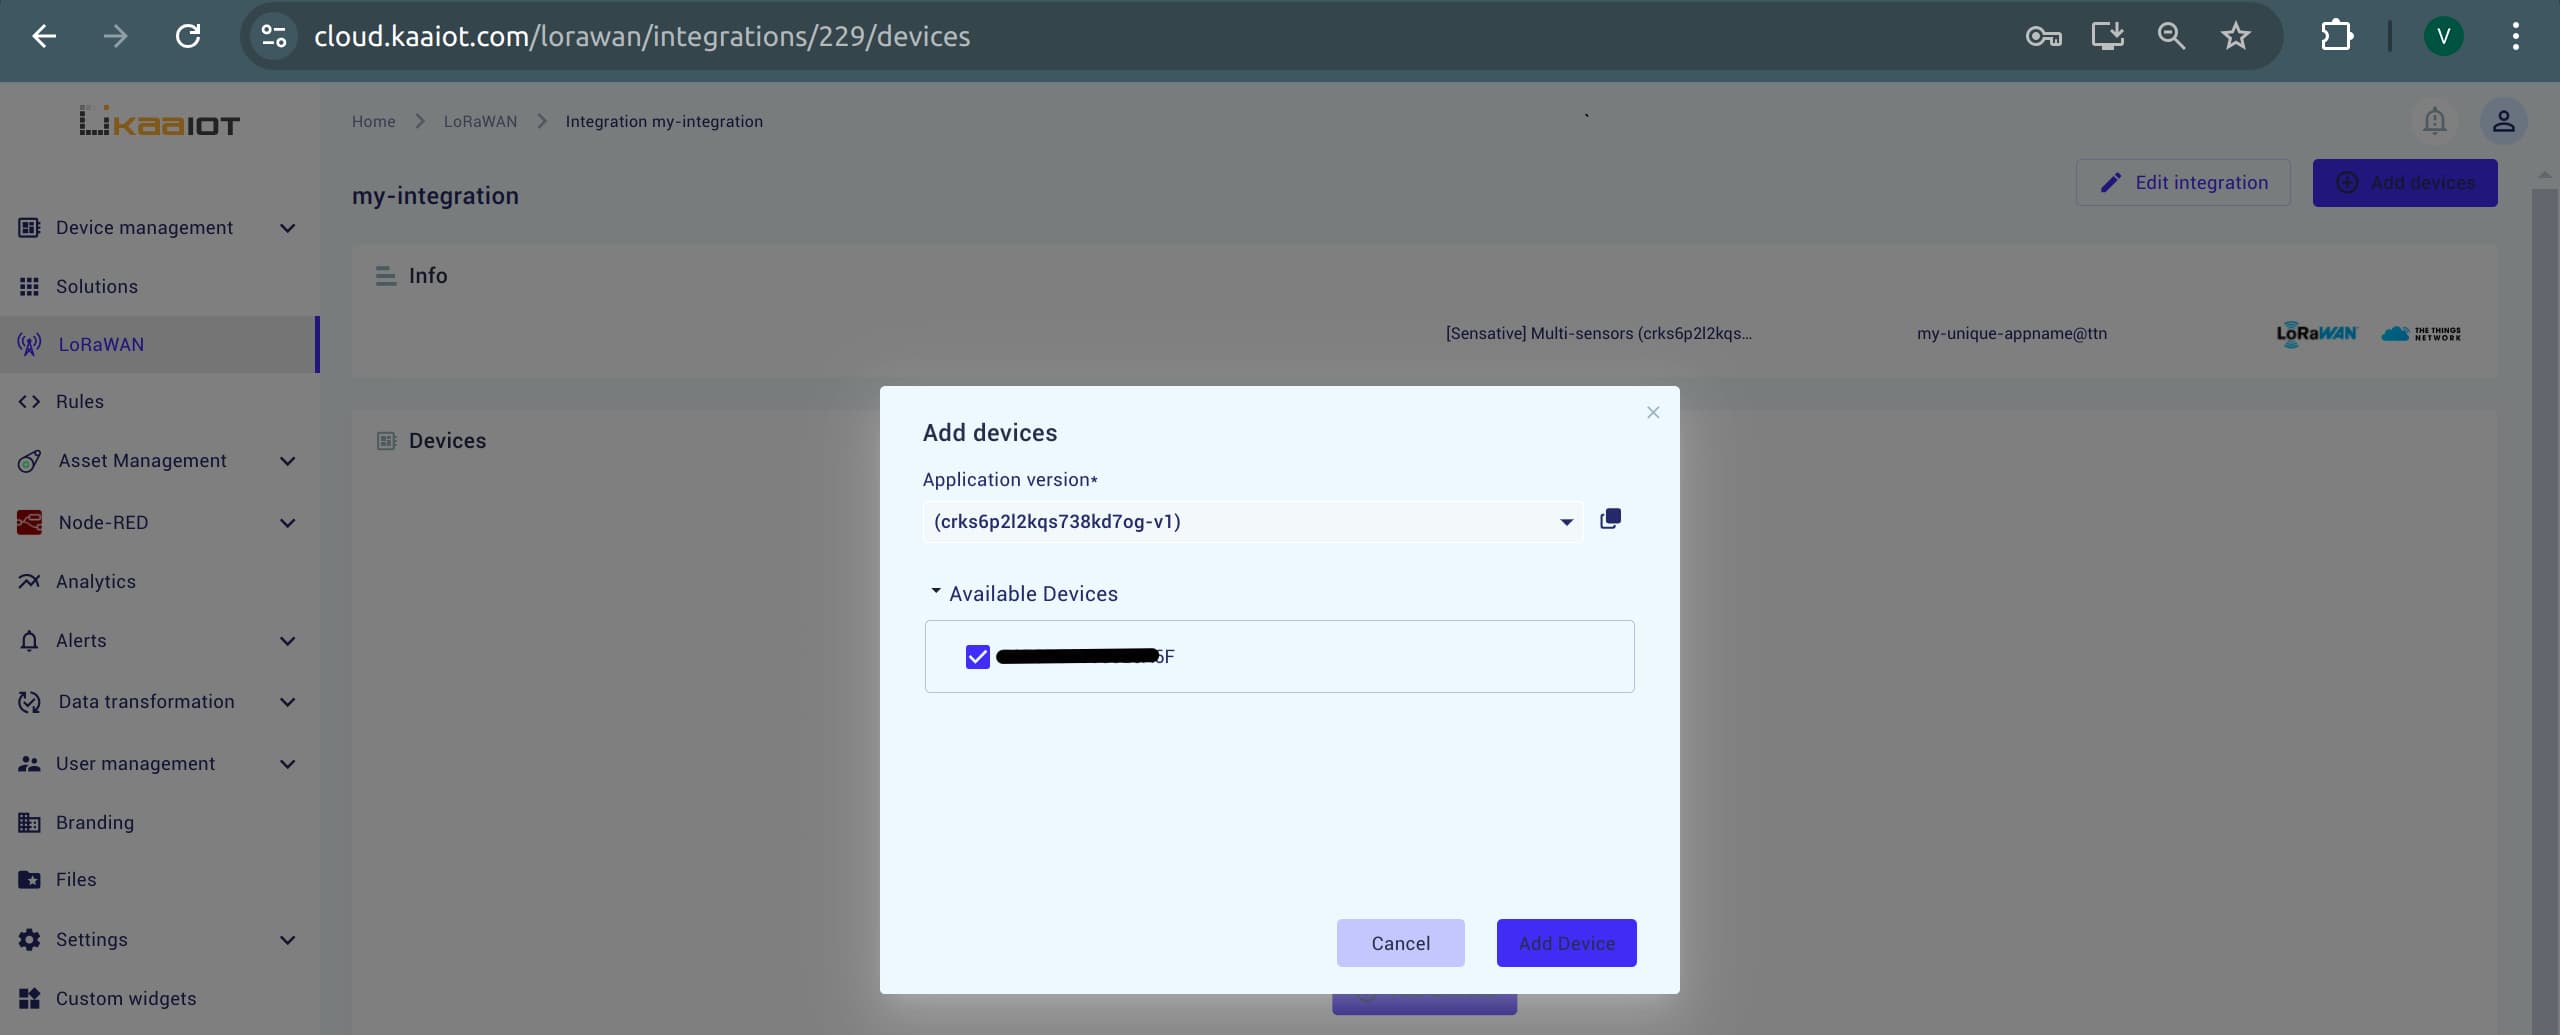
- Add Your Device:
- Click on the newly created integration.
- Click Add a New Device.
In the popup menu, select the default application version and the device you’ve connected.
You can identify it by the
DEV_EUIyou provided earlier.
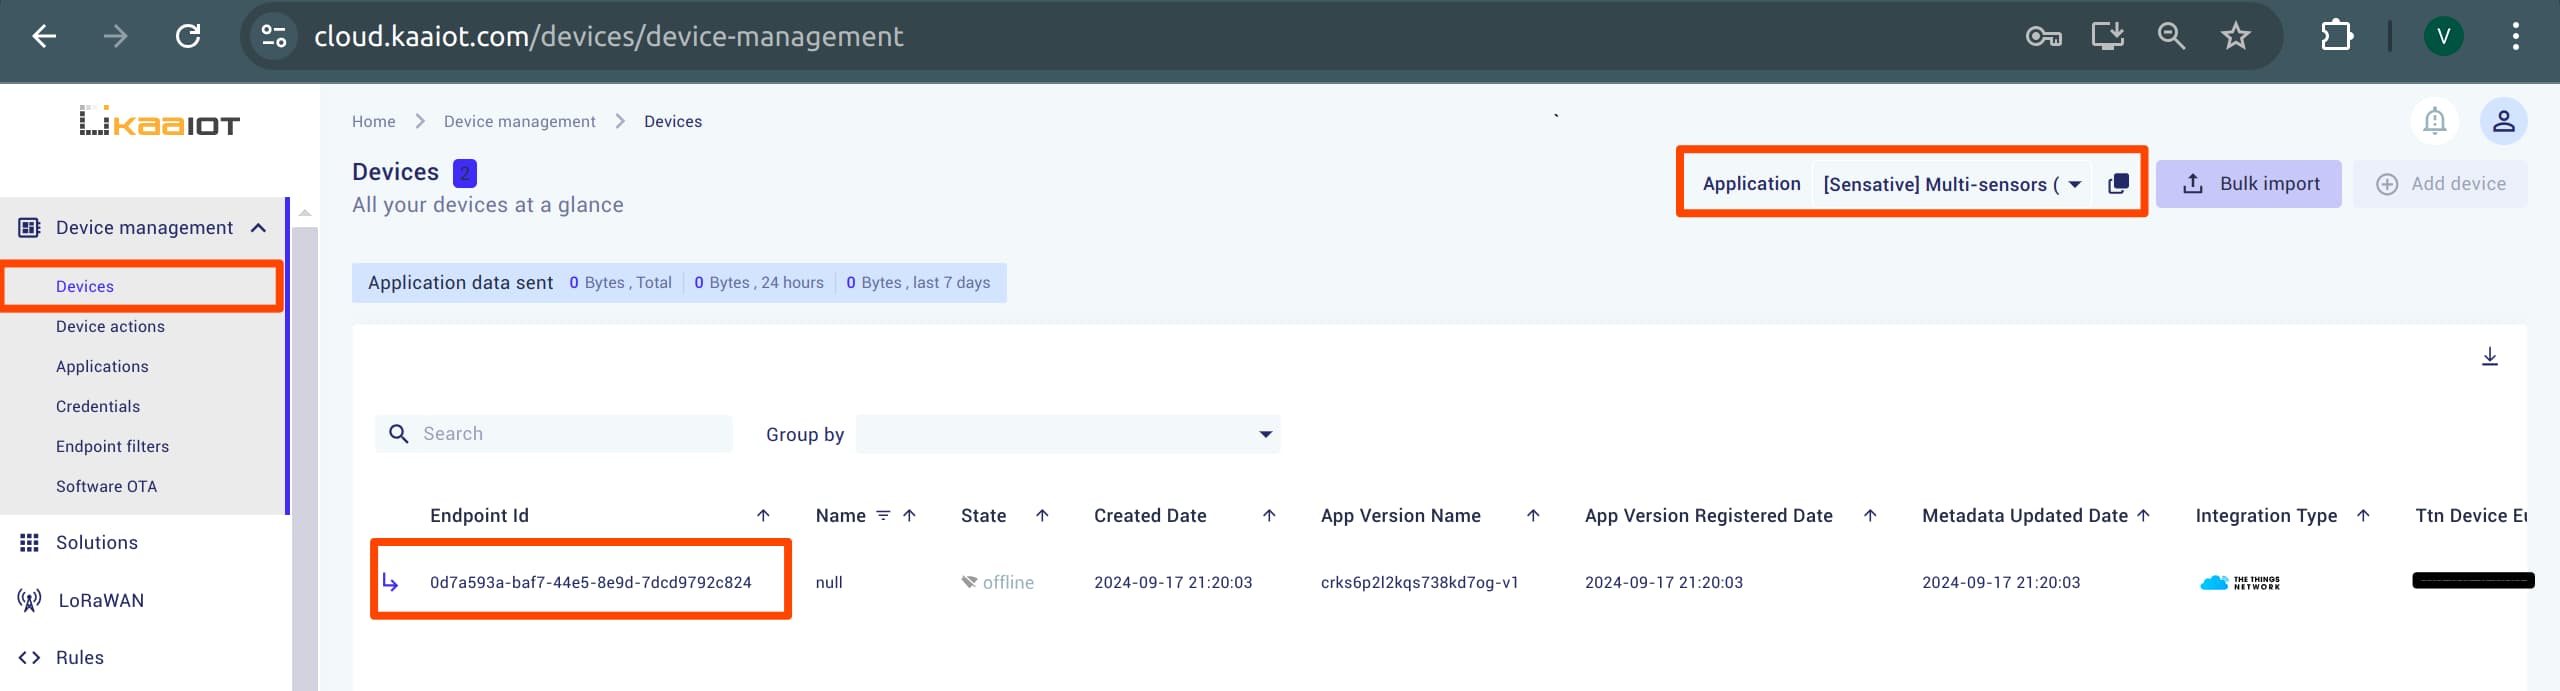
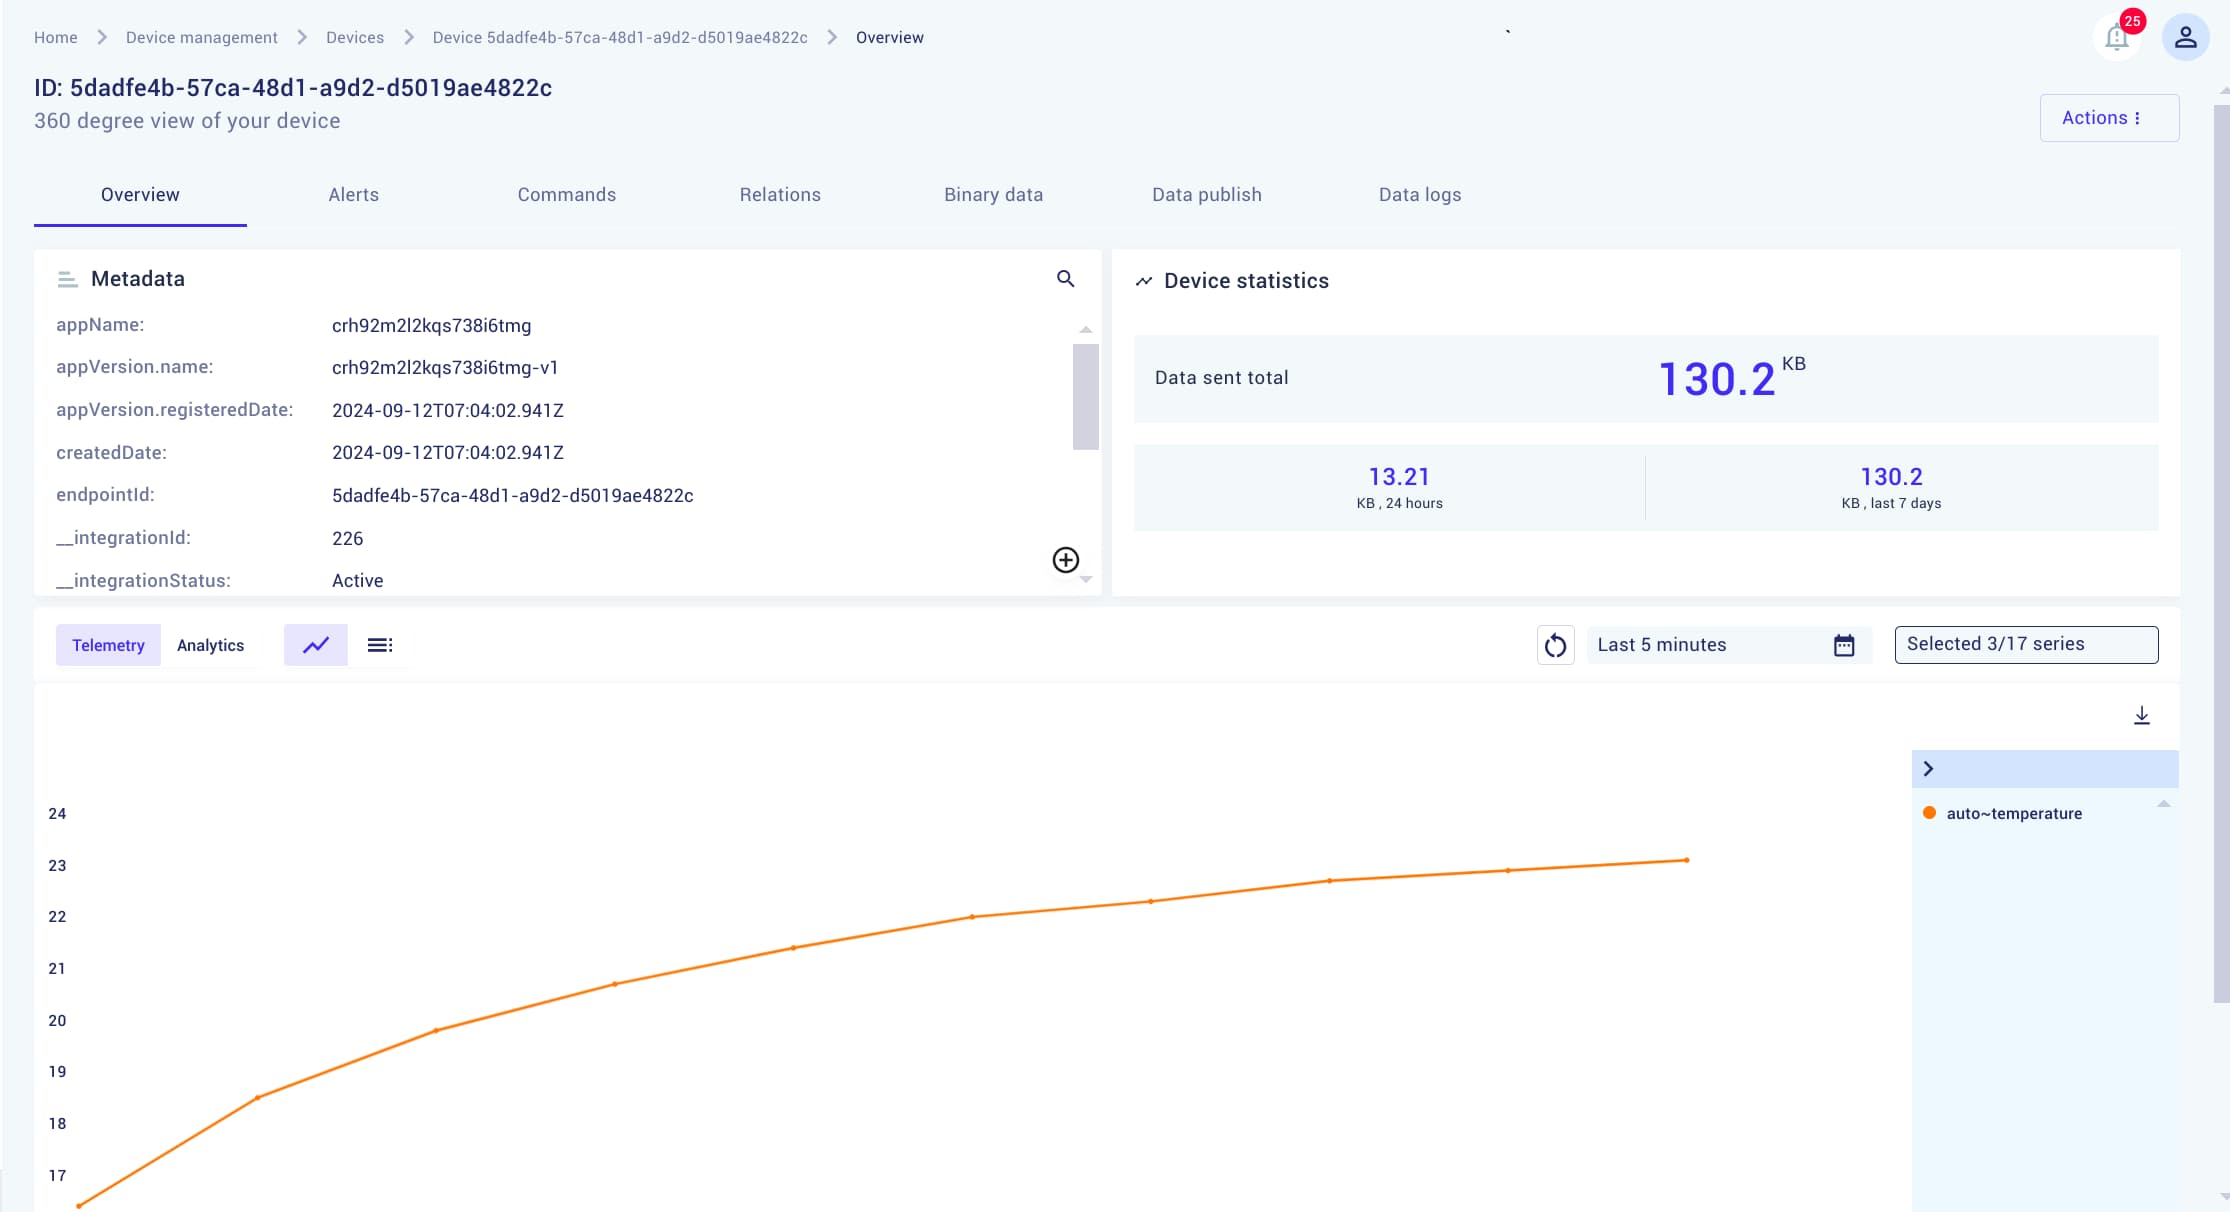
- View Your Device:
- You can find your device in the Devices tab, to view its graphs and received payloads.
Just like that, you’ve integrated your Sensative Multi-Sensor with the KaaIoT platform.
However, there’s still one issue.
The payload we receive is preventing the KaaIoT platform from displaying necessary data, such as temperature and flood level.
This happens because the data is nested inside objects several levels deep.
Different devices send different types of data, and payload formats vary, but KaaIoT provides tools to handle this situation.
We can use the Rule Engine to parse the payload into a format that we can work with.
Note: You can also modify the payload formatting on the TTN side, but it might be better to leave the formatter’s code as is and handle the transformation within KaaIoT as a workaround.
To keep it simple, we’ll create a rule that parses the data for every device in the application whenever it receives data.
Note: You can read more about the Rule Engine here.
Steps to Fix the Payload:
-
Navigate to the Rule tab on the sidebar and create a new rule. Pick a name for it.
-
Create a trigger: This will trigger the rule whenever any device in the KaaIoT application receives new data. Leave the endpoint field empty to apply the rule to all devices.
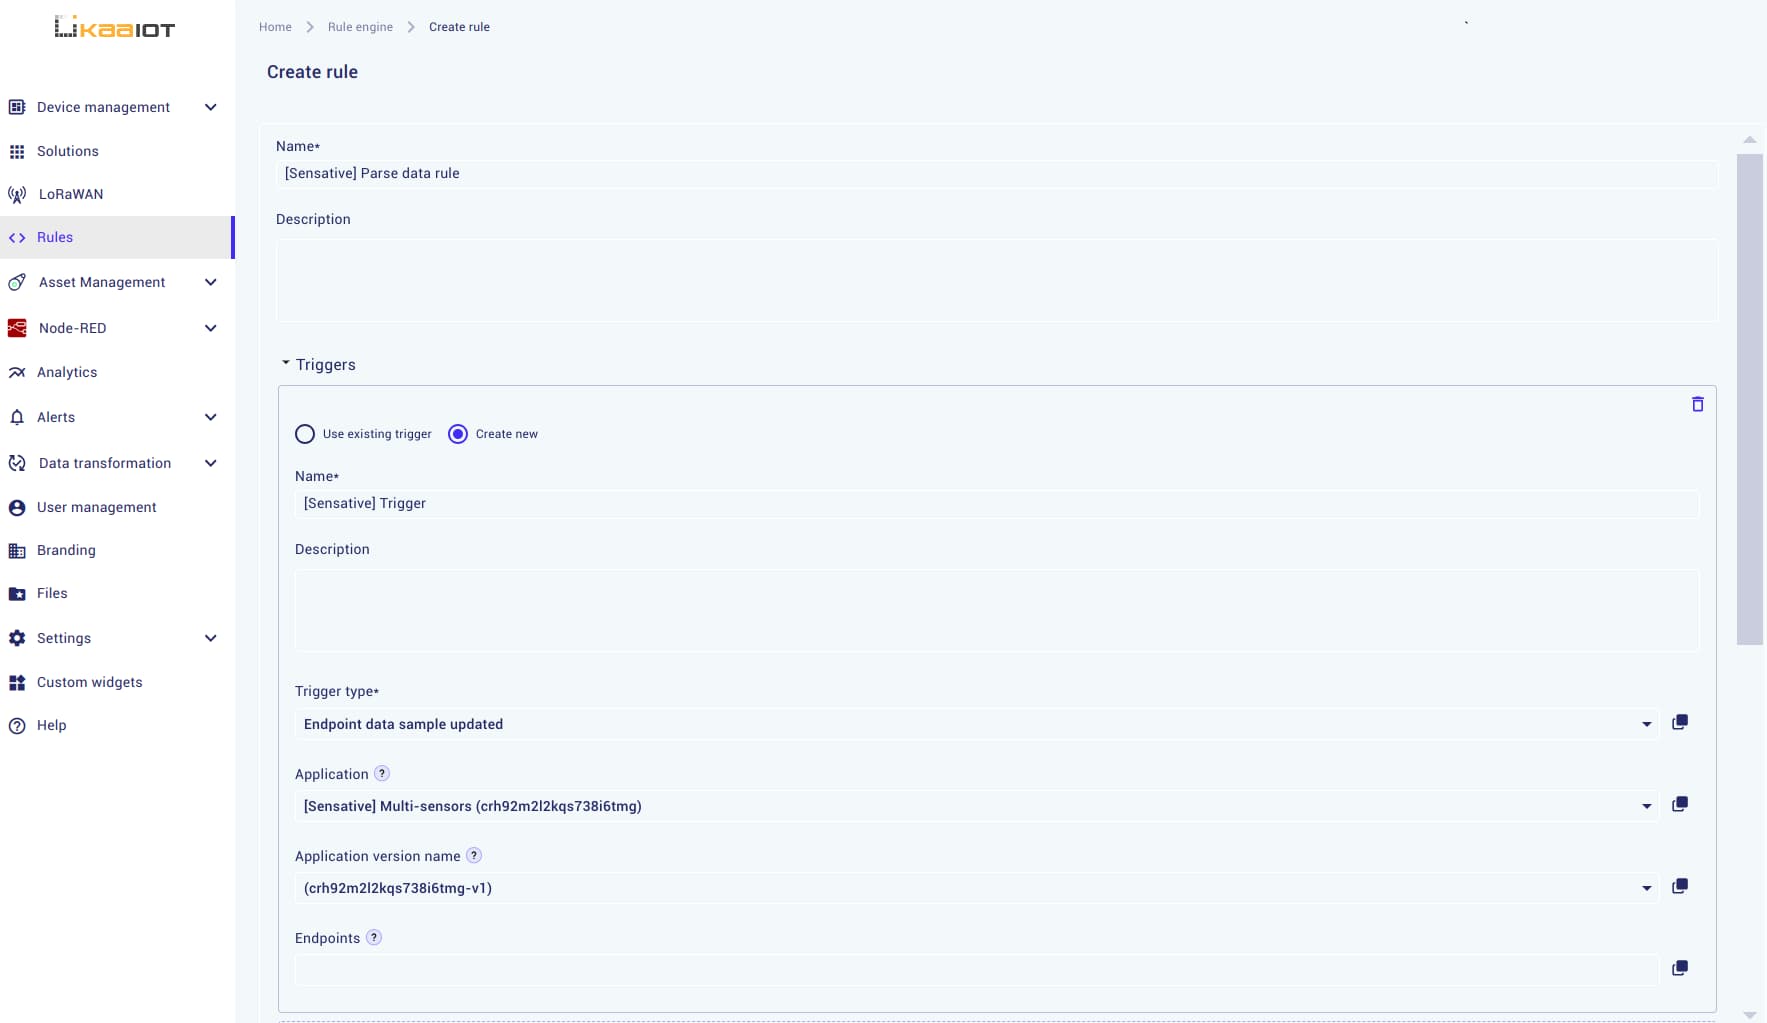
-
Create a condition: Since we don’t need a specific condition to parse data, set the condition to
return true.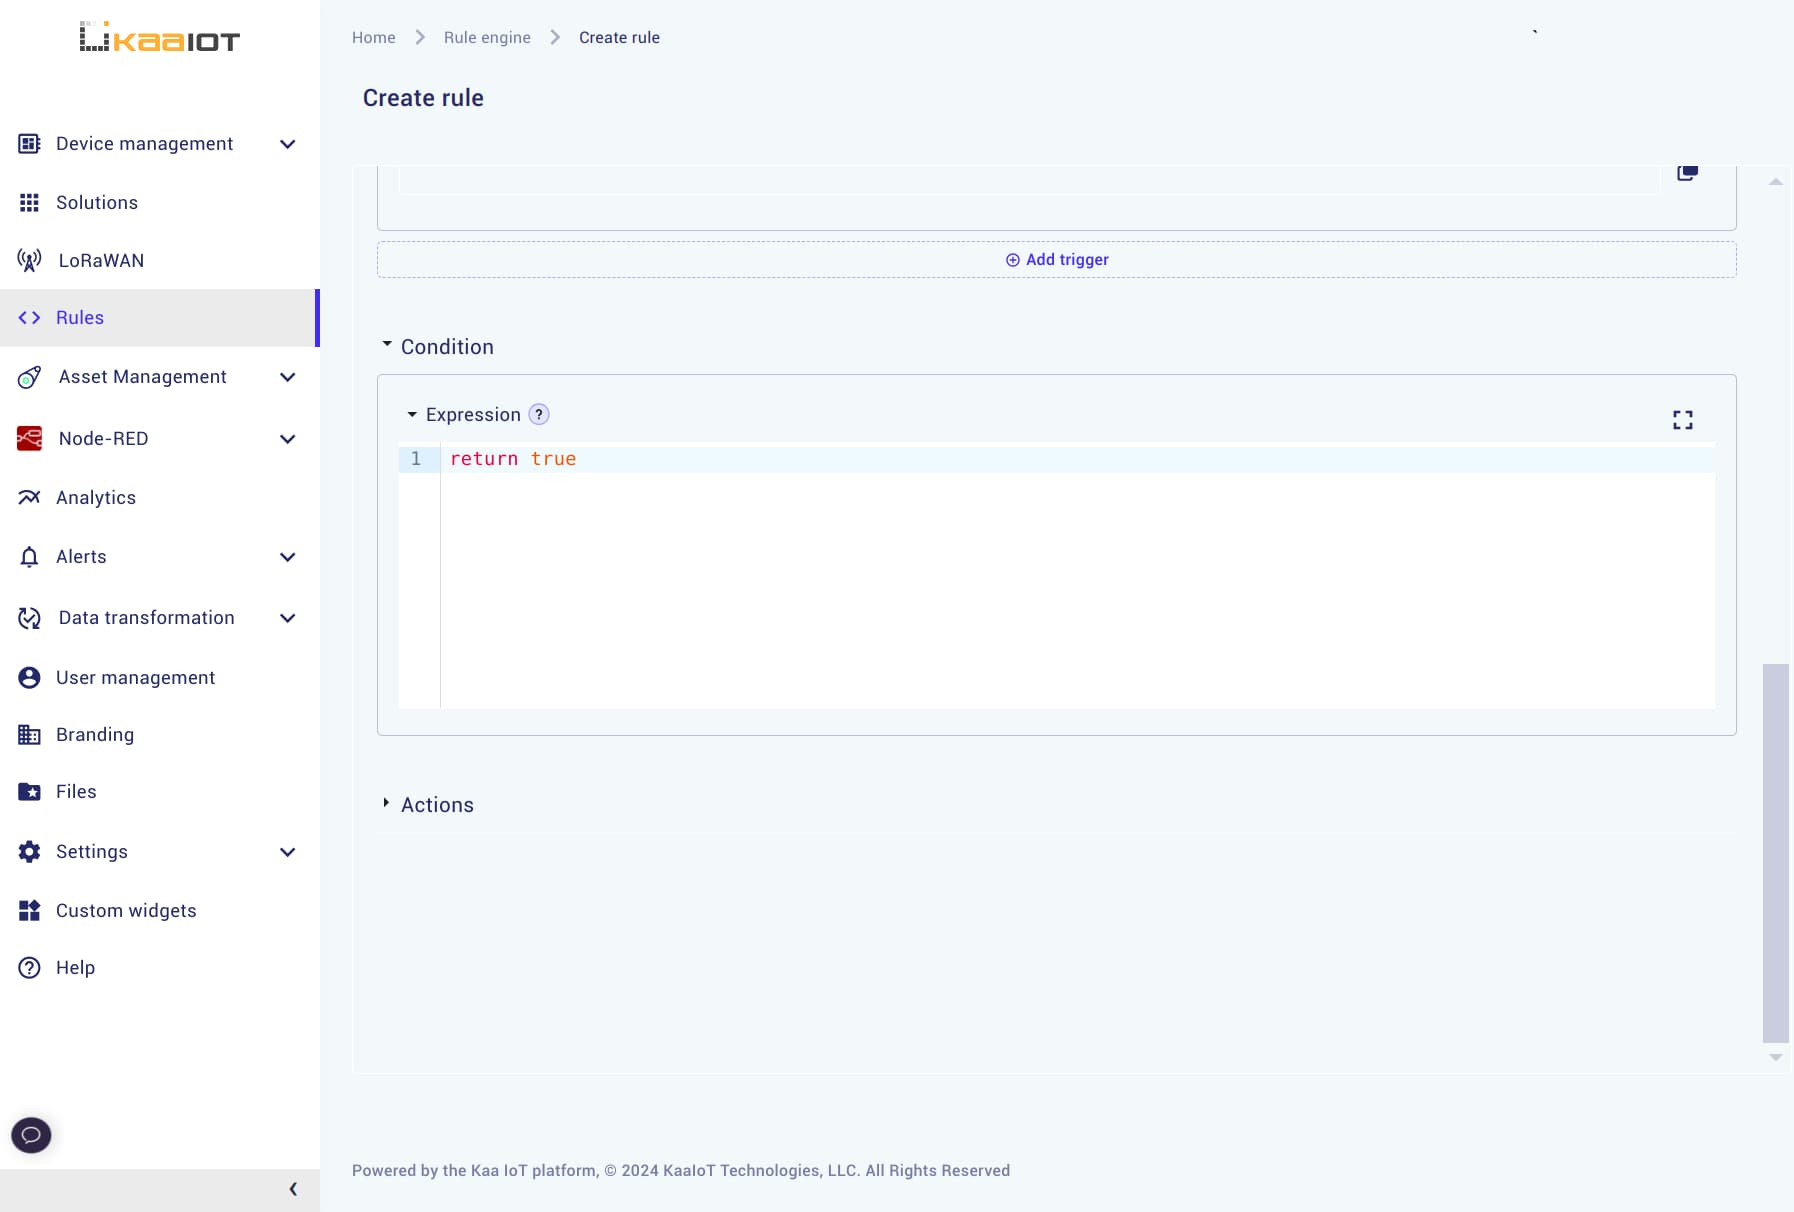
-
Create an action: Lastly, Define the action that will parse the data. Use the following code:
 // Transform the data
 const transformObject = obj => {
   const result = {};
   for (const key in obj) {
       result[key] = obj[key]?.value || obj[key]
   }
   return result;
 };

 // Extract the data samples object
 const dataSamplesArray = ctx.trigger.endpointDataSamplesReceived.dataSamples;
 const dataSamples = dataSamplesArray[1];

 // Apply transformation
 const transformedData = [transformObject(dataSamples)];
 return transformedData;
-
Final step: Create the rule and return to your device page to verify if the temperature values are now displayed correctly.
Conclusion
Congratulations on reaching the end of this guide! You’ve successfully integrated the Sensative LoRa Strips Drip Multi-Sensor with KaaIoT. I hope this guide was helpful to you.